
Introduction: Why DIY Drywall Repair Demands the Right Tools and Safety
Drywall repair is one of the most common home improvement tasks, yet it’s frequently underestimated in terms of the skill and preparation required. Whether you’re patching holes left by wall anchors or smoothing out accidental dents, the quality of your repair depends not just on technique, but on having the right tools and following careful safety practices. Mistakes can lead to uneven finishes, lingering dust hazards, or even costly repairs down the road. This comprehensive guide will walk you through the essential tools you need for any DIY drywall repair project, along with a thorough safety checklist to ensure your workspace—and your health—remain protected. From small touch-ups to larger patch jobs, you’ll gain the confidence to tackle drywall repairs efficiently and safely, avoiding beginner missteps and achieving professional results.
Understanding Common Drywall Repair Scenarios
Before gathering your tools, it’s critical to identify the type of drywall repair you’re facing. Each scenario may require a slightly different approach and set of tools:
- Small nail/screw holes: Often left by picture frames or wall hangings. Quick patch jobs but require smooth blending.
- Minor dents or dings: Typically from moving furniture or doorknobs.
- Medium-sized holes (1–6 inches): Resulting from accidents, these require patching with mesh or pre-made patches.
- Large holes or water damage: May need cut-outs, new drywall pieces, and more advanced finishing.
- Cracks: Often found near windows, doors, or settling areas—need flexible joint compound and careful sanding.
Determining the repair type will influence which tools and safety precautions are necessary.
Essential Tools for DIY Drywall Repair
Investing in the correct tools not only improves the quality of your repairs but also streamlines the process. Here’s a breakdown of the must-have tools for most drywall repair jobs:
1. Cutting and Shaping Tools
- Utility Knife: For scoring drywall paper and trimming damaged sections. Opt for a sharp, retractable model with spare blades.
- Drywall Saw or Jab Saw: Essential for cutting out larger damaged sections. Look for a sturdy handle and sharp teeth for clean cuts.
- Keyhole Saw: Useful for making precise, small holes—especially for electrical or plumbing cut-outs.
2. Patching and Spreading Tools
- Putty Knife (2″–4″): For filling small holes and applying spackle or lightweight joint compound.
- Taping Knife (6″–12″): Wider blades allow for feathering out joint compound for seamless blending.
- Hawk or Mud Pan: Keeps compound accessible and manageable while working.
- Corner Trowel: For smoothing compound in inside corners without distortion.
3. Sanding Tools
- Sanding Block or Sponge: For smoothing patched areas. Choose fine to medium grit for finishing work.
- Pole Sander: Useful for larger areas or ceilings, allowing you to reach high spots without a ladder.
- Dust Extraction Sander (Optional): Reduces airborne dust—highly recommended for indoor repairs.
4. Measuring and Marking Tools
- Tape Measure: For accurate patch sizing.
- Pencil or Marking Tool: To outline repair areas and cut lines.
- Level or Straightedge: Ensures patches and cuts are clean and aligned.
5. Fastening Tools
- Drill or Screwdriver: For securing drywall patches with screws.
- Drywall Screws: Choose the correct length—generally 1 1/4″ for 1/2″ drywall.
- Mesh Tape or Paper Tape: Reinforces seams and prevents cracks from reappearing.
6. Cleaning and Prep Tools
- Shop Vacuum: For cleaning up debris and minimizing dust.
- Drop Cloths or Plastic Sheeting: Protects floors and furniture from compound splatter and dust.
- Painter’s Tape: Masks off trim, outlets, and adjacent surfaces.
Comprehensive Safety Checklist for Drywall Repair
Working with drywall may seem harmless, but dust, sharp tools, and overhead work all present risks. Follow this thorough safety checklist to keep your project accident-free:
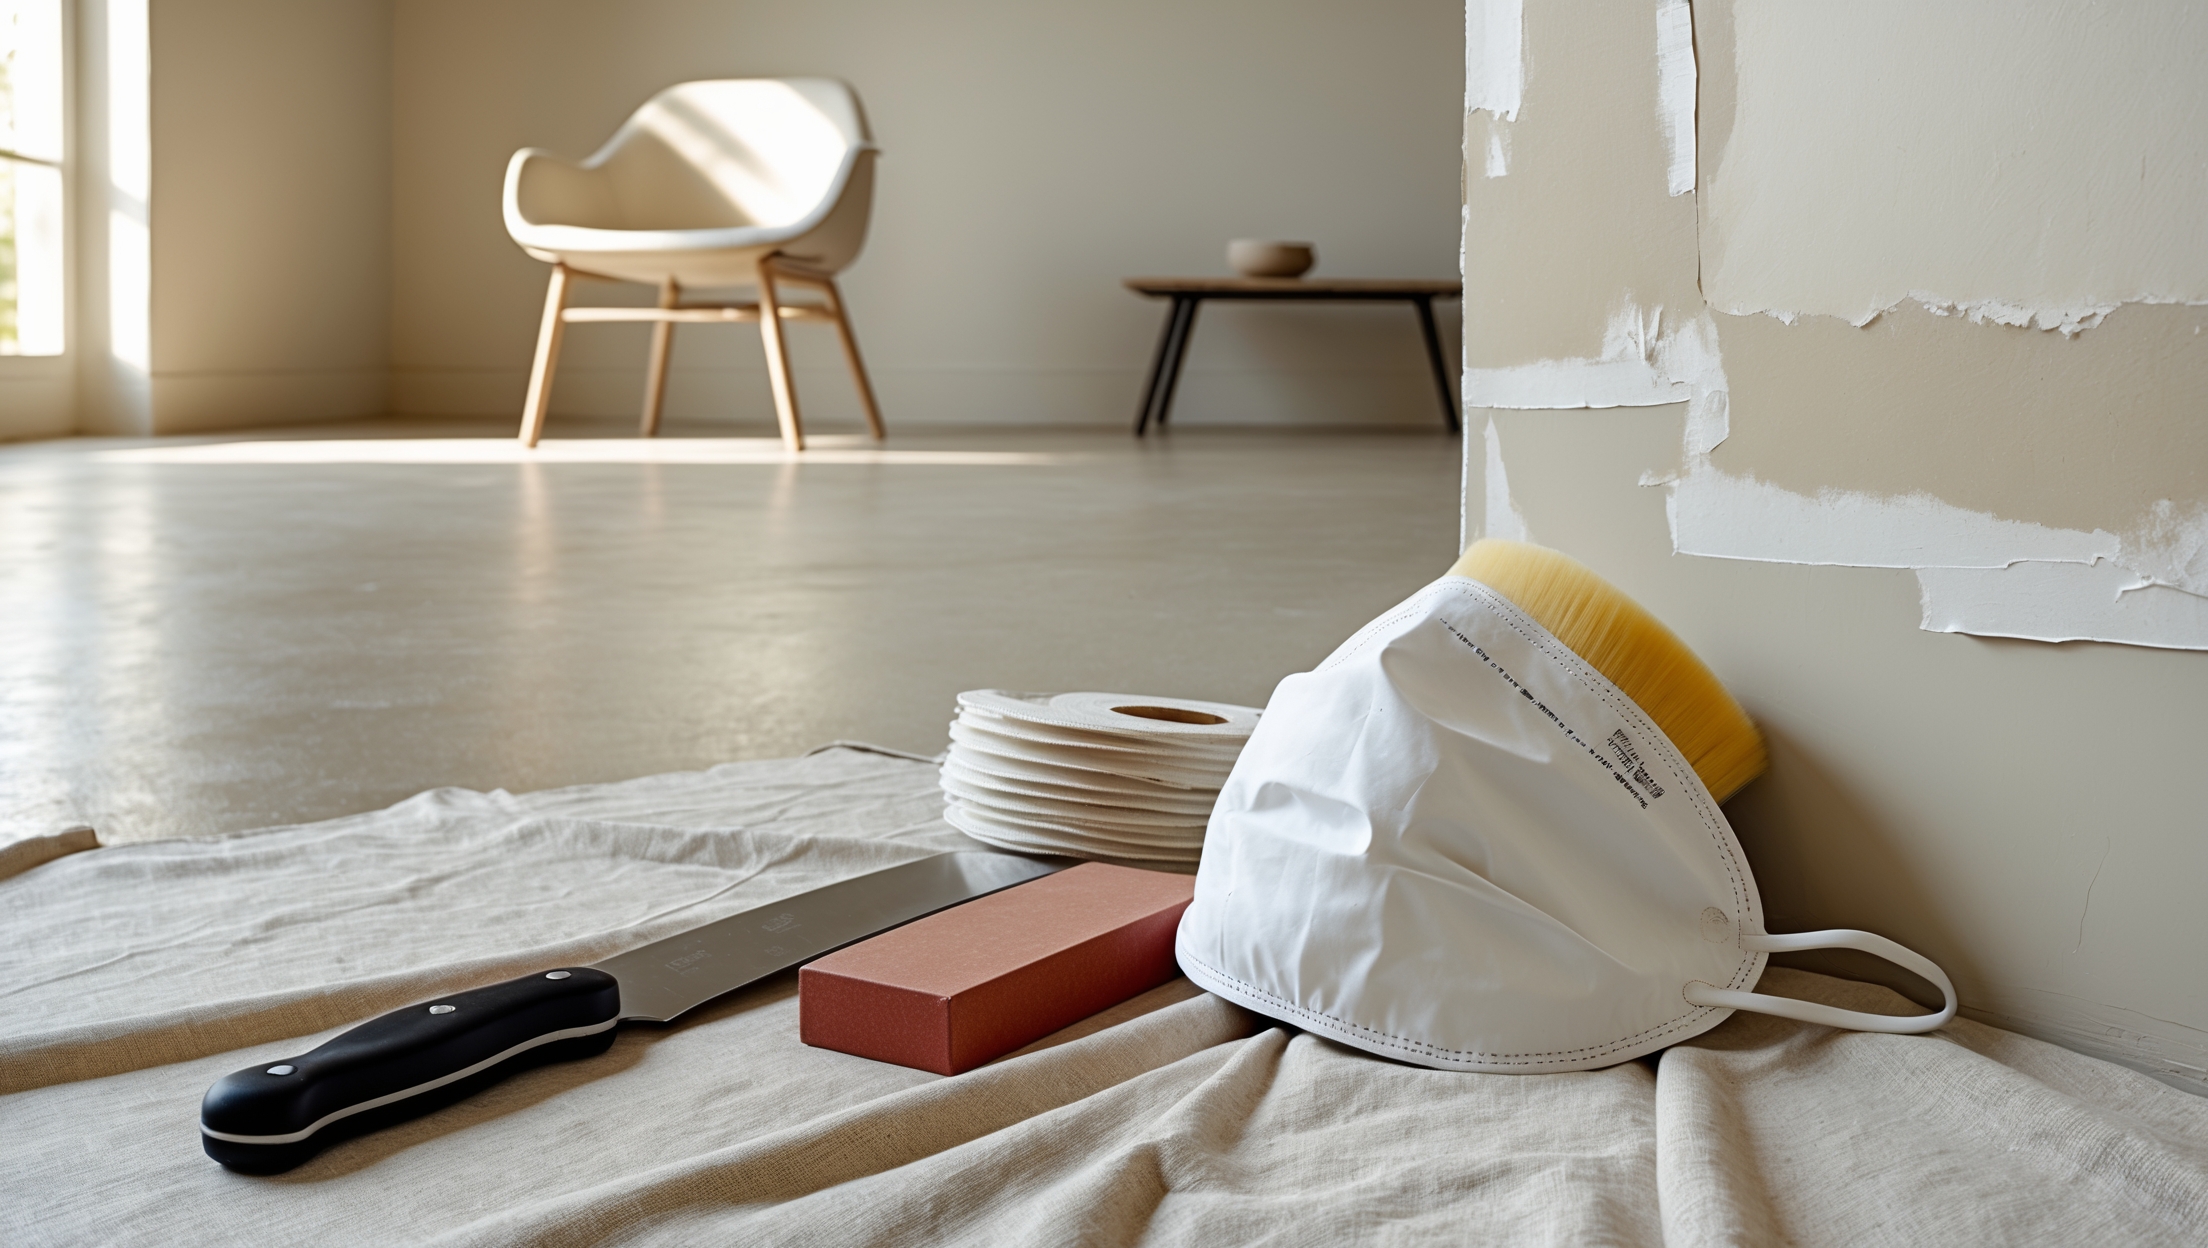
Personal Protective Equipment (PPE)
- Dust Mask or Respirator: Drywall dust is a respiratory hazard. Use a certified N95 mask (or better) to protect your lungs, especially when sanding or cutting.
- Safety Glasses or Goggles: Shields your eyes from flying debris, dust, and accidental splatters of joint compound.
- Work Gloves: Protects hands from cuts when handling drywall sheets or sharp tools.
- Hearing Protection: If using power tools or sanders, wear earplugs or earmuffs to safeguard your hearing.
Workspace Preparation
- Ventilate the Area: Open windows or use fans to disperse dust and fumes. Avoid working in confined, unventilated spaces.
- Remove or Cover Furniture: Move items out of the room, or use plastic sheeting to cover and protect surfaces.
- Seal Off Adjacent Areas: Use painter’s tape and plastic sheets to prevent dust from spreading through the home.
- Clear the Floor: Remove tripping hazards and ensure a stable work surface.
Electrical and Structural Safety
- Turn Off Power: If working near outlets, switches, or wiring, always turn off power at the breaker box.
- Check for Utilities: Use a stud finder with live wire detection to avoid accidental contact with wiring or plumbing.
- Support Large Patches: For holes larger than 6 inches, make sure to install backing strips (like wood furring) to support the patch and prevent sagging.
Tool Safety
- Use Sharp Blades Safely: Always cut away from your body, and replace dull blades promptly.
- Secure Tools Between Uses: Avoid leaving sharp or heavy tools on ladders or unstable surfaces.
- Follow Manufacturer Instructions: For power sanders or drills, review safety guidelines before use.
Health and Ergonomic Safety
- Take Frequent Breaks: Repetitive sanding and overhead work can strain muscles. Stretch, hydrate, and avoid overexertion.
- Minimize Dust Exposure: Wet-sand when possible to reduce airborne dust, and vacuum frequently during and after sanding.
Step-by-Step Guide: A Safe and Effective Drywall Patch
Now that you’re equipped and prepared, here’s a practical walkthrough for repairing a medium-sized hole (about 4 inches) in drywall:
1. Prepare the Area
- Move or cover furniture and lay down drop cloths.
- Turn off power if near electrical fixtures.
- Wear PPE: dust mask, safety glasses, and gloves.
2. Cut Out the Damaged Section
- Mark a square or rectangle around the hole with a pencil and straightedge, ensuring the edges land on solid drywall.
- Use a utility knife or jab saw to cut out the damaged area cleanly.
3. Install Backing Support
- Cut a piece of wood (like a 1×2 furring strip) several inches longer than the hole.
- Insert it behind the wall opening and secure with drywall screws through the existing drywall.
4. Cut and Insert the Drywall Patch
- Measure the cut-out section and transfer dimensions to a new piece of drywall.
- Cut the patch and check for a snug fit.
- Secure the patch to the backing support with screws.
5. Apply Mesh Tape
- Place self-adhesive mesh tape over all seams.
6. Apply Joint Compound
- Use a taping knife to spread the first thin layer of compound over the patch and seams.
- Feather the edges to blend with the existing wall.
- Let dry completely (per product instructions).
7. Sand and Repeat as Needed
- Lightly sand with a sanding block or sponge using circular motions.
- Apply a second, thinner coat of compound, feathering farther out. Allow to dry and sand again.
- Repeat for a third coat if necessary for a perfectly smooth finish.
8. Clean Up
- Vacuum dust and remove all drop cloths and covers before painting.
Expert Tips for Flawless Drywall Repairs
- Don’t Rush Dry Times: Attempting to sand or recoat before compound is dry leads to rough patches and peeling.
- Keep Tools Clean: Dried compound on knives or pans creates ridges and imperfections.
- Use Primer: Always prime repaired areas before painting to prevent flashing and ensure even coverage.
- Match Texture: For textured walls, use a sponge or specialty roller to mimic the existing finish before painting.
- Practice on Scrap: If you’re new to taping and mudding, practice on a scrap drywall piece to refine your technique.
Common Pitfalls Beginners Should Avoid
- Overfilling Holes: Excessive compound takes longer to dry and is harder to sand smooth. Apply multiple thin coats instead.
- Skipping Sanding: Proper sanding between coats is essential for seamless patches.
- Ignoring Dust Control: Drywall dust can spread quickly—always contain and clean up thoroughly.
- Neglecting Safety Gear: Shortcuts here can lead to respiratory or eye injuries.
- Not Checking for Wires/Pipes: Always assume utilities may be present behind the wall.
Maintaining Your Tools and Workspace
Proper maintenance of your drywall repair tools ensures longevity and future project success:
- Clean knives, pans, and trowels immediately after use with warm water.
- Store sanding blocks and sponges in a dry area to prevent mold growth.
- Replace utility knife blades regularly for clean, safe cuts.
- Inspect power tool cords and attachments for wear before each use.
Keeping your workspace organized and free of hazards also speeds up cleanup and reduces stress during repairs.
Conclusion: Safe, Effective DIY Drywall Repairs are Within Reach
Drywall repair may seem daunting at first, but with careful preparation, the right tools, and a commitment to safety, it’s a manageable project for any homeowner. By following the detailed tool guide and safety checklist presented here, you’ll be equipped to handle everything from small dings to more substantial patches, all while protecting your health and your home. Remember: prioritizing dust control, PPE, and workspace organization not only improves your immediate results but also sets you up for future success with every DIY project you tackle. Take time to understand the scope of each repair, invest in quality tools, and never cut corners on safety.
Ultimately, your efforts will be rewarded with smooth, professional-looking walls and the satisfaction of knowing you’ve maintained your home with care and competence. With practice and attention to detail, you’ll soon find that drywall repairs are an empowering way to enhance your living space, boost property value, and prevent small problems from becoming major headaches. So gather your tools, follow your checklist, and approach your next drywall project with confidence—you’ve got this!
When blending minor dents or dings for a seamless finish, are there any particular products or techniques you recommend to avoid visible patch outlines after painting? I’ve had trouble getting smooth results in the past.
To avoid visible patch outlines when blending minor dents or dings, use a lightweight joint compound applied with a wide putty knife or taping knife, feathering the edges well beyond the repair area. Once dry, sand gently with fine-grit sandpaper until totally smooth. Priming the patched spot before painting is key for uniform coverage and helps hide the patch. Take your time with sanding and feathering for the best seamless results.
When it comes to larger repairs, like patching a hole from water damage, how much time should I realistically set aside for the whole process, including drying times between steps?
For a larger drywall repair such as patching a hole from water damage, you should plan for about two to three days. Most of the time will be spent waiting for joint compound and primer to dry between coats. Typically, each layer needs at least 24 hours to dry fully, and you may need two or three layers. Sanding and painting can be done once everything is dry. So, budget several hours of hands-on work, but allow those extra days for drying.
I’m often fixing small nail holes left behind after rearranging pictures. Do you recommend any specific tools or techniques for getting a really smooth finish so the patched spots don’t show under paint later on?
For small nail holes, use a lightweight spackling compound and a flexible putty knife to fill the holes, smoothing off any excess. Once dry, gently sand the area with fine-grit sandpaper (around 220 grit) so it’s perfectly level with the wall. Wipe away dust before priming and painting. Applying primer helps the paint blend evenly, minimizing any patch visibility.
For medium-sized holes that are around 1 to 6 inches, do you recommend using mesh patches over metal ones, and is there a noticeable difference in the long-term durability or finish when choosing between them?
For holes between 1 and 6 inches, both mesh and metal patches can work, but metal patches generally provide stronger support and are less likely to crack over time. Mesh patches are easier to blend for a smoother finish, but may need extra coats of compound for stability. If durability is your main concern, go with metal; for a flawless finish, mesh can be a good choice with careful application.
For someone working on several types of repairs around the house, is there a basic tool kit you would recommend that covers most of the scenarios listed, or would each repair type require specific, separate tools?
A well-rounded basic toolkit should cover most drywall repairs and many other household fixes. Core items include a utility knife, putty knife, screwdrivers, hammer, tape measure, sanding block, and a cordless drill. For drywall projects, add a drywall saw and joint compound. While some specialized repairs might need unique tools, this set will handle most common scenarios, saving you from buying separate tools for each job.
If I’m repairing a medium-sized hole from an accident, how do I decide whether to use a mesh patch or buy a pre-made patch? Are there pros and cons between the two options when it comes to long-term durability or ease of installation?
For a medium-sized hole, both mesh patches and pre-made metal or adhesive patches can work. Mesh patches are easy to blend with the wall and are generally less visible after painting, but they may need multiple coats of joint compound for strength. Pre-made patches are sturdier and quicker to install, but can be harder to hide under paint if the wall isn’t perfectly flat. For long-term durability, pre-made patches usually hold up better, especially in high-traffic areas.
I’m curious about the time investment for these repairs. For someone new to DIY drywall work, how long should I expect a typical medium-sized hole repair to take, from prep through finishing and cleanup?
For someone new to drywall repair, fixing a medium-sized hole—including prepping the area, applying the patch and initial joint compound, letting it dry, sanding, adding a second coat, priming, and cleanup—can take about 3 to 5 hours spread over one or two days. Drying time between coats is the main reason for the extended timeline, so plan to work in stages.
I noticed you mention different tools and precautions depending on the size and type of drywall damage. Do you have any recommendations for how to set up an efficient workspace when dealing with larger holes or water-damaged sections, especially in tight spaces?
When working on large holes or water-damaged drywall in tight spaces, try to clear as much surrounding area as possible for movement and tool access. Use a folding workbench or portable table to keep tools organized nearby. Good lighting is crucial, so add a clamp-on work light if needed. Lay down a drop cloth to catch debris, and use a small shop vac for quick cleanup. Keep all materials within arm’s reach to minimize trips in and out of the space and always wear a dust mask and safety goggles, especially in enclosed areas.
I’m a beginner and trying to figure out what counts as a ‘must-have’ tool versus something that’s just nice to have. For smaller repairs like nail holes or dents, can you list which tools are absolutely essential to buy if I’m on a tight budget?
For small drywall repairs like nail holes or dents, you only need a few essentials: a putty knife (about 2-inch size), some pre-mixed joint compound or spackle, a sanding sponge or fine-grit sandpaper, and a damp cloth to wipe the area clean. Other tools mentioned in the article, like larger taping knives or sanding blocks, are helpful but not strictly necessary for minor patches.
When it comes to repairing water-damaged drywall, do you have any tips for making sure the new drywall blends in seamlessly with the existing wall texture? That’s always been tough for me to get right.
Blending new drywall with existing texture can be tricky, but here are some tips: Feather out your joint compound several inches beyond the repair to help it transition smoothly. Use the same type of texture technique as the original wall—whether that’s knockdown, orange peel, or something else. Practice your texture on a scrap piece first if you can. Once dry, lightly sand the edges for a subtle blend. Matching paint sheen and color also helps hide the repair.
The article covers safety quite a bit—do you have any advice on minimizing dust when sanding inside occupied spaces, especially when working in units where tenants are still living during repairs?
To minimize dust while sanding drywall in occupied spaces, use a sanding pole with a vacuum attachment or a drywall sander with a dust collection system. Seal off the work area with plastic sheeting and painter’s tape to prevent dust from spreading. Always cover vents, and consider using an air purifier. Wet sanding is another option—it produces less dust, though it’s best for small patches.
If I want to tackle small nail or screw holes as well as a larger patch from water damage in the same session, can I use the same joint compound and tools for both, or will I need different materials to make sure everything blends properly?
You can use the same all-purpose joint compound and most of the same tools, such as putty knives and sandpaper, for both small holes and a larger patch. Just be sure to use wider knives or a drywall taping knife for the larger repair to help blend the edges smoothly. For best results, apply thin layers and sand between coats for both types of repairs.
The article talks about preventing dust hazards during drywall repair. Are there specific types of masks or respirators recommended for this kind of project, especially if I’m only tackling a small area?
For small drywall repair projects, a disposable N95 respirator mask is usually sufficient to protect you from dust. These masks are designed to filter out fine particles like drywall dust and are widely available at hardware stores. Make sure the mask fits snugly on your face with no gaps. If you have allergies or are sensitive to dust, you might consider a mask with a higher filtration rating or one with a valve for easier breathing.
I noticed you mentioned health protection and dust hazards. What’s the safest way for a beginner to keep dust under control when sanding joint compound, especially if I have kids or pets in the house?
To keep dust under control, always use a sanding block with a dust collection attachment or a wet sponge instead of dry sanding, as this creates less dust. Seal off the work area with plastic sheeting and tape, and turn off any fans or HVAC systems to avoid spreading dust. Clean up thoroughly after sanding, and keep kids and pets out of the area until everything is finished and cleaned.
Can you explain more about how to protect yourself from lingering dust hazards during drywall repair? Are there certain masks or ventilation strategies you suggest for someone working in a small apartment?
To minimize dust hazards during drywall repair in a small apartment, use a well-fitted N95 or P100 respirator mask, as these effectively filter fine particles. If possible, open windows and use a portable fan to direct dust outside. Seal off the work area with plastic sheeting and painter’s tape to contain dust. After finishing, use a vacuum with a HEPA filter for cleanup instead of sweeping, which can stir up dust.
Could you provide advice on how to estimate how much time a typical medium-sized drywall patch (like from minor water damage) will take, especially factoring in drying and sanding times? I need to plan repairs around my business hours.
For a medium-sized drywall patch, set aside about 2 to 3 hours spread out over one to two days. Initial cutting and patching take 30–45 minutes. Joint compound usually needs 12–24 hours to dry between coats, so plan for at least one overnight drying period. Sanding each layer takes 10–20 minutes. If you apply two coats, your total working time will be a couple of hours, but drying time is the main factor to schedule around.
If I’m mainly dealing with hairline cracks near windows and doors, would I need the same set of tools as someone patching large holes, or can I get by with just a few basics from your checklist?
For hairline cracks near windows and doors, you can keep things simple. All you really need is a putty knife, lightweight spackle or joint compound, sandpaper, and possibly a small brush for dusting. More advanced tools from the checklist are mostly for larger holes or more involved repairs, so you should be fine with these basics.
I’m trying to stock up on essentials for drywall repairs but want to keep costs reasonable. Are there any tool brands or tool types that provide good quality without breaking the bank, especially for occasional touch-ups and not large-scale projects?
For occasional drywall repairs, you don’t need to invest in expensive professional tools. Brands like Stanley, Husky, and Hyde offer reliable hand tools at reasonable prices. Look for basic essentials: a 6-inch putty knife, a sanding sponge, a utility knife, and a small drywall saw. Multi-tools or tool kits specifically for drywall repair can also save money and space. These will cover most small touch-ups without a big investment.
In the section on repair scenarios, you mention that water damage might need cut-outs and new drywall pieces. How can I tell if water-damaged drywall is salvageable or if I definitely need to replace it completely?
To decide if water-damaged drywall is salvageable, check for softness, crumbling, or visible mold—these are signs it must be replaced. If the area feels firm, dries out completely, and shows no staining or warping, you might just need to prime and paint it. Persistent odor, discoloration, or sagging means a replacement section is safer.
The safety checklist sounds really important, especially with all the dust involved. Are there specific types of masks or eye protection you recommend for someone who doesn’t already have this gear at home?
For drywall repair, a disposable N95 respirator mask is a solid choice to protect against dust. These are widely available at hardware stores and are easy to use. For eye protection, clear safety goggles that fully cover the eyes and have side shields are recommended, since they prevent dust from entering from the sides. Both options offer good protection and are affordable for home projects.
In the section about dealing with medium-sized holes, you mention using mesh or pre-made patches. Is there a big difference in finish quality or durability between those two options, and do you recommend one over the other for beginners?
Mesh tape and pre-made patches both work well for medium-sized drywall holes, but there are some differences. Pre-made metal or adhesive patches are generally easier for beginners because they’re quick to apply and give consistent results. Mesh tape can work just as well, but it requires more careful application and feathering of joint compound to get a smooth finish. For most beginners, pre-made patches are the simpler, more forgiving choice, offering reliable durability and a neat look.
I noticed your safety checklist mentions dust hazards. If I’m repairing several medium-sized holes in an older building, are there specific respirators or dust control tips you recommend to minimize health risks during sanding?
For sanding drywall in older buildings, use a NIOSH-approved N95 respirator to filter out fine dust. If the building may have lead paint or asbestos, consider a P100 respirator and consult professionals. To control dust, seal off work areas with plastic sheeting, use a vacuum with a HEPA filter for cleanup, and consider wet sanding to keep dust levels down.
For the medium-sized holes you mention (like 1–6 inches), do you recommend using mesh patches or the solid pre-made patches? Is there a situation where one works better than the other, especially for someone doing this for the first time?
For medium-sized holes (1–6 inches), both mesh patches and solid pre-made patches can work, but for first-timers, solid pre-made patches are usually easier to handle and provide a sturdier backing. Mesh patches are great for smaller holes or when you want a thinner finish, but they require more careful application to avoid bumps. If you’re new to drywall repair, starting with a solid patch might give you a smoother result with less fuss.
For someone who has never done a medium-sized hole repair, are there differences in tools or techniques between patching that and fixing cracks near doors or windows? I want to make sure I choose the right materials for each scenario.
Yes, there are differences in both tools and techniques. For a medium-sized hole, you’ll typically need a drywall patch, utility knife, joint compound, sanding block, and perhaps a drywall saw. The process involves cutting out the damaged area, attaching the patch, and covering it with joint compound. For cracks near doors or windows, you often just need a putty knife, joint compound, and possibly some mesh tape. These cracks usually get filled and smoothed, rather than patched. Choosing the right materials for each repair will help achieve a smooth, lasting finish.
The article talks about the importance of safety during drywall repair, especially with lingering dust. What’s the bare minimum safety gear I should have on hand if I’m just patching a couple of small nail holes in a bedroom?
For patching a few small nail holes, you can keep it simple. At minimum, have a dust mask to avoid inhaling fine particles and use a damp cloth to wipe away any dust. If you’re sanding, some eye protection like safety glasses is also a good idea, but for tiny holes, a dust mask and cleanup should be enough.
When it comes to sanding drywall repairs, is there a certain tool or method you recommend to minimize dust hazards, especially if you have to work in a lived-in space? I want to make sure I keep the area clean and safe.
To minimize dust while sanding drywall, consider using a sanding block or a pole sander with a dust collection attachment. Many professionals use a drywall vacuum sander, which connects to a shop vac and captures most dust as you work. Also, wet sanding with a damp sponge can be effective for smaller areas and produces much less dust. Sealing off the work area with plastic sheeting and wearing a dust mask will further help keep your space clean and safe.
The article talks about dust hazards during drywall repair. If I’m working in a house with young kids and allergies, what specific precautions or equipment would you recommend to keep the air as clean as possible while sanding?
When sanding drywall in a home with young kids and allergies, use a vacuum-equipped sander or a drywall sander with a dust collection attachment to capture the dust at its source. Make sure to seal off the work area with plastic sheeting and painter’s tape. Wearing a high-quality mask like an N95 respirator is important, and consider running an air purifier with a HEPA filter in nearby rooms to help keep the air clean.
When dealing with water-damaged drywall, how can I tell if I need to replace a whole section versus just patching the affected area? Are there specific signs I should look for before starting the repair?
When inspecting water-damaged drywall, check for soft spots, sagging, crumbling, or visible mold. If the drywall feels spongy, is discolored throughout, or shows widespread damage, it’s best to replace the entire section. If the area is small, dry, and the rest of the wall is solid, patching may be enough. Always make sure the leak is fixed and the area is completely dry before any repairs.
When dealing with medium-sized holes that require mesh or pre-made patches, do you have any tips for choosing between the two? Are there situations where one method is more durable or easier for beginners to use?
Both mesh tape and pre-made patches can work for medium-sized drywall holes, but pre-made patches are usually easier for beginners to handle. They come with adhesive backing and a metal or fiberglass layer that gives extra strength, making them less likely to crack. Mesh tape works well for slightly smaller holes and gives a smoother finish, but it requires careful feathering with joint compound. If you want a quick, sturdy solution, go with a pre-made patch; for a seamless look and if you’re comfortable working with compound, mesh tape is a good choice.
If I need to repair multiple small holes left after rearranging pictures all over my living room, do I really need all the tools listed for bigger repairs or can I get by with just the basics? Which tools would you recommend as truly essential for touch-ups?
For patching multiple small holes from picture hooks, you only need the basics. A putty knife, some premixed lightweight spackle or joint compound, and fine-grit sandpaper should be enough. You probably won’t need a drywall saw or large taping knives. Just apply the spackle, let it dry, sand it smooth, and touch up with paint. This simple set of tools is perfect for quick touch-ups like yours.
In your safety checklist for drywall repair, are there any tools or supplies you would consider essential for someone working in a small space, like a hallway, where ventilation isn’t great?
In a small, poorly ventilated space like a hallway, a good quality dust mask or respirator is essential to protect you from drywall dust. Goggles are also important for eye protection, since dust can linger. Consider a compact shop vacuum for quick cleanup as you go, and a portable fan to help circulate air if possible. Use low-dust joint compounds or sanding sponges to reduce airborne particles.
For a first-time DIYer like me, how do I know if my drywall crack near a window is just from settling or if it might be a sign of something more serious? The article mentions cracks need flexible joint compound—when should I consider calling a pro instead?
If your drywall crack is thin, follows a straight line, and doesn’t get bigger over time, it’s likely just normal settling and can be repaired with flexible joint compound as the article suggests. However, if the crack is wide, jagged, keeps reopening, or you see signs of moisture, uneven window frames, or doors sticking nearby, these could signal structural issues. In those cases, it’s best to call a professional to assess the situation before making repairs.
If I’m just patching nail and screw holes from old picture frames, do I need to invest in all the essential tools listed, or are there a few budget-friendly basics that would be enough to get smooth results for small repairs?
For patching small nail and screw holes, you don’t need to buy every tool on the full checklist. A small tub of pre-mixed spackle, a putty knife, and a bit of fine-grit sandpaper should be enough for smooth repairs. You can use a damp cloth for cleanup. Save the more advanced tools for larger drywall projects.
When deciding between mesh patches and pre-made patches for medium-sized holes, how do you determine which option gives a smoother finish or is easier for beginners to work with?
Pre-made metal or composite patches often provide a more even base and are easier for beginners, as they simply stick over the hole and require less skill to blend in. Mesh patches also work well but need more careful mud application and feathering to get a smooth finish. For a smoother result with less fuss, pre-made patches are usually the better choice for medium-sized holes.
When it comes to patching medium-sized holes, is it better to use mesh or pre-made patches in terms of long-term durability? The article lists both, but I’m not sure which works best for a beginner.
For medium-sized holes, self-adhesive metal or composite pre-made patches are usually easier and more durable for beginners compared to mesh tape. Pre-made patches provide reliable reinforcement and are less likely to crack if installed correctly, while mesh tape is a bit trickier to apply smoothly and can sometimes lead to weaker repairs if the compound isn’t applied evenly. For long-term durability and a simpler process, pre-made patches are a solid choice.
I’m curious about minimizing dust when sanding drywall repairs, since you mentioned lingering dust hazards. Are there specific tools or safety measures you’d recommend for keeping the workspace clean and safe, especially in small apartments?
To minimize dust when sanding drywall, consider using a sanding pole with a dust attachment that connects to a vacuum. Wet sanding with a damp sponge is also effective for small repairs, as it produces far less dust. Make sure to seal off the area with plastic sheeting and use a dust mask or respirator for personal protection. Cover any vents and keep windows open for ventilation if possible in your apartment.
For medium-sized holes that require mesh or pre-made patches, do you recommend one method over the other in terms of durability and ease for a beginner? I want to make sure my repair holds up and doesn’t show after painting.
For medium-sized holes, pre-made patches are usually easier for beginners because they come with adhesive backing and a smooth surface, making them straightforward to apply and blend. They offer reliable durability and minimize the chances of bumps or uneven areas. Mesh tape works well too but requires more careful mud application and sanding to get a seamless finish. If you want a repair that lasts and looks good under paint, pre-made patches are a safe choice.
I noticed you list essential tools for most drywall repairs—are there budget-friendly options you’d recommend for those just starting out? I want to stock up without overspending, so any advice on where to invest versus where to save would be helpful.
For beginners, it makes sense to spend a little more on a sturdy utility knife and a decent sanding block, since these get a lot of use and can make the job easier. You can save money by choosing basic taping knives and a manual drywall saw—no need for the top-shelf brands. Many hardware stores offer starter kits with essential tools at a lower price, which can be a good way to get everything you need without overspending.
I’m getting ready to patch a couple medium-sized holes (about 3 inches each) in my hallway drywall. The article mentions mesh and pre-made patches—could you explain how to decide between those two options for better results as a beginner?
For medium-sized holes like yours, both mesh and pre-made patches can work, but pre-made patches are usually easier for beginners. They’re sturdy, simple to apply, and require less surface prep. Mesh tape is better for smaller cracks or holes, but it might be trickier to get smooth results on larger areas. For your 3-inch holes, a self-adhesive pre-made patch will likely give you a more even finish with less effort.
You mention that different drywall damage types require specific tools and safety steps. If I want to tackle both small nail holes and a medium-sized patch in one day, do I need to use separate tools or can I clean and reuse the same ones between jobs?
You can generally use the same basic tools, like putty knives and sanding blocks, for both small nail holes and medium-sized patches. Just make sure to clean them thoroughly between tasks, especially before moving from a larger patch to a smaller repair. For safety gear like masks or gloves, reuse is fine as long as they’re still in good condition and not overly dirty.
For small nail and screw holes, what’s the best way to make sure the patched area blends perfectly with the rest of the wall? I always seem to end up with a spot that shows through paint, so I’m curious about your smoothing and sanding tips.
To make patched nail or screw holes blend in seamlessly, start by using a lightweight spackle and apply it just slightly higher than the wall surface. Once dry, use a fine-grit sanding sponge to carefully feather the edges so it’s flush with the wall. Wipe away dust before priming and painting, and if needed, lightly sand between paint coats. Matching the wall’s original texture—whether that’s smooth or a bit bumpy—will also help the repair disappear.
For someone handling repairs near windows or doors where cracks are common, what’s the best way to ensure the joint compound remains flexible over time? I’m concerned about the cracks reappearing in a few months.
To help prevent cracks from reappearing near windows or doors, use a flexible joint compound or one labeled as ‘patch and repair’ for added flexibility. After applying, embed fiberglass mesh tape over the crack to reinforce the area. Allow for proper drying, then apply thin layers of compound, sanding between coats. Finish with a high-quality, flexible paintable caulk at the edges where movement is most likely. This combination helps the repair withstand future shifts and temperature changes.
For someone who’s tackling a mix of nail holes and one medium-sized hole, are there any multi-purpose repair kits or tool bundles you recommend to streamline the process without overspending on single-use tools?
For your project, a multi-purpose drywall repair kit would be ideal. Many kits include spackle or lightweight joint compound, a putty knife, sanding pad, mesh patch, and sometimes even a small paint touch-up tool. These kits are budget-friendly and cover most small to medium repairs, so you won’t need to buy separate tools for each step. Look for an all-in-one kit labeled for holes up to 4 inches—this should streamline everything you need for both nail holes and the medium-sized patch.
For someone repairing several different problem spots like small nail holes and a couple of medium-sized holes from accidents, do you recommend buying all the tools listed, or can some be skipped for beginners trying to keep costs down?
If you’re mainly patching small nail holes and a few medium-sized spots, you can skip some of the more specialized tools. A basic kit with a putty knife, joint compound, sanding block, and possibly a drywall patch for larger holes should cover most repairs. You might not need a drywall saw or corner trowel for these tasks. Focus on essentials and add tools as your DIY projects grow.
For someone new to DIY, is there a way to prioritize which tools are essential to buy for occasional small repairs versus tools that are only necessary for bigger patch jobs? I’m trying to stick to a modest budget for starter projects.
For occasional small drywall repairs, focus on essentials like a putty knife, utility knife, sanding sponge, joint compound, and a small drywall saw. These should cover most minor dings or holes. Larger patch jobs may require extras like a drywall taping knife, drywall panels, corner tools, and a drill. Start with the basics, and add specialized tools only if you tackle bigger repairs down the road.
If I’m on a tight budget and just need to fix a cracked area near a window, which tools from your list are truly essential, and which ones could I skip or substitute with everyday household items?
For a small crack near a window, the essentials are a utility knife (or a sharp kitchen knife), joint compound, a putty knife (an old plastic spatula can substitute), and some sandpaper (or a sanding sponge if you have one). You can skip the drywall saw, dust mask, and large taping tools for such a minor repair. Just make sure the area is clean before starting.
When dealing with medium-sized holes that need mesh or pre-made patches, do you suggest one method over the other for beginners wanting a smooth finish? Are there notable pros and cons between using mesh versus a pre-made patch?
For beginners aiming for a smooth finish, pre-made patches are usually easier to use since they offer a sturdy, flat surface right away and require less skill to blend in. Mesh tape patches are more flexible and allow for a more seamless repair if you’re comfortable applying joint compound smoothly. However, mesh can sometimes lead to unevenness if not applied carefully. Pre-made patches are less prone to cracking and can be quicker for medium-sized holes, making them a practical choice if you’re new to drywall repair.
If I’m only dealing with minor dents and nail holes, can I get by with just a few basic tools, or do I still need to invest in a full set of what you listed? I’m on a bit of a budget and would love to know what’s truly essential for small repairs.
For minor dents and nail holes, you can definitely stick with just the basics. You’ll need a small putty knife, some lightweight spackle or joint compound, and a sanding sponge or fine-grit sandpaper. A damp cloth for cleaning dust is helpful too. There’s no need to invest in a full toolkit for these small repairs—these few items will cover your needs and keep costs low.
When working with medium-sized holes that need mesh or pre-made patches, do you recommend one method over the other for durability or ease of blending? I want to avoid any visible seams after painting, but I’m not sure which approach gives a smoother finish.
For medium-sized holes, pre-made patches often provide a bit more structure and are easier to apply smoothly, reducing the chance of visible seams after painting. However, mesh tape can also work well if you carefully feather out your joint compound and sand between coats. If your main concern is a seamless, smooth finish, pre-made patches tend to be more forgiving, especially for beginners.
When it comes to repairing medium-sized holes that are about 1–6 inches, do you recommend using mesh patches over pre-made metal patch kits in terms of ease of use and durability? I’m trying to figure out which method would create the least visible repair line after repainting.
For holes between 1 and 6 inches, mesh patches are usually easier to work with and blend more smoothly beneath paint, making repair lines less noticeable. Pre-made metal patches are durable but can sometimes leave a slight bump or edge if not feathered well with joint compound. For best results, use a mesh patch with careful sanding and layering of compound to ensure a seamless finish.
Could you elaborate on the specific types of dust masks or respirators that are best for drywall repair projects? I want to make sure I’m protected from lingering dust hazards, but I’m unsure how to differentiate between basic masks and ones that are actually effective.
For drywall repair, it’s important to use more than just simple cloth or surgical masks. Look for N95 respirators, which are designed to filter out fine dust particles common with drywall work. These masks fit snugly around your face and are rated to remove at least 95% of airborne particles. Avoid basic dust masks labeled as nuisance dust masks, as they don’t provide enough protection for drywall dust.
For patching medium-sized holes, the article references using either mesh or pre-made patches. How do you decide which patching material is best for a beginner, and are there any differences in required tools or safety precautions when working with each type?
Mesh patches are often easier for beginners since they’re self-adhesive, flexible, and blend well with joint compound. Pre-made patches are sturdier, good for slightly larger holes, but may need more sanding for a smooth finish. Both types require basic tools like a putty knife and sanding block. The same safety steps apply: wear a dust mask and safety goggles to protect against dust when sanding. Choose mesh for simplicity and pre-made for extra strength.
As a small business owner looking to keep repair costs low, which of the essential drywall tools would you recommend prioritizing for purchase versus renting or borrowing, particularly for small patch jobs and minor dents or dings?
For small patch jobs and minor dents, it’s wise to purchase affordable essentials like a putty knife, utility knife, sanding sponge, and a basic drywall saw. These are inexpensive and you’ll likely use them repeatedly. Larger tools like a power sander or drywall lift can be borrowed or rented if needed, but for minor repairs, you probably won’t need them often.
If I have a couple of small screw holes and some minor dents from moving furniture, should I use the same patching compound for both, or do certain products work better for dents versus holes?
You can generally use the same lightweight spackling compound for both small screw holes and minor dents. Lightweight spackle is ideal for quick fixes like these because it dries fast and sands easily. Just apply it with a putty knife, let it dry, and sand smooth. For very deep dents or larger holes, a stronger joint compound might be better, but for your situation, spackle should work well.
If I have a medium-sized hole—like the kind from a doorknob going through the wall—but I am worried about getting visible seams, what type of patch and finishing tools would you recommend for the smoothest result?
For a medium-sized hole like a doorknob puncture, a pre-made drywall patch (aluminum mesh or self-adhesive variety) works well. Apply the patch over the hole, then use a 6-inch or 8-inch drywall knife to spread joint compound smoothly over and beyond the patch edges. After it dries, sand with a fine-grit sanding block for a seamless blend. Applying thin, multiple coats and feathering the edges helps hide seams.
For medium-sized holes, is it necessary to use mesh patches, or are there cases where a pre-made patch would be better? I want to avoid uneven finishes, so any advice on which method blends in best with existing walls would be helpful.
For medium-sized holes, both mesh patches and pre-made metal or composite patches can work, but pre-made patches often provide a flatter, sturdier base that helps prevent uneven finishes. If you want a seamless blend with your existing wall, a pre-made patch covered with joint compound and sanded smooth usually yields the best results. Be sure to feather out the edges well and apply several thin layers for the most invisible repair.
When it comes to repairing medium-sized holes, are mesh patches better than pre-made patches, or does it depend on the specific situation? I want to avoid having to redo any repairs later.
For medium-sized holes, both mesh patches and pre-made (solid) patches can work well, but your choice depends on the wall location and your desired finish. Mesh patches are easy to apply and blend smoothly with the wall, but they may not be as sturdy for larger holes or high-traffic areas. Pre-made metal or plastic patches offer more strength and are ideal if you want a long-lasting repair. For a durable, seamless result, use a pre-made patch for bigger holes and reserve mesh patches for smaller repairs.
You mention a thorough safety checklist for drywall repair projects—could you give more details on which specific safety gear is absolutely necessary for patching medium-sized holes, especially if I am working in an older home?
For patching medium-sized holes in drywall, especially in older homes, essential safety gear includes a well-fitted N95 respirator to protect from dust and potential lead paint, safety goggles to shield your eyes, and heavy-duty work gloves to prevent cuts from tools or debris. If there’s any chance of asbestos (common in homes built before the 1980s), it’s safest to have the area professionally tested before starting work.
If I only have a limited budget, which tools from your checklist would you suggest are absolutely essential to buy, and which ones could possibly be improvised or borrowed for a successful repair?
For basic drywall repair, the essentials to buy are a utility knife, a putty knife, and some sandpaper. You’ll need joint compound as well, but that’s a material rather than a tool. A sanding block, tape measure, and drywall saw can often be borrowed or improvised with similar household tools. For example, you can use a straight edge as a guide for cutting if you don’t have a T-square. Prioritize the tools that directly touch the wall for best results.
When patching medium-sized holes in drywall, is there a significant difference in outcome between using mesh patches and pre-made metal patches, especially in terms of durability and ease of sanding?
Mesh patches and pre-made metal patches both work well for medium-sized drywall holes, but there are some differences. Mesh patches are easier to blend into the wall and are generally simpler to sand smooth, which helps achieve a seamless finish. Metal patches offer added strength and durability, especially for areas that might get bumped, but they can be a bit harder to sand down perfectly. If a smooth, invisible repair is your priority, mesh patches are usually preferred.
If I’m planning to tackle a larger patch job but only have basic hand tools, are there any must-have tools I should prioritize upgrading to first from your checklist, or can I get by with just the basics for most repairs?
For larger drywall patch jobs, it’s helpful to upgrade a few key tools beyond the basics. A drywall saw makes cutting clean openings much easier than a standard utility knife. Investing in a wide taping knife (10-12 inches) will help you create smoother seams and blend patches better. While you can manage with just basic hand tools for small repairs, these upgrades will make larger projects go more smoothly and look more professional.
For the medium-sized holes that need mesh or pre-made patches, do you have any tips on choosing between these patch types or how the repair process might differ depending on which one is used?
Mesh patches are great for irregularly shaped or smaller medium holes because they’re flexible and easy to trim. Pre-made metal or composite patches work well for larger medium holes, offering extra strength. With mesh, ensure you apply joint compound smoothly in thin layers to blend it in. Pre-made patches often need a bit more feathering of compound around the edges to hide the outline. Both require sanding and repeat coats for a seamless finish, but the pre-made patches can save time if you want extra durability.
How much time should I realistically set aside for a typical drywall repair involving dents and a few nail holes, including all the prep and drying stages you mention, if I’m fitting this in between school drop-offs and work calls?
For a standard drywall repair with dents and nail holes, you’ll want to set aside about 2 to 3 hours spread out over the day. Actual hands-on work—like prepping, applying compound, and sanding—takes under an hour, but you’ll need to wait a few hours between coats and for final drying. You can easily fit the steps in between other commitments, just factor in the drying times.
If I’m only repairing a few minor nail and screw holes, do I really need to invest in all the tools listed, or are there affordable alternatives that still deliver good results for small touch-ups?
For small repairs like nail or screw holes, you don’t need every tool from the full checklist. A small tub of pre-mixed joint compound, a putty knife, some fine-grit sandpaper, and a damp cloth are usually enough. These are affordable and easy to find. For best results, just fill the hole, smooth it, let it dry, sand lightly, and wipe clean before painting.
Could you clarify what protective gear is most important if I’m working on medium-sized holes that generate a lot of dust? I want to make sure my workspace stays safe, especially since I have customers stopping by occasionally.
For drywall repairs that create a lot of dust, the most important protective gear includes a dust mask or respirator to protect your lungs, safety goggles to shield your eyes, and gloves to keep your hands safe from sharp tools or irritants. If your workspace is shared with customers, consider using plastic sheeting or tarps to contain dust and keep the area clean. Regularly ventilate the space to minimize lingering dust.
When dealing with cracks near windows or doors as mentioned in the article, what type of joint compound works best to prevent the cracks from reappearing, and is there a preferred method for sanding these delicate areas?
For cracks near windows or doors, a setting-type joint compound (often called hot mud) is ideal because it dries harder and shrinks less than pre-mixed compounds, helping to prevent cracks from returning. When sanding these delicate areas, use a fine-grit sanding sponge instead of sandpaper to avoid damaging surrounding surfaces and to maintain better control, especially around trim or corners.
The article suggests using mesh or pre-made patches for medium-sized holes between 1–6 inches. For someone on a tight budget, is one option more cost-effective or easier to blend with the surrounding wall compared to the other?
If you’re on a tight budget, self-adhesive mesh patches are usually more cost-effective than pre-made patches. Mesh is inexpensive and easy to cut to size. With careful application of joint compound and sanding, mesh patches can blend well with the wall, but they may require a bit more skill and extra coats compared to pre-made patches to achieve a seamless finish.
For medium-sized holes around 3–4 inches, do you recommend using mesh patches over pre-cut metal ones, or does it really depend on the wall location? I’m curious if there’s a quality or durability difference for DIY repairs in high-traffic areas.
For holes around 3–4 inches, both mesh and pre-cut metal patches can work, but metal patches usually offer better strength and impact resistance, which is important in high-traffic areas. Mesh patches are easier to blend in visually and are great for less vulnerable spots. For long-lasting results where bumps or knocks are likely, metal patches are generally more durable.
The article mentions needing more advanced finishing for large holes or water damage. How do I know when a repair is too complicated to handle myself safely and it’s time to call a professional instead?
If you notice structural damage, mold, electrical wiring, or plumbing behind the damaged drywall, it’s best to call a professional. Large holes (anything bigger than about 12 inches), extensive water damage, or sagging drywall can also indicate repairs that go beyond basic DIY. If you feel unsure about the tools or techniques required, or if the problem seems to be recurring, seeking professional help is the safest choice.
For medium-sized holes that need patching with mesh or pre-made patches, how can I tell which type is better for my wall? Are there situations where one should be avoided over the other?
Mesh tape is ideal for small to medium holes (about 1-3 inches) and works well if you want a seamless patch, especially on flat surfaces. Pre-made metal or plastic patches are sturdier and better for larger medium holes (up to 6 inches), or if the area lacks surrounding support. Avoid mesh tape on holes larger than 3 inches, as it may sag, and avoid pre-made patches on textured walls where blending could be difficult.
When patching medium-sized holes with mesh or pre-made patches, is there a preferred type of joint compound to use for a smoother finish, or are all brands generally suitable?
For patching medium-sized holes with mesh or pre-made patches, it’s best to use a lightweight joint compound, as it spreads easily and sands smoothly for a nice finish. While most reputable brands will work, the consistency of lightweight varieties makes them easier to handle for DIY projects. Just be sure to apply thin layers and sand between coats for the smoothest result.
You mention that different types of holes or dents might require different tools. For someone just starting out, is there a minimum set of tools you’d recommend for handling both small and medium drywall repairs without breaking the bank?
For beginners tackling both small and medium drywall repairs, you don’t need too many tools to get started. A putty knife (4 to 6 inches), a utility knife, a sanding sponge, and a small tub of joint compound will cover most dents and small holes. For medium holes, add a drywall saw and some drywall patches or mesh tape. This basic set keeps costs low and will handle most typical repairs.
As a parent with small kids, I’m concerned about drywall dust and safety. Are there specific steps or recommended tools from your checklist that help minimize dust exposure during repairs, especially in rooms that my kids use frequently?
Absolutely, minimizing drywall dust is important, especially with children around. From our checklist, using a sanding block with an attached dust collection bag or a drywall pole sander with a vacuum attachment can reduce dust spread. Always seal off the work area with plastic sheeting and painter’s tape, and wear a high-quality dust mask. After repairs, wipe all surfaces with a damp cloth before letting kids back in the room.
When you talk about essential tools, are there any budget-friendly options for someone who only plans on doing a couple of repairs? Or should I expect to invest in higher quality tools even for small touch-ups?
For a few small drywall repairs, you don’t need to invest in expensive tools. Many hardware stores offer budget-friendly options like plastic putty knives, simple sanding blocks, and basic utility knives that work well for occasional use. If you’re only doing minor touch-ups, these lower-cost tools should be more than enough for a quality job.
After identifying the type of drywall damage, what’s the typical timeframe for completing a medium-sized patch repair, from cutting out the damaged section to painting? I want to plan my business schedule around it.
For a medium-sized drywall patch, you can expect the process to take about 24–48 hours. This includes cutting out the damaged section, installing the patch, applying joint compound in two or three layers (with drying time between each), sanding, priming, and painting. Most of the time is spent waiting for compound and paint to dry, so you can plan for short work sessions spread over two days.
You mentioned that sanding can create lingering dust hazards. Is there a specific type of mask or protective gear you recommend for minimizing dust exposure when working in smaller rooms?
For sanding drywall in small rooms, use a NIOSH-approved N95 respirator mask, which filters out fine dust particles effectively. Avoid basic cloth or paper masks, as they don’t offer enough protection. Safety goggles and disposable coveralls can also help keep dust away from your eyes and clothing. Always ventilate the area if possible to further reduce dust buildup.
For medium-sized holes that need mesh or pre-made patches, is it better to use metal or fiberglass mesh for long-term durability? Also, do you need any special tools to secure them, or just basic putty knives?
For medium-sized holes, fiberglass mesh is generally preferred for most drywall repairs because it’s easier to work with, resists cracking, and integrates smoothly with joint compound. Metal patches are also durable but can sometimes be harder to conceal perfectly. You don’t need any special tools—basic putty knives, a utility knife, and sandpaper are usually enough to apply and finish either type of patch effectively.
Are there any affordable alternatives to pre-made drywall patches for fixing holes around 2 inches wide, or do you recommend sticking with those for best results?
For 2-inch holes, you can definitely use affordable alternatives instead of pre-made drywall patches. A simple option is to cut a small piece of scrap drywall to fit the hole and secure it with joint compound or a bit of backing support like a wooden paint stick glued behind the hole. This method is cost-effective and can work just as well as store-bought patches if done carefully.
After identifying the repair scenario—like small nail holes versus larger dents—what are some signs that the initial patchwork or blending is not going well? Any troubleshooting tips for avoiding those uneven finishes or dust hazards mentioned in the article would be really helpful.
Some signs that your patchwork or blending isn’t going well include visible ridges, bumps, or noticeable lines where the repair was made, as well as patches that appear raised or sunken after drying. To avoid uneven finishes, make sure to feather out your joint compound well beyond the repaired area and sand between coats. Always let each layer dry completely before sanding and applying the next. For dust control, use a sanding sponge with a dust-catching feature or lightly dampen the surface before sanding to keep particles down.
If I only need to fix several small nail holes and maybe one minor dent, do I still need to invest in all the essential drywall tools listed, or are there budget-friendly alternatives that do the job for lighter repairs?
For small nail holes and a minor dent, you don’t need to buy every tool on the full checklist. A simple putty knife, some lightweight spackle, and a sanding sponge are usually enough. Many stores even sell small patch kits with everything included for minor repairs, making it a budget-friendly option for light touch-ups.
For medium-sized holes, the article talks about using mesh or pre-made patches. Is there a significant quality difference between the two methods in the final finish, or is it mostly a matter of personal preference and budget?
Both mesh and pre-made patches can produce a smooth finish when applied and sanded correctly. Pre-made patches are often sturdier and easier for beginners, especially on slightly larger holes, while mesh tape works well for smaller repairs. The final result depends more on your application and finishing technique than on the type of patch, so it often comes down to what you’re most comfortable with and your budget.
The article mentions that drywall repairs can produce lingering dust hazards. Are there specific dust masks or respirators you recommend for DIYers, especially for someone working in a small apartment with minimal ventilation?
For drywall repairs in small, poorly ventilated spaces, look for N95-rated disposable dust masks, as they filter out fine particles from sanding and cutting. You can also consider reusable half-face respirators with P100 filters for even better protection. Make sure the mask fits snugly around your nose and mouth, and always check for a secure seal before starting your project.
If I’m only repairing small nail or screw holes, do I really need to invest in all the tools listed, or are there a few budget-friendly basics you’d recommend that can still give a professional-looking finish?
For small nail or screw holes, you don’t need the full list of tools. A putty knife, lightweight spackling compound or pre-mixed joint compound, a sanding sponge, and a damp cloth are usually enough. These basics will let you fill, smooth, and clean up the area, providing a tidy, professional-looking finish without a big investment.
When budgeting for tools, are there any specific brands or types you recommend that offer good durability for frequent use, without being overly expensive? I’d like to avoid cheap tools that won’t hold up, but also don’t want to over-invest.
For reliable, reasonably priced drywall tools, brands like Stanley, Hyde, and Irwin are worth considering. They offer good durability for regular use without the premium price tag. Look for stainless steel putty knives, a sturdy taping knife, and a quality sanding block—these brands usually have options that balance quality and value well. Avoid no-name bargain bins, but you don’t need top-tier contractor brands for most DIY projects.
As a small business owner, I sometimes have employees handle drywall repairs in our space. Are there any specific safety checklist items you recommend for workplaces versus home environments, especially regarding dust management and protecting people in nearby rooms?
In workplaces, it’s important to add extra steps for dust control and bystander safety compared to home DIY. Use plastic sheeting or temporary barriers to seal off the repair area, and post clear signs to keep others out. Make sure employees use respirators or dust masks, not just simple masks, and provide eye and ear protection. If possible, schedule repairs after hours and use HEPA filter vacuums for cleanup to prevent dust from spreading to nearby rooms.
For medium-sized holes that need patching with mesh or pre-made patches, is there a certain type or brand you’d recommend for beginners? I’m also curious if there’s much difference between using mesh versus metal patches in terms of finish quality.
For beginners, self-adhesive mesh patches are usually the easiest to use and blend well for medium-sized holes. Brands like 3M and Duck offer reliable options. Mesh patches are thinner, so they’re less noticeable after finishing, while metal patches provide more strength but may need extra care to feather out smoothly. If you’re new to drywall repair, mesh patches often give a smoother finish with less effort.
You broke down repairs by size, but when dealing with cracks near windows or doors due to settling, is there a particular brand or type of flexible joint compound you recommend for best results? I’ve tried a couple but sometimes the cracks reappear after a few months.
Cracks near windows and doors often return because standard joint compounds aren’t flexible enough to handle ongoing movement. For these areas, try using an elastomeric patching compound or a flexible joint compound specifically labeled for crack repair. Products like Sheetrock Brand Flexible Pre-Mixed Patch or DAP Alex Flex are formulated to accommodate slight movements, helping prevent cracks from reappearing. Always follow the manufacturer’s instructions and consider using mesh tape for extra reinforcement over the crack.
If I have minor dents in my drywall from my kids bumping furniture into the walls, which safety precautions from your checklist should I focus on the most? Is a dust mask still necessary for such small repairs?
For minor dents, the main safety precautions to focus on are protecting your eyes with safety glasses and wearing gloves to avoid irritation from joint compound. While a dust mask is most important during sanding or when dealing with larger repairs that create a lot of dust, it’s still a good idea to wear one even for small fixes if you’ll be sanding at all, especially if anyone in your home has sensitivities to dust.
For a beginner handling a medium-sized hole repair, are there any affordable tool alternatives that still deliver a decent finish, or is it best to invest in professional-grade equipment even for small projects?
For a medium-sized hole repair, you don’t need to invest in professional-grade tools. Affordable alternatives like a plastic putty knife, a basic sanding block, and a premixed joint compound from your local hardware store can give you a good finish. A utility knife and a simple drywall patch kit are usually enough for beginners. Focus on careful application and sanding for the best results.
With a busy schedule, I want to finish a drywall patch as quickly and safely as possible without sacrificing quality. Are there any time-saving tips or tool must-haves you recommend for parents tackling repairs in between work and family commitments?
For busy parents, consider using a pre-mixed, fast-drying joint compound to speed up drying time. A drywall repair kit can simplify the process by including everything you need. Using a sanding sponge instead of loose sandpaper helps control dust and makes cleanup quicker. Also, a putty knife with an ergonomic grip saves time and effort. Preparing your workspace and having all tools ready before starting will help you work efficiently and safely.
I see that the article mentions different approaches and tools for various repair scenarios, like using mesh for medium holes versus flexible compound for cracks. Could you elaborate on how the safety precautions might differ when working with water-damaged drywall compared to just patching small nail holes?
When repairing water-damaged drywall, you’ll need extra safety steps compared to patching nail holes. Water damage can lead to mold or mildew, so it’s important to wear gloves, goggles, and a mask or respirator to protect against airborne spores. Make sure the area is completely dry before starting repairs and ventilate the workspace well. Small nail holes typically don’t pose health risks beyond minimal dust, so standard dust masks and eye protection are usually sufficient.
About water-damaged drywall sections—if I only have basic tools at home, can I still safely cut and replace damaged spots, or is it better to call in a pro? What are the minimum safety steps I need to follow for this?
If you have basic tools like a utility knife, a drywall saw, and a screwdriver, you can usually handle small water-damaged drywall repairs yourself. Just be sure to wear safety goggles and a dust mask when cutting, turn off electricity in the area if you’re near outlets, and check that the area is completely dry before repairing. For large or moldy sections, it’s safer to consult a professional.
I noticed you mention mesh patches for medium-sized holes. Are there budget-friendly alternatives to pre-made patches that still deliver a good finish, or is it worth investing in the ready-made options for beginners?
You can absolutely use budget-friendly alternatives for patching medium-sized holes. For example, you can cut a piece of drywall slightly larger than the hole, secure it with drywall clips or scrap wood behind the wall, and tape the seams with joint compound and paper or fiberglass tape. This method takes a bit more effort but provides a solid repair. Ready-made mesh patches are quicker and easier for beginners, but homemade methods work well if you’re comfortable with a bit of extra prep.
If I’m just starting out and don’t have any drywall tools yet, what would you recommend as the minimum essentials to buy for small touch-ups without overspending? Is there any item you feel is safe to skip for a beginner working on basic repairs?
For small drywall touch-ups, you’ll need a putty knife (2-inch or 4-inch), a small tub of pre-mixed joint compound, sandpaper (medium and fine grit), and a utility knife. A sanding block can make smoothing easier, but you can use folded sandpaper if you want to save a bit. For basic repairs, you can skip the drywall saw and dust mask if you’re not cutting or sanding large areas. Just start with these basics, and you’ll be able to handle most minor patches without extra expense.
For someone just starting out with DIY repairs, about how much should I expect to spend on acquiring the essential tools you mentioned for patching both small holes and minor cracks?
For a beginner, you can expect to spend around $30 to $60 on the essential tools for drywall repair. This includes a putty knife, sanding sponge or sandpaper, utility knife, drywall saw, drywall compound, and a paintbrush or roller. If you already have some basic tools at home, your cost might be even lower. These tools are usually reusable for future projects as well.
You mentioned using mesh or pre-made patches for medium-sized holes. Is there a difference in long-term durability between the two, or is it mainly a matter of what’s easier for beginners to handle?
Mesh patches and pre-made patches both work well for medium-sized holes, but there are some differences. Mesh patches are generally thinner and integrate smoothly with compound, but they rely on proper application for lasting strength. Pre-made metal or composite patches tend to be sturdier and offer more long-term durability, especially in high-traffic areas. Beginners may find pre-made patches easier to handle since they require fewer steps, but for most standard repairs, both options can last if installed correctly.
For medium-sized holes that need mesh or pre-made patches, is it better to choose one method over the other for a first-timer? Also, how long should I expect the entire patch and finish process to take before the wall is ready for painting?
For someone new to drywall repair, pre-made patches are often easier and more straightforward than mesh tape. They usually come with adhesive backing and clear instructions, making the process less messy. The whole process—patching, applying joint compound, letting it dry, sanding, and priming—can take about 24 hours due to drying times, though much of that is waiting between steps.
For someone dealing with recurring cracks near windows due to settling, are there any specific safety precautions or tools you recommend that go beyond the basic joint compound and sanding listed in your article?
For recurring cracks near windows caused by settling, it’s a good idea to use a utility knife to widen and clean out the crack before repair, which helps the joint compound adhere better. Consider using fiberglass mesh tape for added crack resistance. For safety, always wear safety goggles and a dust mask, as removing old material or sanding near windows can release dust and debris. A stable step ladder will also help you safely reach higher areas around windows.
When dealing with water-damaged drywall, are there any essential tools or steps not covered in basic patch jobs that I should be aware of to avoid mold issues later?
When tackling water-damaged drywall, you’ll need a moisture meter to check for hidden dampness before repairs. It’s important to remove all affected drywall, not just visibly damaged areas. Use a utility knife and pry bar for thorough removal, then allow the area to dry completely with fans or a dehumidifier. Apply a mold-resistant primer before installing new drywall to help prevent future mold problems.
When repairing cracks near windows or doors, do you have any advice on selecting the right type of joint compound or mesh tape to prevent the crack from coming back? I want to make sure I don’t overlook something important in the process.
Cracks near windows or doors often return due to movement, so choosing the right materials is key. Use fiberglass mesh tape instead of paper tape because it’s more flexible and resists cracking in these areas. For the joint compound, a setting-type compound (like hot mud) works best as it hardens quickly and is less prone to shrinking. Make sure to feather the edges well and allow each layer to dry before sanding and applying the next. This should help prevent future cracks.
For parents with small kids at home, are there extra steps I should take to keep dust and debris from spreading during drywall repair, especially when sanding or cutting out damaged sections?
Absolutely, extra care is important with small kids at home. Seal off the repair area with plastic sheeting and painter’s tape to contain dust. Close doors and cover vents to keep debris from spreading. Use a vacuum with a HEPA filter when sanding, and consider wet sanding to reduce airborne dust. Always clean up thoroughly afterward, and keep kids away from the work zone until everything is finished and cleaned.
For a beginner tackling medium-sized holes in drywall, which essential tools from your checklist would you prioritize buying first if you’re on a tighter budget, and are there any acceptable substitutes for those tools?
For medium-sized holes, focus on a putty knife, utility knife, sandpaper or sanding block, drywall patch, and joint compound. These are the basics you can’t skip. If you’re on a tight budget, you can use an old credit card as a putty knife, and a fine-grit sanding sponge or even a piece of sandpaper wrapped around a block of wood as a substitute for a sanding block. Just ensure your patch fits well and your tools are clean for the best results.
For medium-sized holes that need mesh or pre-made patches, is there a certain type of patch you recommend for beginners to avoid a bumpy finish? Also, do the tools differ if I’m repairing a hole on a ceiling versus a wall?
For beginners, self-adhesive mesh patches are a great choice for medium-sized holes, as they’re easy to apply and help create a smoother finish with less risk of bumps. For ceilings, the tools are mostly the same as for walls—like a putty knife, sanding block, and joint compound—but you might want a broader knife or a lightweight joint compound to reduce sagging. Working overhead can be trickier, so take your time and let each layer dry fully.
Could you clarify what specific safety measures you’d suggest when dealing with drywall dust during sanding? I want to make sure I’m protecting my lungs, especially in a smaller workspace.
When sanding drywall in a small space, always wear a NIOSH-approved N95 respirator to protect your lungs from fine dust. Use protective goggles and consider sealing off the work area with plastic sheeting to prevent dust from spreading. If possible, use a sanding tool with an attached vacuum or dust collection system. Make sure the area is well-ventilated by opening windows or using a fan to direct dust outdoors.
For beginners who just have a few small nail or screw holes to repair, is it necessary to buy all the specialized tools, or are there reliable shortcuts using more basic tools most people already have at home?
For small nail or screw holes, you don’t need to buy specialized drywall tools. Most people can use a small putty knife or even a stiff plastic card to apply pre-mixed spackling compound or lightweight joint compound. Once dry, gently sand the area with fine sandpaper, which many have around the house. These basic tools are usually enough for minor repairs.
If I need to repair a crack that’s near a door frame where there might be future movement, what safety steps or extra materials would you suggest to help prevent the crack from coming back?
Repairing a crack near a door frame can be tricky due to possible movement. Use a flexible joint compound or caulk designed for cracks that may shift. Applying fiberglass mesh tape over the crack before patching adds extra strength. For safety, wear a dust mask and goggles when sanding or mixing compounds, and make sure the area is well-ventilated. These steps can help prevent the crack from returning.
If my drywall repair turns out uneven or the patched spot looks obvious after painting, what are some troubleshooting steps to fix the finish without having to redo the whole patch?
If the patched area stands out or looks uneven after painting, you can usually fix it without redoing the whole patch. Lightly sand the area to smooth out any high spots or rough edges, then apply a thin layer of joint compound to feather the edges into the surrounding wall. Let it dry, sand again for a smooth finish, and touch up with primer and paint. Repeat if necessary until the patch blends in seamlessly.
When patching medium-sized holes with mesh or pre-made patches, how can I make sure the final finish blends in smoothly with the surrounding wall? I always worry that my patches are a little too obvious once the paint goes on.
To ensure your patch blends in smoothly, feather out the joint compound beyond the edges of the patch by several inches, sanding between coats for a gradual transition. Use at least two to three thin layers of compound, sanding lightly after each. Once dry, apply a primer before painting, as this helps even out texture and color. Matching the wall’s texture with a sponge or brush before painting can also make the repair less noticeable.
My main concern with DIY drywall repairs is the dust and cleanup, especially in homes with kids or sensitive tenants. Can you elaborate on which safety gear is absolutely essential and if there are any tips for minimizing drywall dust during sanding?
For drywall repairs, wearing an N95 respirator mask is essential to protect your lungs from dust. Safety goggles and gloves are also highly recommended. To minimize dust, use a sanding block with a dust collection attachment or a vacuum sander if possible. Hanging plastic sheeting over doors and vents will help contain dust to the work area. Clean up with a HEPA vacuum and damp cloths to capture fine particles, keeping the environment safer for kids and sensitive individuals.
When dealing with medium-sized holes that need mesh or pre-made patches, how do I know which type of patch is best for my situation? Is there a big difference in durability or ease of installation between the options?
For medium-sized holes, both mesh patches and pre-made metal or fiberglass patches can work well. Mesh patches are easy to apply and blend smoothly with the wall surface, making them great for quick repairs. Pre-made patches, especially those with a metal backing, offer added strength and are better for areas that might get bumped or need extra support. If the repair is in a high-traffic area, a metal-backed patch may offer more durability, while mesh is usually easier and faster to install for most DIYers.
When identifying the type of repair, how do you know if a crack near a window or door is just cosmetic or a sign of a bigger problem? Does your checklist include signs to look out for before starting repairs?
Cracks near windows and doors are common, but some can point to underlying issues. If the crack is thin, follows the seam, and doesn’t widen over time, it’s likely cosmetic. However, wide cracks, cracks that shift or reappear quickly after repair, or those accompanied by sticking doors or windows may signal structural movement. The checklist in the article does suggest looking for these warning signs before you start repairs, so you can decide if professional inspection is needed.
For repairing medium-sized holes versus cracks, do the safety precautions change a lot? I’m especially wondering if things like respiratory protection or ventilation become more important depending on the repair scenario.
For both medium-sized holes and cracks, it’s important to use basic safety measures like gloves, eye protection, and dust masks. However, when repairing medium-sized holes, you’ll typically create and sand more dust, making respiratory protection and good ventilation even more crucial. For small cracks, there’s usually less dust, but it’s still wise to keep the area ventilated and wear a mask, especially if you’re sanding.
The article mentions the importance of a safety checklist for drywall repair, especially regarding dust hazards. What are some practical ways to minimize drywall dust in an apartment setting where ventilation might be limited?
To minimize drywall dust in an apartment with limited ventilation, use plastic sheeting and painter’s tape to seal off the work area, including doors and vents. Work with damp sponges for sanding when possible instead of dry sanding to reduce airborne dust. Clean up frequently with a vacuum equipped with a HEPA filter. Wearing a dust mask or respirator will also help protect you during the repair process.
For medium-sized holes that need mesh or pre-made patches, do you recommend one method over the other for durability or ease of blending the patch with the surrounding wall? I’ve seen both suggested but wasn’t sure which gives more seamless results.
For medium-sized drywall holes, using mesh patches is generally preferred if you want a more seamless blend with the surrounding wall. Mesh patches allow you to feather the joint compound smoothly, making edges less noticeable after painting. Pre-made metal or plastic patches are durable and quick to install, but they can sometimes be harder to fully conceal, especially on smooth walls. For best results, apply thin layers of joint compound and sand gently between coats, whichever method you choose.
For medium-sized holes that need a mesh or pre-made patch, are there any tips on choosing between mesh tape and metal patches? I’m not sure which one holds up better in high-traffic areas where the wall might get bumped again.
For high-traffic areas where bumps are likely, metal patches generally offer better durability and resistance to impact compared to mesh tape. Mesh tape is fine for smaller or less vulnerable spots, but metal patches provide a sturdier backing that helps prevent cracks or re-damage. Just make sure to feather out the joint compound smoothly over the patch to blend it with the wall.
The article mentions that mistakes during drywall repair can lead to lingering dust hazards. Could you clarify which specific tools or techniques are recommended for minimizing drywall dust, especially in homes with children or people with allergies?
To minimize drywall dust, the article recommends using hand sanders with dust-collecting attachments or a drywall vacuum sander. Wet sanding with a damp sponge is another technique that produces much less dust. Additionally, setting up plastic sheeting or zipper doors can help contain the work area, and using an air purifier or HEPA-filtered vacuum will further protect sensitive individuals from airborne particles.
You mentioned mesh patches for medium-sized holes. In your experience, how do these compare to using pre-made metal patches in terms of durability and ease of application for beginners?
Mesh patches are usually easier for beginners to work with because they are flexible, self-adhesive, and blend smoothly with joint compound. Metal patches offer extra strength and rigidity, which can be better for high-traffic areas, but they can be trickier to cover seamlessly. For most medium-sized holes in typical walls, mesh patches provide a good balance of durability and ease of use.
For medium-sized holes needing mesh or pre-made patches, are there specific types or brands you’d recommend for beginners? I want to make sure the repair isn’t noticeable after painting, so I’m curious about what works best for a seamless finish.
For beginners, adhesive mesh patches are a great choice because they’re easy to use and blend smoothly. 3M and DAP both offer reliable pre-made patch kits that include everything you need. Make sure to carefully feather the joint compound beyond the patch edges and sand thoroughly once dry. Using a lightweight spackle and a fine-grit sanding sponge can also help achieve an invisible repair after painting.
Could you clarify what protective gear is most important if I’m sanding drywall indoors? I want to make sure I’m not missing any key safety items from the checklist you mentioned.
When sanding drywall indoors, the most important protective gear includes a high-quality dust mask or respirator to avoid inhaling fine dust, safety goggles to protect your eyes, and gloves for your hands. It’s also a good idea to wear long sleeves and use hearing protection if you’re using power sanders. These items will help keep you safe and comfortable while working.
The article mentions that different types of drywall damage require different sets of tools. For someone just starting out, is there a basic list of tools that would cover most small to medium repairs without having to buy everything at once?
Absolutely! For most small to medium drywall repairs, a basic toolkit should include a utility knife, a putty knife (2-4 inches wide), a sanding block or sandpaper (120–150 grit), a tape measure, and a drywall saw for cutting out damaged sections. You’ll also need joint compound and drywall tape. These essentials will handle patching holes, fixing cracks, and smoothing surfaces without requiring a big investment.
If I’m mainly dealing with small nail and screw holes from picture frames, can I get by with just a few basic tools rather than buying a whole kit, or will I likely need more advanced supplies to avoid uneven finishes in the long run?
For small nail and screw holes, you can definitely stick with just a few basic tools. All you really need is lightweight spackle or joint compound, a small putty knife, and some fine-grit sandpaper. Just fill the holes, smooth the area, let it dry, and sand lightly before painting. No advanced supplies are necessary for these minor repairs, and you should get a smooth, even finish this way.
For medium-sized holes that need mesh or pre-made patches, are there specific brands or patch types that are easier for beginners to use? I want to avoid mistakes that could lead to uneven finishes later on.
For beginners, adhesive mesh patches from brands like 3M or Duck are popular because they stick well and make it easy to get a smooth surface. Pre-made metal or fiberglass patches are also user-friendly, as they hold shape and provide support. Look for self-adhesive options and follow instructions carefully—these tend to blend well and minimize the risk of uneven finishes. Applying joint compound in thin, even layers and sanding between coats will also help achieve a seamless result.
You mentioned that repairs for water-damaged drywall require more advanced finishing. Can you elaborate on what additional safety precautions are necessary for those situations, especially regarding mold or moisture control?
When repairing water-damaged drywall, safety precautions become more important because of potential mold and lingering moisture. Always wear gloves, goggles, and an N95 mask to avoid mold exposure. Before starting, check for hidden moisture with a moisture meter and ensure the area is completely dry. If you find mold, use a mold-killing cleaner and let the surface dry thoroughly. Proper ventilation during and after repairs is key to preventing future moisture problems.
If I’m dealing with small nail holes from hanging pictures and a couple of minor dents from moving furniture, do I need to invest in separate tools for each type of repair, or can I get by with a basic kit?
You can definitely handle small nail holes and minor dents with a single basic drywall repair kit. Most kits include spackle or joint compound, a putty knife, and sandpaper, which are all you need for these repairs. There’s no need for separate tools—just make sure to clean the area, apply the compound, smooth it out, and sand once dry for a seamless finish.
I noticed you mentioned lingering dust hazards as a potential issue during drywall repairs. What’s the best way to keep dust from spreading to other rooms, especially if I’m working in a space with kids or pets around?
To prevent drywall dust from spreading, seal off the work area with plastic sheeting and painter’s tape around doorways and vents. Use a vacuum with a HEPA filter to clean as you go, and consider turning off your HVAC system temporarily to avoid circulating dust. Keeping kids and pets out of the work area until cleanup is complete is also a good idea.
If I’m only dealing with small nail holes and minor dents, can I get away with buying just a few basic tools, or would you still recommend investing in the full list you provided for larger repairs?
For small nail holes and minor dents, you only need a few basic tools like a putty knife, lightweight spackle, and some fine-grit sandpaper. There’s no need to invest in the full list of tools meant for larger repairs. Just make sure to smooth the area well and let everything dry before painting for the best results.
The article talks about needing more advanced finishing for large holes or water damage. Does that mean these types of repairs are usually not DIY-friendly, or are there particular tools or techniques that make tackling bigger repairs manageable for beginners?
Larger repairs like big holes or water damage can be more challenging, but they’re not impossible for beginners if you’re prepared. You’ll need some extra tools, like a drywall saw, joint tape, and a larger taping knife. Following step-by-step instructions and taking your time with each layer—especially sanding and finishing—can help you get professional-looking results even if you’re new to drywall repair.
For the medium-sized holes that need mesh or pre-made patches, is there a certain type of patch material you recommend for beginners to get a smoother finish, or are all mesh patches pretty much the same in your experience?
For beginners, self-adhesive fiberglass mesh patches are usually the easiest to work with and offer a smooth, even finish when combined with lightweight joint compound. While most mesh patches perform similarly, look for ones with strong adhesive backing and a fine mesh—these stick better and blend more smoothly with the wall. Pre-made metal-backed patches are also a good choice for extra durability, especially on slightly larger holes.
When dealing with small nail or screw holes from wall anchors, is there a particular type of joint compound you recommend that blends best, or does it not make much difference for those tiny repairs?
For small nail or screw holes, lightweight spackling paste or lightweight joint compound both work very well. They’re easy to apply, sand smoothly, and blend nicely with most wall textures. For tiny repairs like these, there’s usually no noticeable difference in finish between the two—just make sure you feather out the edges for the best blend.
For medium-sized holes requiring mesh or pre-made patches, are there advantages to using one method over the other in terms of durability and ease of use for beginners?
For medium-sized holes, pre-made patches are often easier for beginners because they’re simple to apply and require minimal tools. Mesh tape can work well too but usually needs more skill to smooth out and blend the repair seamlessly. In terms of durability, both methods can be effective if applied correctly, but pre-made metal-backed patches tend to offer a bit more strength for larger holes.
If I’m only repairing small nail holes and minor dents, do I still need all the tools listed in the article, or are there a few basics you recommend starting with for beginners on a budget?
For small nail holes and minor dents, you don’t need every tool listed. Basic essentials include a putty knife, some lightweight spackle or joint compound, and a sanding sponge. If you want a neater finish, have a damp cloth for wiping excess compound. These few items should be enough for simple repairs and are budget-friendly for beginners.
For someone on a tight budget, are there a few essential tools that can handle multiple types of repairs, or do I really need to invest in separate tools for patching, sanding, and shaping drywall as outlined in your checklist?
You can definitely get by with a few multi-purpose tools if you’re on a budget. A 6-inch putty knife works well for applying joint compound, patching holes, and even scraping. Sanding sponges are inexpensive and can handle most sanding needs. For shaping drywall, a utility knife is versatile and useful for straight cuts and trimming. Investing in these basics should cover most small repair jobs without needing specialized tools.
As a small business owner who occasionally takes on patch jobs around my shop, could you provide more details about which dust control measures are most effective when sanding drywall indoors? I want to minimize air quality issues for both staff and customers.
To minimize dust while sanding drywall indoors, use a sanding pole or sponge connected to a shop vacuum with a HEPA filter. Lightweight plastic sheeting can be taped over doorways and vents to contain dust in the work area. Wet sanding with a damp sponge also keeps dust down, though it’s slower. Afterward, use an air purifier to help clear any remaining particles.
Does the safety checklist you mention include recommendations for dealing with drywall dust? I’m a bit worried about cleanup and making sure I don’t breathe in too much, especially since I have kids around.
Yes, the safety checklist in the article covers precautions for drywall dust. It suggests wearing a dust mask or respirator to avoid inhaling particles, especially important if children are present. Also, ventilate the area by opening windows and using fans, and use plastic sheeting to contain dust. After repairs, vacuum with a HEPA filter and wipe surfaces to thoroughly clean up any remaining dust.
When dealing with medium-sized holes, do you have any tips on deciding between using a mesh patch versus a pre-made rigid patch? Are there certain situations where one is noticeably better or easier for beginners?
For medium-sized holes (about 2 to 6 inches), mesh patches are flexible and blend easily with the wall, making them good for slightly irregular surfaces. Pre-made rigid patches offer more support and are often easier for beginners since they stick firmly and reduce the chance of sagging or cracking. If the area is in a high-traffic spot or you want extra durability, a rigid patch is often the better choice. For smooth walls and quick fixes, mesh can work well, but take care to feather joint compound for a seamless finish.
For a small business on a tight budget, are there any versatile tools from your essential list that work well for both minor dents and medium-sized holes, or is it better to buy separate specialized tools for each scenario?
A versatile 6-inch putty knife is a great investment that handles both minor dents and medium-sized holes effectively, saving you from buying separate tools. A utility knife is also useful for trimming damaged drywall edges in both cases. These two tools cover most patching tasks, so you can manage a variety of repairs without needing specialized equipment for each situation.
When you mention the importance of safety for drywall repairs, what specific protective gear do you recommend beyond a basic dust mask? For example, is eye protection or a certain type of respirator necessary if I’m dealing with sanding large patched areas indoors?
For drywall repairs, especially when sanding large areas indoors, it’s smart to wear safety goggles to protect your eyes from dust and debris. In addition to a basic dust mask, consider using a NIOSH-approved N95 respirator for better filtration of fine drywall particles. Wearing gloves and long sleeves will also help protect your skin from irritation during the repair process.
If I’m only doing minor dent and nail hole repairs, would a basic repair kit cover all the essential tools listed, or are there specific items you recommend upgrading even for small jobs?
For minor dent and nail hole repairs, a basic repair kit usually includes most of the essentials like spackle, a putty knife, and sanding pads. However, I recommend upgrading to a metal putty knife instead of a plastic one for better durability and smoother results. Also, using a fine-grit sanding block instead of loose sandpaper can make the finish more even, even on small jobs.
I noticed the article lists different approaches depending on whether you’re dealing with small nail holes or larger water-damaged sections. Could you elaborate on how safety practices differ when you’re cutting out a big section of drywall compared to just patching minor dents?
When cutting out a large section of drywall, you’ll need to take extra safety precautions compared to fixing small dents. Wear safety goggles and a dust mask to protect against debris and dust. Ensure power to nearby outlets is off to avoid electrical hazards. Use a utility knife or saw carefully, watching for hidden pipes or wires. For small dents or nail holes, typically just spackle and sanding are needed, so basic safety like gloves and ventilation is usually sufficient.
If I’m just dealing with minor dents and dings from moving furniture, do I need to invest in all the tools you listed, or is there a pared-down kit you would recommend for small, quick repairs?
For minor dents and dings, you don’t need the full set of tools. A pared-down kit should include a small putty knife, lightweight spackle or pre-mixed joint compound, fine-grit sandpaper, and a clean cloth for dusting. This simple set will handle quick repairs easily and is much more budget-friendly for small jobs.
I’m new to drywall repairs and I’m not sure what kind of safety gear is essential, especially when it comes to sanding. Do I really need a respirator, or will a basic dust mask and goggles be enough for small touch ups and patch jobs?
For small drywall touch-ups and patch jobs, a basic dust mask and goggles can usually provide enough protection, as long as you’re working in a well-ventilated area. Drywall dust can irritate your eyes and lungs, so eye protection and something covering your nose and mouth are important. However, if you notice a lot of dust or feel any discomfort, consider upgrading to a respirator for extra safety.
When patching medium-sized holes, do you think mesh patches work better than pre-made patches, especially for beginners? I’m trying to figure out which is easier to blend in for a seamless finish.
For medium-sized holes, mesh patches are often easier for beginners to work with compared to rigid pre-made patches. Mesh patches are thinner and lay flatter against the wall, which helps achieve a smoother, more seamless finish after applying joint compound. Just make sure to feather the edges well with each coat of compound and sand gently between coats for the best results.
Do most of these essential drywall tools have affordable versions that work well enough for occasional repairs, or do you recommend splurging on higher-quality items even for just one or two projects a year?
For occasional drywall repairs, most basic tools like taping knives, sanding blocks, and utility knives are available in affordable versions that will work just fine. If you’re only tackling a couple of projects a year, there’s no need to invest in professional-grade tools. Just make sure the tools feel sturdy and comfortable to use, and they should serve you well for light, occasional jobs.
The article mentions dust hazards during drywall repair. Can you suggest the best way to control dust if I don’t have any professional ventilation equipment? I’m mainly working in a small bedroom and want to keep cleanup as easy as possible.
To control dust in a small bedroom without professional equipment, try hanging plastic sheeting over doors and vents to contain the dust. Use a damp cloth to wipe surfaces and a vacuum with a HEPA filter if you have one. Wet-sanding the drywall can also help minimize dust. Always wear a dust mask for personal safety during sanding and cleanup.
If I’m just fixing a few small nail holes from hanging pictures, is it necessary to buy all the essential tools you mention, or are there any simple DIY alternatives that work just as well for minor touch-ups?
For filling a few small nail holes, you don’t need all the specialized drywall tools listed in the article. You can use a small putty knife or even a plastic card to apply spackle or lightweight joint compound. After it dries, gently sand the area with a piece of fine-grit sandpaper or a sanding sponge. This simple approach is perfect for minor touch-ups.
After patching up small nail holes and minor dents, what’s the best way to ensure the repaired area blends seamlessly with the surrounding wall texture before painting? Do you have any tips for matching the original finish without using expensive tools?
To blend the repaired area, gently feather the edges of the patch with a damp sponge or fine-grit sandpaper once the filler is dry. For matching texture, use household items like a slightly dampened sponge or a small brush to mimic the wall’s finish while the patch is still pliable. Practice on a scrap piece first to get a feel for the texture. Let everything dry thoroughly before painting.