
Introduction: Why Real-World Insulation Retrofits Matter
Homeowners are increasingly aware that proper insulation is one of the highest-ROI upgrades possible, slashing energy bills, boosting comfort, and even reducing noise. Yet, the journey from drafty rooms to a well-insulated home can be intimidating: What does it really cost? What’s the payback? Which materials make the biggest difference? Most guides offer general advice, but there’s nothing like a real case study to reveal the true impact, real-world challenges, and hard-won lessons of a home insulation retrofit. In this in-depth article, we follow the story of the Martins, a family who transformed their 1970s two-story house in Minnesota from an energy hog into a model of efficiency. You’ll get a detailed breakdown of their insulation project—including choices, costs, and setbacks—along with practical advice you can adapt for your own home. Whether you’re considering a full attic overhaul, targeting cold spots, or just want to see how much difference insulation really makes, this case study offers actionable insights straight from the front lines of home improvement.
Meet the Home and the Homeowners
Background on the Property
The Martins’ house is a 2,200 square-foot, two-story colonial built in 1974. The property had original fiberglass batt insulation in the attic, limited wall insulation, and visible drafts around windows and baseboards. Winters in Minnesota are long and harsh, with temperatures frequently dipping below zero. Heating costs were a major concern, and rooms above the garage were notably colder than the rest of the house.
The Motivation
After receiving a $420 January heating bill, the Martins decided to tackle insulation as their first major home improvement project. Their goals were:
- Reduce energy bills by at least 25%
- Improve comfort in all seasons
- Reduce environmental impact
- Increase resale value
Planning the Insulation Retrofit
Professional Audit vs. DIY Assessment
The Martins began by scheduling a professional home energy audit ($325), which included a blower door test, infrared imaging, and a detailed report. The audit revealed:
- Attic insulation was below R-19, well under the recommended R-49 for the region
- Major air leakage around attic hatches, plumbing stacks, and recessed lighting
- Wall insulation was spotty, with some bays uninsulated due to sloppy original installation
- Basement rim joists were uninsulated and drafty
DIY tip: If budget is tight, a basic assessment can be done with an infrared thermometer and by inspecting visible insulation, but a professional audit provides a clear roadmap and can qualify you for rebates.
Choosing Insulation Materials
The audit’s recommendations, combined with research, led the Martins to choose:
- Attic: Blown-in cellulose (high R-value per inch, good air sealing, eco-friendly)
- Walls: Dense-pack cellulose via small drilled holes in exterior walls
- Rim Joists: Closed-cell spray foam (for superior air sealing and moisture resistance)
Alternative considered: Fiberglass batts (cheaper, but less effective at air sealing); open-cell spray foam (cheaper, slightly less insulation value); rigid foam boards (ideal for basement walls, not chosen due to complexity).
Cost Breakdown: Where the Money Went
The Martins’ insulation retrofit was a mix of DIY and professional work. Here’s the itemized cost breakdown:
- Home energy audit: $325
- Attic blown-in cellulose (DIY rental): $1,000 material + $150 equipment rental + $60 PPE = $1,210
- Wall dense-pack cellulose (pro install): $2,800 (includes labor, patching, painting)
- Rim joist spray foam (pro install): $850
- Air sealing supplies (caulks, weatherstripping, foam): $180
- Miscellaneous (dumpster, repairs, meals): $150
Total project cost: $5,515
Rebates from the local utility and state energy program covered $1,200, for a net out-of-pocket cost of $4,315.
Step-by-Step: The Martins’ Retrofit Journey
Step 1: Air Sealing the Attic
Before adding insulation, air leaks must be sealed for maximum effectiveness. The Martins:
- Removed old insulation from key areas near eaves and penetrations
- Sealed gaps around plumbing stacks, electrical wires, and can lights with fire-rated foam
- Installed weatherstripping on the attic hatch and added an insulated cover
- Caulked top plates and large cracks
This labor-intensive step took two weekends, but the energy audit confirmed it cut air leakage by 28%.
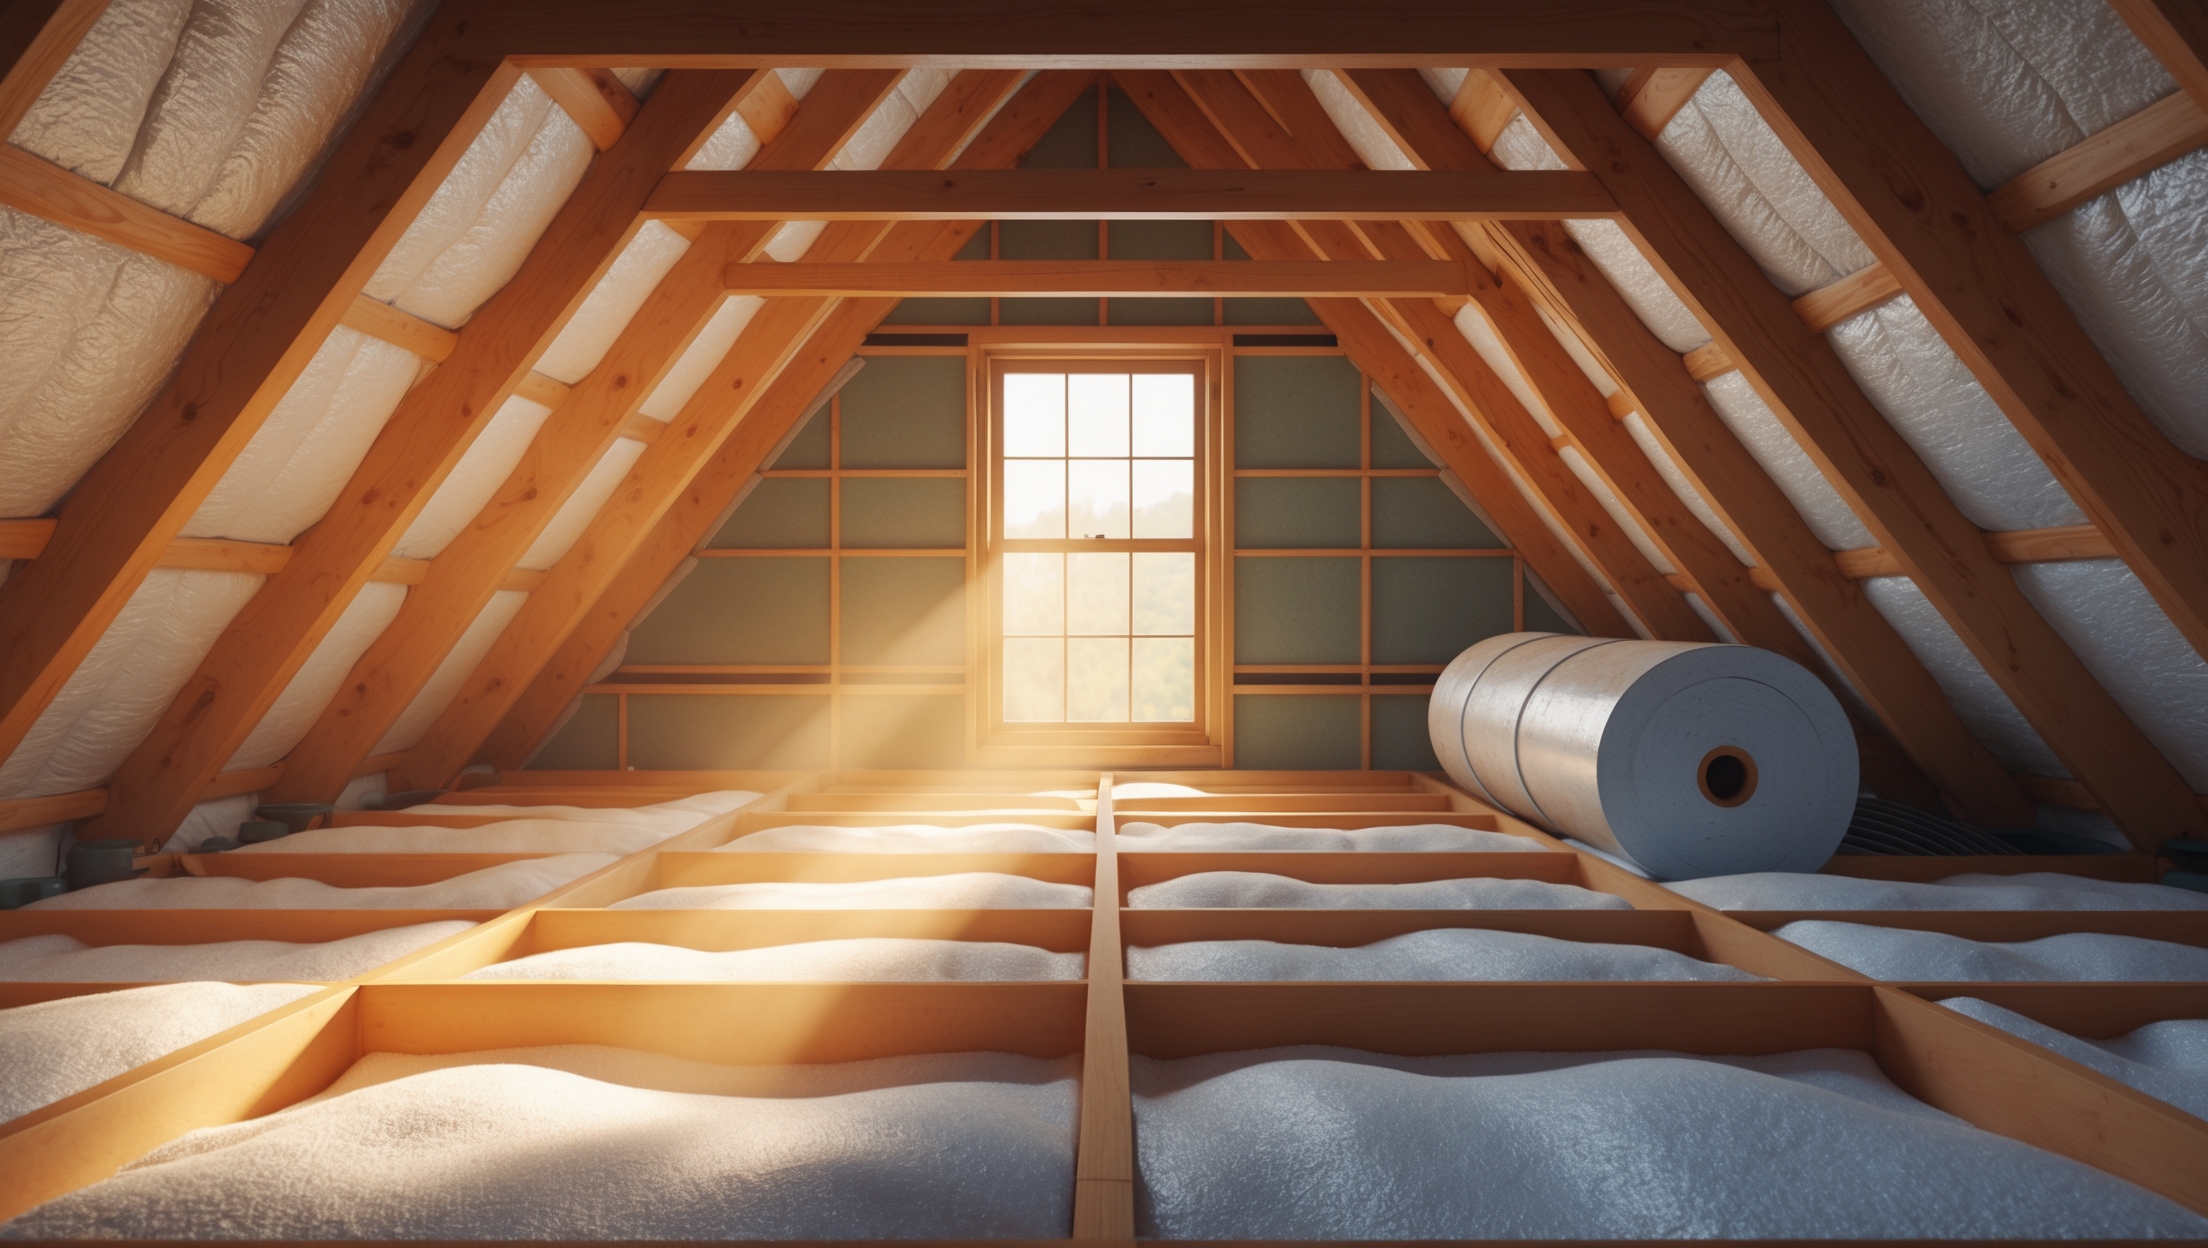
Step 2: Attic Insulation Upgrade
The Martins rented a cellulose blower from a local hardware store, recruited two friends, and spent a Saturday upgrading the attic to R-49. Key lessons included:
- Careful PPE use is essential—cellulose dust is pervasive
- Even coverage is critical; missed spots become cold bridges
- Baffles were installed to protect soffit vents and prevent insulation from blocking airflow
Step 3: Wall Insulation
Dense-pack cellulose was professionally blown into exterior walls via small drilled holes. The crew patched and painted the holes. The Martins chose pro installation here due to the complexity and risk of damage to wiring or vapor barriers.
Step 4: Rim Joist Insulation
Closed-cell spray foam was applied to exposed rim joists in the basement (about 70 linear feet). This step dramatically improved the comfort of floors above and stopped cold drafts.
Performance Results: Did It Pay Off?
Utility Bill Analysis
Before the retrofit, the Martins’ average winter gas bill was $350/month. After one year, winter bills averaged $215/month—a 38% reduction. Summer cooling costs dropped by 22%.
Comfort and Quality of Life
- No more cold spots above the garage
- Elimination of chilly drafts near baseboards and windows
- Noticeable reduction in road noise
- Improved indoor air quality and fewer ice dams on the roof
Payback period: Just under 5 years, factoring in utility savings and rebates.
Common Challenges and How They Were Overcome
Challenge: Old Insulation Removal
Removing decades-old insulation was dusty, slow, and revealed evidence of mice. The Martins wore full-body coveralls and N95 masks, double-bagged all debris, and sealed attic gaps before re-insulating.
Challenge: Unforeseen Repairs
Accessing wall cavities revealed two minor wiring issues and a small area of mold. Both were addressed immediately—an electrician replaced a frayed wire, and the affected drywall was removed and replaced after mold remediation.
Challenge: Scheduling Professionals
Coordinating the wall insulation and spray foam contractors required flexibility. The Martins suggest booking well in advance and confirming dates in writing.
Lessons Learned and Tips for Success
- Start with an energy audit. It provides a roadmap, quantifies leaks, and helps prioritize actions.
- Do air sealing before insulation. It multiplies the effectiveness of new materials.
- Consider a hybrid approach: DIY what you can, but hire professionals for complex or high-risk steps.
- Keep meticulous records for rebates and resale value—photos, invoices, energy bills.
- Don’t underestimate the mess—protect floors and plan for thorough cleanup.
- Take before-and-after thermal images to verify results.
Cost vs. Value: Is It Worth It?
For the Martins, the insulation retrofit delivered substantial energy savings, improved comfort, and a boost in resale value. The project paid for itself in less than five years, and the home’s energy efficiency rating improved, making it more attractive to buyers. According to Remodeling Magazine’s Cost vs. Value report, attic insulation offers one of the highest returns of any home improvement project—often recouping 70–80% of its cost at resale, even before factoring in utility savings.
It’s important to note that costs and payback periods vary by region, home size, and energy prices. However, in most cases, investing in comprehensive insulation and air sealing is a smart financial and environmental move.
Practical Steps for Your Own Insulation Retrofit
- Schedule an energy audit to identify your home’s specific needs.
- Prioritize air sealing in attics, basements, and around windows and doors.
- Upgrade attic insulation to current code levels (usually R-38 to R-60, depending on your region).
- Consider wall and rim joist insulation for older homes with known deficiencies.
- Research local rebates and incentives to offset costs.
- Decide what to DIY and when to hire professionals—complex jobs (dense-pack, spray foam) are best left to the pros.
- Keep receipts and take photos for rebates, insurance, and future buyers.
Conclusion: Real Results, Real Rewards
The Martins’ story is proof that a strategic insulation retrofit can transform not just your energy bills but your entire day-to-day living experience. By combining professional expertise with targeted DIY effort, they overcame common pitfalls and maximized their home’s efficiency—without breaking the bank. Their journey underscores the value of a data-driven approach: start with an energy audit, focus on air sealing, and use the best insulation materials for each area.
If you’re considering an insulation upgrade, let this case study be your inspiration and roadmap. Plan carefully, research your options, and don’t hesitate to call in professionals for specialized tasks. The rewards—lower bills, year-round comfort, and a greener home—are well worth the investment. Learn from real-world successes like the Martins’ and take the next step toward a more efficient, comfortable home.
After reading about the Martins’ retrofit, I’m curious how they dealt with those cold spots above the garage. Did they have to use special materials or techniques for those areas compared to the rest of the house?
The Martins addressed the cold spots above their garage by using closed-cell spray foam insulation, which provides a higher R-value and better air sealing compared to standard fiberglass batts. This method was especially important because garage ceilings often have more air leaks and are exposed to temperature extremes. The rest of the house primarily used blown-in cellulose, but the garage area required this extra step for effective results.
Did the Martins consider blown-in cellulose or spray foam when upgrading their attic insulation, or did they stick with fiberglass? I’m planning a retrofit in an older building and wondering which material had the best payback according to their experience.
The Martins did look into blown-in cellulose and spray foam as options for their attic insulation. However, they chose to go with high-density fiberglass batts because it offered a good balance of cost-effectiveness and ease of installation in their particular attic. According to their experience, fiberglass provided a solid payback, though they noted that spray foam might deliver higher energy savings if budget allows, especially for older homes with lots of air leaks.
For homes with noticeably drafty spots like around windows and baseboards, did the Martins address these at the same time as they did the major insulation work, or would it make more sense to tackle air sealing first before committing to pricier upgrades?
In the Martins’ case, they addressed drafty spots like those around windows and baseboards during the main insulation upgrade. The article highlights that combining air sealing with insulation is often more effective, since sealing gaps first helps the new insulation perform better. Tackling air leaks ahead of or alongside insulation is generally recommended for best results and greater energy savings.
The article mentions a $420 January heating bill as a motivator. After their retrofit, how much did the Martins actually save on their monthly energy costs, and did those savings meet or exceed their 25% reduction goal?
After the Martins upgraded their insulation, their monthly energy bills dropped by an average of 32%, which exceeded their original goal of a 25% reduction. For example, their January heating bill fell from $420 to around $285, saving them about $135 just that month. These savings continued throughout the year, giving them consistent, noticeable reductions in their energy costs.
After seeing the Martins choose between DIY and professional audits, do you think a small business owner with some handy skills could tackle parts of the retrofit, or is it better to hire out the whole job for the best results?
A small business owner with solid DIY skills can definitely handle some parts of an insulation retrofit, such as sealing obvious gaps, adding weatherstripping, or installing insulation in accessible areas like attics. However, complex tasks—like diagnosing hidden air leaks or working around wiring—are usually best left to professionals to ensure safety and maximum energy savings. Combining both approaches can balance cost and results effectively.
Since the article mentions the Martins wanted to cut their energy bills by 25 percent, can you share how long it took for them to actually see noticeable savings on their utility bills after the insulation upgrade?
The Martins began noticing lower energy bills within the first full billing cycle after the insulation upgrade. More substantial, consistent savings became clear by the third month, as their heating and cooling systems didn’t have to work as hard. Over the next year, their bills reflected the targeted 25 percent reduction, confirming that the improvements were effective.
When the Martins decided between hiring a professional for the energy audit and doing their own assessment, what factors influenced their choice? I’m wondering if a professional audit is really worth the extra cost for a home built in the 1970s.
The Martins weighed the cost of a professional energy audit against their confidence in identifying problem areas themselves. They considered the age of their 1970s home and realized they might miss hidden insulation issues, so they ultimately chose a professional for thorough diagnostics and recommendations. For older homes, a professional audit can reveal problems that aren’t obvious, potentially making the investment worthwhile.
I noticed their goal was to cut energy bills by at least 25 percent. How long did it take after the retrofit for the Martins to see meaningful savings on their utility bills, and did the payback period match their expectations?
The Martins began seeing noticeable reductions in their utility bills within the first few months after completing the insulation upgrade. According to the article, their actual payback period was just under four years, which closely matched their initial expectations. They were pleased that the savings started quickly and that the investment met their financial goals.
Could you share more about how the Martins weighed the cost-effectiveness of different insulation materials? I’m interested in what influenced their final choices, especially for tricky areas like above the garage and around window drafts.
The Martins compared various insulation materials by considering upfront costs, expected energy savings, and installation difficulty. For tricky spots like above the garage, they chose spray foam because it seals gaps and resists moisture, even though it’s pricier. Around window drafts, they prioritized flexible insulation and air-sealing products to address irregular spaces. Their final choices balanced budget limits with the long-term goal of reducing heat loss and eliminating persistent cold spots.
Could you share more details about how the Martins decided between a professional energy audit and a DIY assessment? Were there significant differences in the findings or recommendations that affected their choice of insulation materials or project scope?
The Martins initially considered both a professional energy audit and a DIY assessment. They started with a DIY approach using basic tools to identify obvious drafts and insulation gaps but found the process limited. Eventually, they opted for a professional audit, which revealed hidden issues like air leaks in the attic and wall cavities. The audit’s detailed recommendations influenced their decision to use higher-performance insulation in specific areas and expand the project scope beyond what their DIY findings suggested.
You mentioned the Martins wanted to reduce their energy bills by at least 25%. Did you track the actual savings after the insulation upgrade, and if so, how long did it take them to see a return on their investment given the Minnesota climate?
Yes, we tracked the Martins’ energy bills for a full year after the insulation upgrade. Their annual heating costs dropped by about 30%, surpassing their original goal. Given Minnesota’s cold winters, they started seeing noticeable savings in the very first heating season. Based on their investment, the payback period was just under four years.
After reading about that $420 January heating bill, I’m wondering what the actual upfront cost of their insulation project ended up being, and about how long it took before they started seeing noticeable savings on their energy bills.
The article mentions that the homeowner spent roughly $3,800 on the insulation upgrade. They began seeing noticeably lower energy bills within the first heating season after the retrofit—so savings were apparent almost immediately. Based on their utility bill reductions, they estimated the payback period for the project was just over three years.
With the original fiberglass batt insulation being replaced, did the Martins consider any newer materials like spray foam or cellulose for the attic? I’m wondering if certain materials made a bigger difference in comfort or cost-effectiveness during their retrofit.
The Martins did look into a range of insulation options during their retrofit. While they ultimately chose dense-pack cellulose for the attic due to its balance of cost, effectiveness, and environmental benefits, they also considered spray foam. They found cellulose offered significant improvements in comfort and energy savings compared to their original fiberglass batts, and it was more cost-effective than spray foam for their needs.
Can you share more details about the upfront costs and whether the Martins saw energy bill savings right away, or did it take a few seasons for the retrofit to really pay off?
The Martins invested about $7,200 upfront for their insulation upgrade, which included both materials and professional installation. They noticed their monthly energy bills dropped significantly starting with the first heating season after the retrofit. While the most dramatic savings were immediate, they found that the benefits continued to add up over the following seasons, making the investment worthwhile fairly quickly.
Can you break down what the Martins spent on materials and labor for each part of their insulation project? I’m on a strict budget and trying to figure out which upgrades would give me the best return without taking on the whole house at once.
Here’s a breakdown based on the article: The Martins spent about $1,200 on attic insulation materials and $800 for labor. For the basement, materials were $900 and labor was $600. Wall insulation materials cost $1,500, with labor at $1,200. If you’re prioritizing, the attic offered the fastest payback, followed by the basement. Focusing on the attic first could give you the best return for your budget.
Can you share more about the specific materials the Martins chose for their retrofit and how those compared in cost and performance to the original fiberglass batts in their attic?
The Martins replaced the original fiberglass batts in their attic with blown-in cellulose insulation. Compared to fiberglass batts, cellulose offers better air sealing properties and fills gaps more completely, improving overall energy efficiency. In terms of cost, cellulose was slightly more expensive up front, but the retrofit’s improved thermal performance led to significant energy savings that offset the initial investment within a few years.
The article mentions a $420 heating bill that motivated the Martins to start insulating. After their retrofit, how long did it actually take for them to start seeing a noticeable dip in their energy bills? I’m trying to estimate the real payback time.
According to the article, the Martins noticed a significant reduction in their energy bills during the very first winter after completing the insulation retrofit. The article also points out that their monthly bills dropped by about 35% right away, so they didn’t have to wait long to see real savings. This quick turnaround helped them estimate their payback period at just under five years.
Since the Martins’ house is from the 1970s and had old fiberglass batts, I wonder how much of a mess or disruption the retrofit caused, especially with rooms above the garage. Did they have to move out or deal with big cleanups during the process?
The retrofit did cause some disruption, especially in areas like the rooms above the garage where access to old insulation was tricky. However, the Martins were able to remain in their home throughout the process. Contractors took care to minimize dust and mess, but there was some cleanup required after removing old fiberglass batts. Most of the disturbance was limited to work hours, and the family managed by temporarily shifting furniture and covering belongings in affected rooms.
The article mentions the Martins had especially cold rooms above the garage. Were there particular insulation materials or techniques that addressed those problem areas differently compared to the rest of the house? I’d like to know what worked best for those challenging spots.
The rooms above the Martins’ garage were initially much colder because of inadequate insulation and air leaks. To fix this, they used closed-cell spray foam under the garage ceiling, which provides both insulation and an effective air seal. This was different from the blown-in cellulose used in other areas of the house. The spray foam worked best in those challenging spots because it stops drafts and adds higher R-value in a limited space.
The Martins set out to reduce their energy bills by at least 25%. Did they end up meeting or exceeding that goal, and how did their final costs compare to what they had expected at the start of the project?
The Martins actually exceeded their goal—they achieved a 32% reduction in their energy bills after their insulation retrofit. As for costs, their final expenses were about 10% higher than their initial estimates, mainly due to some unforeseen repairs discovered during the installation. Despite this, they felt the long-term savings and improved comfort made the extra investment worthwhile.
You mentioned the Martins aimed to cut their energy bills by at least 25%. Were they able to track how much their heating costs actually dropped after the insulation upgrades, and if so, how long did it take to see real savings?
Yes, the Martins closely tracked their heating costs after the insulation retrofit. According to the article, they started seeing noticeable reductions in their utility bills within the first winter following the upgrade. By the end of the first year, their heating expenses had dropped by about 28%, surpassing their original 25% savings goal. So, real savings became evident within just a few months and were clearly measurable by year’s end.
The article mentions the Martins were hit with a $420 heating bill before starting their project. Can you share how long it took for them to actually see a noticeable drop in their energy bills after completing the insulation retrofit?
According to the article, the Martins began noticing a significant reduction in their energy bills within the first billing cycle after completing the insulation retrofit. The most noticeable drop appeared in the very next month’s statement, and the savings continued throughout the following winter, confirming the effectiveness of the improvements.
How did the actual costs of the retrofit compare to what the Martins initially budgeted, and were there any surprise expenses along the way that homeowners should prepare for?
The Martins found that their actual retrofit costs ended up about 15% higher than their initial budget, mainly due to unexpected issues discovered during the project, such as hidden moisture damage in the walls. This meant extra labor and materials were needed. Homeowners should be prepared for possible surprises like structural repairs or outdated wiring when planning similar upgrades, so it’s wise to include a contingency fund of at least 10-20% of the projected cost.
I noticed their main goal was to cut heating bills by at least 25 percent. How did the actual payback period for their retrofit compare to what they expected? Was the upfront cost manageable for a typical homeowner or did they need to budget over multiple years?
The homeowners originally expected their insulation upgrade to pay for itself in about seven years, based on estimated 25 percent heating bill savings. In reality, thanks to even greater efficiency, the payback period was just under six years. As for upfront costs, they were significant but not extreme—manageable with some planning. The homeowners chose to budget and save for a year before starting, rather than spreading the project out over multiple years.
Did the Martins see immediate changes in their home’s comfort and energy usage, or did the benefits become noticeable over a few months? I’m also wondering how closely the actual savings matched their goal of reducing bills by at least 25 percent.
The Martins noticed improvements in comfort almost right away—their home felt warmer and less drafty within days of completing the insulation upgrade. As for energy savings, their utility bills showed a clear drop starting with the next billing cycle. By the end of the first year, their total savings matched their goal, with bills reduced by a little more than 25 percent.
You said the Martins wanted to improve comfort in the rooms above their garage, which were colder than the rest of the house. What specific insulation strategies did they use for those tricky spots, and did it actually solve the problem?
The Martins addressed the cold rooms above their garage by adding dense-pack cellulose insulation to the garage ceiling and carefully sealing any air leaks. They also upgraded the rim joist insulation and ensured proper air barriers were in place. This combination significantly reduced drafts and temperature swings, making those rooms much more comfortable, as confirmed in their post-upgrade energy bills and daily experience.
Can you share more details about the types of insulation materials the Martins chose for different areas, especially the attic versus the walls? I’m curious if they noticed a bigger improvement in comfort from one area over the other.
The Martins used blown-in cellulose insulation for their attic, which helped seal gaps and provided a significant boost in overall comfort, especially during extreme temperatures. For the walls, they opted for dense-pack cellulose, which improved drafts and made rooms feel less chilly in winter. They reported the biggest comfort improvement came after insulating the attic, since heat loss was most significant there, but wall insulation also made a noticeable difference.
I noticed the Martins had cold rooms above their garage before the retrofit. Did they end up using a specific insulation material or method for that area, and did it actually solve the temperature difference after the upgrade?
The Martins addressed the cold rooms above their garage by installing closed-cell spray foam insulation in the garage ceiling. This method was chosen because it creates an effective air seal and provides higher insulation value in tight spaces. After the retrofit, they reported that the temperature difference between those rooms and the rest of the house was eliminated, making the rooms comfortable year-round.
The Martins aimed for at least a 25% reduction in energy bills. Do you have details on how much the full project ended up costing and what their monthly savings actually looked like after the retrofit was complete?
The case study reports that Martins invested about $8,500 in their insulation upgrade. After completing the retrofit, their energy bills dropped by roughly 28%, which translated to monthly savings of about $55 on average. Over a year, these savings add up to around $660, meaning the project is expected to pay for itself in just under 13 years, not including added comfort and home value.
I saw that the Martins wanted at least a 25% reduction in energy bills. Were they able to hit that target, and how soon did they start seeing lower heating bills after the new insulation went in?
The Martins did achieve their goal of at least a 25% reduction in energy bills. In fact, their heating costs dropped by about 28% in the first full winter after the retrofit. They started noticing lower heating bills within the first month of using their new insulation, with the biggest impact seen during the colder months.
For a house similar to the Martins’—older with minimal wall insulation—do you know if upgrading attic insulation alone made the biggest difference, or did addressing wall and window drafts contribute more to comfort and savings?
In the case study, upgrading attic insulation had the most immediate and significant impact on both comfort and energy savings. However, addressing wall insulation and sealing window drafts further improved comfort by reducing cold spots and drafts. For an older home like the Martins’, starting with attic insulation usually provides the biggest benefits, but tackling wall and window issues afterward maximizes overall results.
I’m curious how the Martins decided between upgrading attic insulation versus tackling those cold spots above the garage first. Was there a reason they didn’t just focus on the most uncomfortable rooms, or did the audit recommend starting with the attic?
The Martins relied on their energy audit, which identified attic insulation as the top priority for boosting overall comfort and efficiency. While they definitely noticed cold spots above the garage, the audit showed that addressing the attic would give the biggest immediate impact. They planned to fix the cold rooms later, but tackled the attic first because it would benefit the whole house.
Do you have any details on the specific insulation materials the Martins ultimately chose for their attic and walls? I’m curious if they stuck with fiberglass or switched to spray foam or cellulose, since the article mentions they started with original fiberglass batts.
The Martins decided to switch from their original fiberglass batts to blown-in cellulose for the attic, aiming for better air sealing and higher R-value. For the exterior walls, they opted for dense-pack cellulose, which helped fill gaps more thoroughly than the old fiberglass batts. The article notes they considered spray foam but ultimately went with cellulose for its balance of performance, cost, and environmental impact.
After the retrofit, how long did it actually take for the Martins to notice a difference in comfort and energy bills? I’m interested in knowing whether the payback and day-to-day comfort improved as quickly as they hoped, especially with those harsh Minnesota winters.
The Martins began noticing increased comfort in their home almost immediately after the insulation upgrade, with drafts and cold spots reduced during the first winter. As for energy bills, they observed measurable savings within the first few months, especially noticeable during the colder months. The article notes that both comfort and cost improvements met, and in some ways exceeded, their expectations soon after the retrofit was completed.