
Introduction: Why the Right Tools Matter for Deck Maintenance
Decks are the heart of outdoor living for many homeowners, providing an inviting space for gatherings, relaxation, and enjoying the beauty of your yard. Yet, the key to a deck that stands the test of time is consistent, thorough maintenance. Whether you’re working with pressure-treated lumber, hardwoods, or composite materials, the right set of tools can make all the difference—transforming a daunting, time-consuming chore into a manageable, even enjoyable, project. Attempting to clean, repair, or refinish your deck without the proper equipment often leads to subpar results, unnecessary frustration, and even safety hazards. This detailed guide is designed to walk you through every tool and piece of equipment you’ll need for safe, efficient, and effective DIY deck maintenance. From routine cleaning to deeper repairs and refinishing, you’ll learn exactly what each tool is for, how to use it, and tips for maximizing both your results and your investment.
Understanding Deck Maintenance Tasks
Common Deck Maintenance Activities
- Routine cleaning to remove dirt, algae, and mildew
- Inspecting and replacing damaged boards or fasteners
- Sanding rough surfaces and preparing for refinishing
- Staining or sealing wood for weather protection
- Checking and tightening hardware for structural stability
Before assembling your toolkit, it’s important to understand the range of tasks involved in maintaining your deck. Each activity requires specific tools and preparation. Skipping steps or improvising with the wrong equipment can compromise both the appearance and safety of your deck.
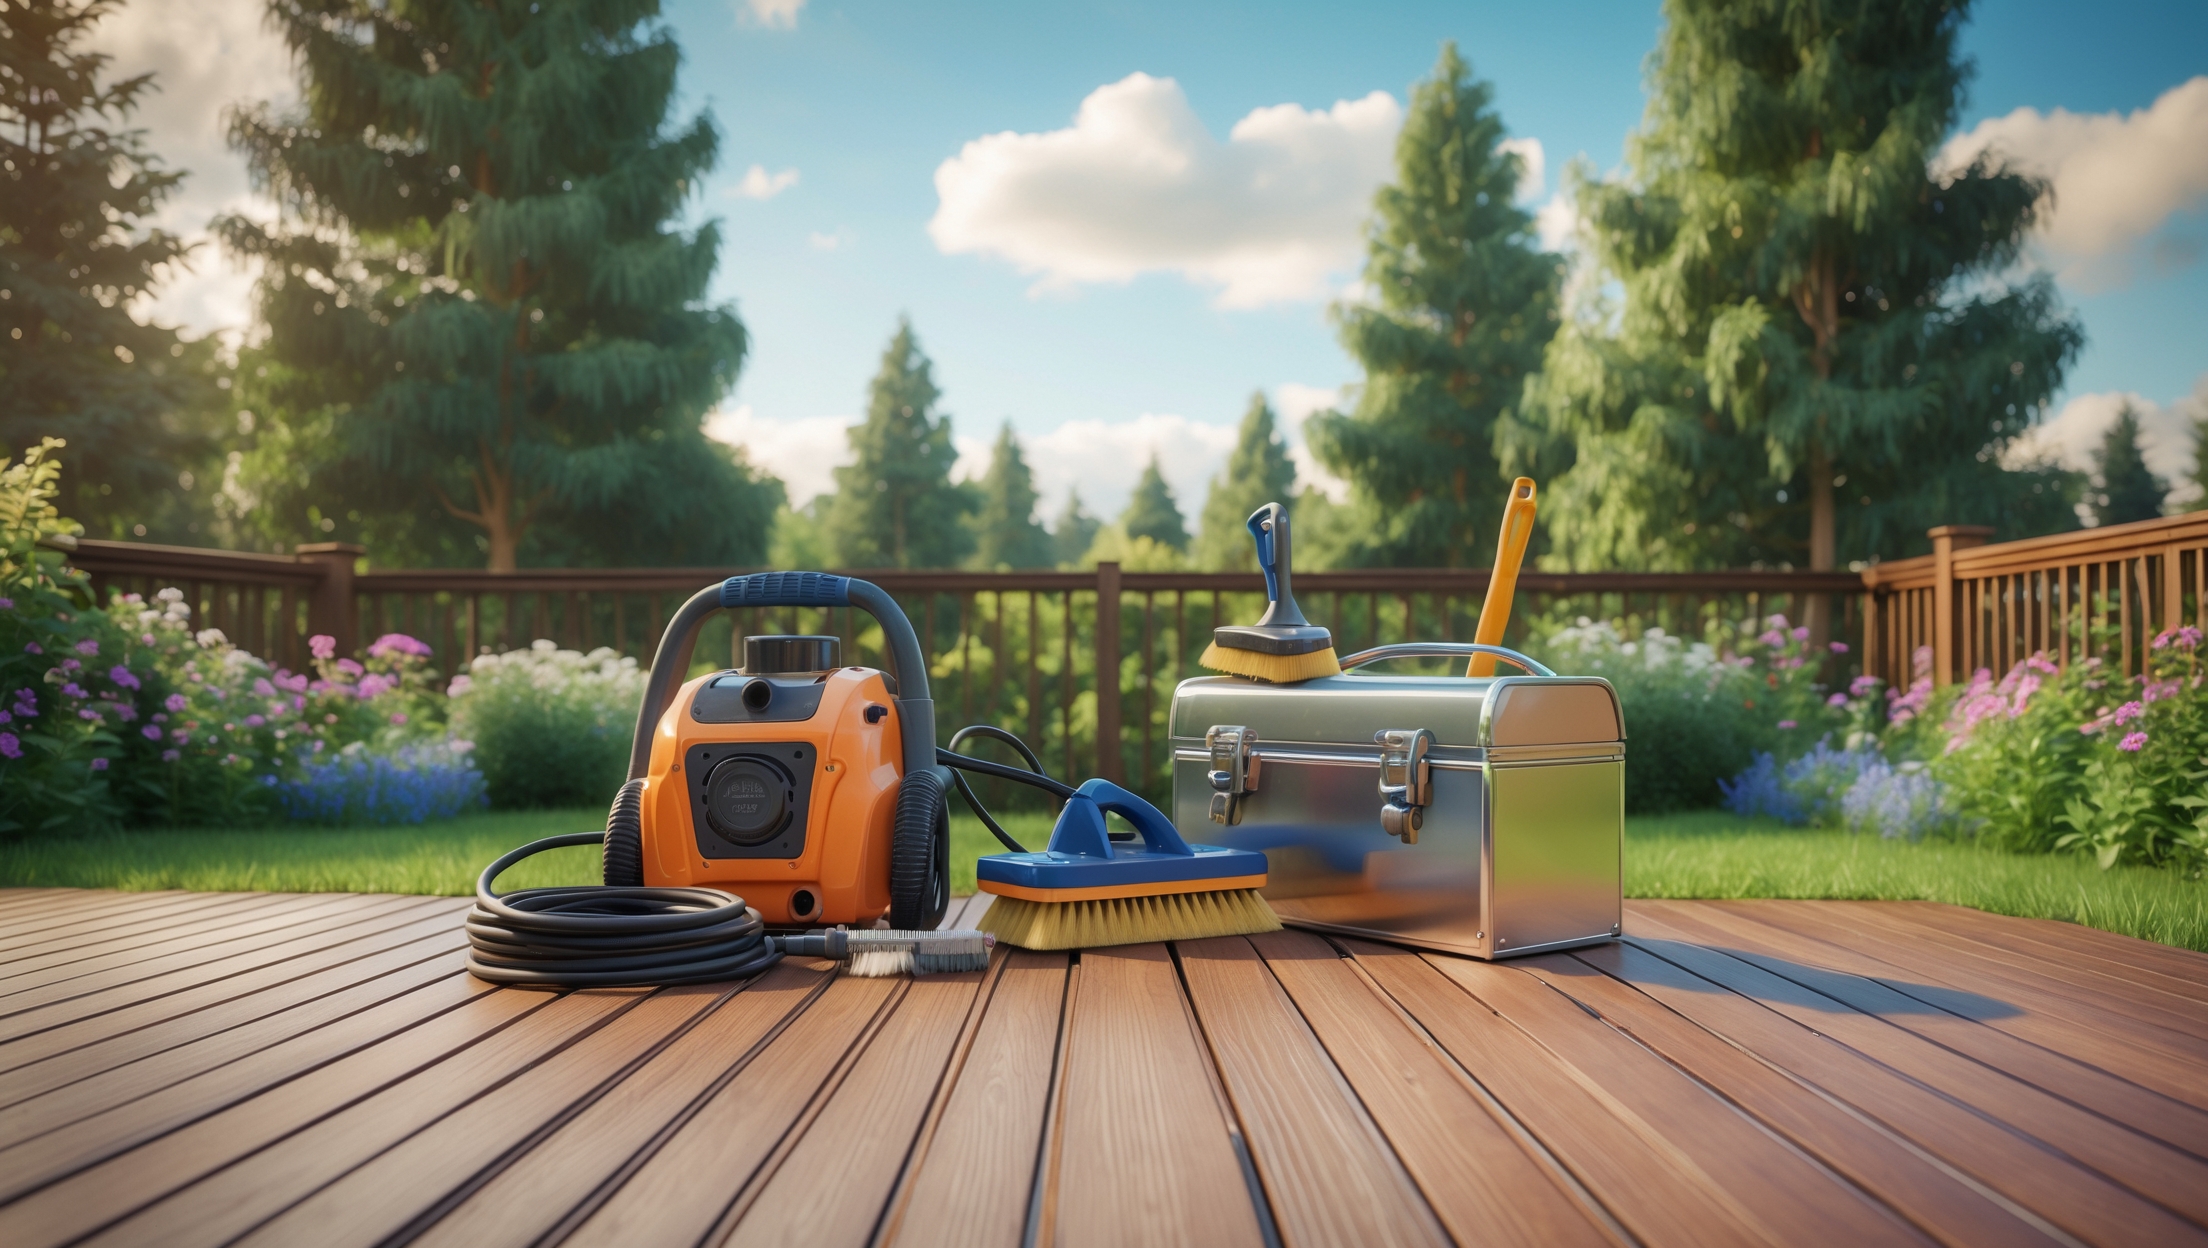
The Essential Tools for DIY Deck Cleaning
Basic Cleaning Supplies
- Stiff-bristled deck brush: For scrubbing away dirt and organic growth. Look for brushes with long handles to reduce back strain.
- Buckets: Large, sturdy buckets for mixing cleaning solutions and rinsing.
- Garden hose with adjustable nozzle: For rinsing debris and applying water efficiently.
Advanced Cleaning Equipment
- Pressure washer: An invaluable tool for deep-cleaning decks. Choose a model with adjustable pressure (1,200–1,500 psi is ideal for wood). CAUTION: Excessive pressure can damage wood fibers or composite surfaces. Always test on a small area first.
- Deck cleaner or wood brightener: Purchase a deck-specific cleaning solution. Avoid bleach-based cleaners, which can degrade wood and harm surrounding plants.
Protective Gear for Cleaning
- Work gloves: Protect hands from splinters, chemicals, and grime.
- Safety goggles: Prevent cleaning solution or debris from entering your eyes.
- Non-slip footwear: Essential on wet or soapy surfaces.
Cleaning is the first and most frequent maintenance task. Investing in the right cleaning tools saves time, reduces effort, and helps prevent the buildup of damaging mold or mildew.
Inspection Tools: Spotting Trouble Before It Grows
Visual and Physical Inspection Basics
- Flashlight or headlamp: For inspecting under the deck where light is limited.
- Moisture meter: Detects trapped moisture in wood, which can lead to rot. Inexpensive handheld meters are widely available.
- Flathead screwdriver or awl: Use to probe suspicious areas for soft spots or hidden rot.
Regular, thorough inspections allow you to catch problems early—before they turn into expensive repairs. These simple tools help you assess the condition of both visible and concealed parts of your deck.
Repair and Replacement Tools
Hand Tools for Common Repairs
- Hammer: For driving or removing nails.
- Pry bar: To safely lift damaged boards or remove fasteners.
- Cordless drill/driver: For removing and installing screws. Opt for one with variable speed and a good set of bits.
- Oscillating multi-tool: Excellent for precision cuts or sanding in tight spots.
- Socket wrench set: Tightens bolts and lag screws securing structural elements.
Fasteners and Replacement Parts
- Galvanized or stainless-steel screws and nails: Prevents rust and corrosion. Always match the fastener type to your deck material.
- Replacement deck boards: Keep a few on hand for quick swaps when boards show damage or rot.
Quality tools and hardware make repairs easier and ensure your deck stays structurally sound. Keep your repair kit organized and accessible for fast fixes.
Sanding and Surface Preparation Tools
Manual and Power Sanding Options
- Orbital sander: Best for large, flat deck surfaces. Choose models with adjustable speed and dust collection.
- Detail sander or corner sander: Reaches tight spaces, railings, and steps.
- Sandpaper (various grits): Start with coarser grits (60–80) for removing old finish, then move to finer grits (120–150) for a smooth surface.
- Sanding blocks: For hand-sanding small areas and edges.
Dust Management
- Shop vacuum: Essential for collecting dust and debris, especially when sanding.
- Dust masks or respirators: Protect your lungs from fine particulates during sanding.
Proper sanding prepares the surface for staining or painting, resulting in a finish that lasts longer and looks better. Skipping this step or using the wrong tools can lead to uneven results or premature finish failure.
Staining, Sealing, and Finishing Tools
Application Tools and Accessories
- Paint rollers with extension poles: Speed up application of stains or sealants on large deck surfaces.
- Stain pads or brushes: For detailed application on railings, steps, and edges.
- Paint trays and liners: Make it easy to load stain or sealant onto your applicators.
- Drop cloths or plastic sheeting: Protects landscaping and adjacent surfaces from drips and spills.
- Painter’s tape: Achieve clean lines where the deck meets walls or posts.
Mixing and Cleanup
- Stir sticks: For thoroughly blending stains or sealants.
- Mineral spirits or water (as appropriate): For cleaning brushes and pads.
Using the right application tools ensures an even, durable finish and reduces material waste. Don’t cut corners—quality applicators make a noticeable difference.
Safety Equipment for Deck Maintenance
Personal Protective Gear
- Safety goggles: Protects eyes during sanding, cleaning, and repairs.
- Work gloves: Shields hands from splinters, chemicals, and sharp fasteners.
- Hearing protection: Especially important when using power sanders or saws.
- Knee pads: Reduce strain during extended work on deck surfaces.
Environmental and Site Safety
- Warning signs or cones: Alert others to ongoing maintenance and wet surfaces.
- Proper ventilation: Use fans or open windows when using chemical cleaners or sealants.
Never underestimate the importance of safety gear. Accidents can happen quickly, and using even basic protection can prevent serious injuries.
Optional but Helpful Tools and Equipment
- Extension cords: Rated for outdoor use, essential for power tools if outlets are far from your deck.
- Ladders or step stools: For reaching high railings or overhead features.
- Tool caddy or organizer: Keeps all your equipment at hand and prevents misplaced tools.
- Infrared thermometer: Useful for checking deck surface temperature before applying stains or sealants.
While not mandatory, these items can increase your efficiency and make the job more comfortable—especially for larger decks or more complex projects.
Tool Care and Storage Best Practices
Cleaning and Maintenance
- Thoroughly clean all tools after use, especially those exposed to chemicals or abrasive dust.
- Dry tools fully before storage to prevent rust or decay.
- Sharpen or replace worn-out blades and bits regularly.
Safe Storage
- Store power tools in a dry, secure area.
- Use wall hooks or shelving to keep hand tools organized.
- Keep chemicals and stains in original containers, away from heat or open flames.
Proper care extends the life of your tools and ensures they’re ready for your next maintenance session, saving both time and money in the long run.
Cost Considerations: Investing Wisely in Your Toolkit
Budgeting for Tool Purchases
- Start with essentials. If your budget is limited, invest in quality over quantity—especially for frequently used items like a pressure washer or sander.
- Rent or borrow specialized tools. For one-off tasks, renting (such as a floor sander or high-end pressure washer) can be more cost-effective.
- Shop seasonal sales and consider bundles or kits for savings.
Long-Term Value
- Durable, well-maintained tools can serve you for many years and multiple projects.
- Some tools (like drills and vacuums) have uses beyond deck maintenance, adding value to your overall home improvement toolkit.
Budget wisely to maximize both your immediate results and future project flexibility.
Frequently Asked Questions
Can I maintain my deck without power tools?
Yes, but it’s more labor-intensive. Manual brushes, sandpaper blocks, and elbow grease can get the job done, but power tools like sanders and pressure washers save considerable time and effort.
Should I buy or rent a pressure washer?
If you plan to maintain your deck and other exterior surfaces regularly, buying may be worthwhile. For occasional use, renting is cost-effective and saves storage space.
What’s the most important safety item?
Work gloves and eye protection are non-negotiable. For sanding or using chemicals, always add a dust mask or respirator.
Conclusion: Equip Yourself for Deck Maintenance Success
Maintaining your deck is a rewarding project that pays off in years of safe, beautiful outdoor living. With the right tools and equipment, you can tackle cleaning, repairs, and refinishing efficiently and confidently—saving money, increasing your home’s value, and ensuring your deck remains a welcoming retreat. Remember, the upfront investment in quality tools pays dividends over time, both in project outcomes and personal safety. Start with the basics, add specialized items as needed, and always prioritize proper care and storage. Whether you’re sprucing up a small patio or caring for a sprawling multi-level deck, this guide empowers you to approach every maintenance task with clarity and skill. Here’s to many more seasons of carefree enjoyment on a deck that looks—and performs—as good as new.
For someone who hasn’t done any deck maintenance before, is there a particular type or brand of stiff-bristled deck brush you recommend? I’m not sure what makes one better than another, especially for scrubbing off algae.
For first-time deck maintenance, look for a deck brush with stiff synthetic bristles, as these are durable and effective against algae. A brush head around 10 inches wide works well for covering more area. Brands like O-Cedar and Libman are reliable and widely available. Make sure the brush can attach to a standard extension pole to save your back while scrubbing. The most important factors are sturdy bristles and a comfortable handle.
The article mentions inspecting and possibly replacing damaged boards as part of routine maintenance. How can I tell if a board just needs sanding or if it really needs to be replaced?
To decide if a deck board needs just sanding or full replacement, check for deep cracks, rot, or structural softness. If the wood feels spongy, crumbles, or your screwdriver sinks in easily, replacement is best. If the board is solid but has surface splinters or rough spots, sanding should be enough. Always make sure there’s no sign of mold or major warping before opting for sanding.
I noticed you mentioned sanding rough surfaces before refinishing. How do I know if my deck boards really need sanding, and what grit sandpaper would you recommend starting with for typical backyard decks?
To determine if your deck boards need sanding, run your hand along the surface and check for splinters, raised grain, or rough patches. If the boards feel uneven or have old finish flaking off, sanding will help create a smoother surface for refinishing. For most backyard decks, start with a medium-grit sandpaper such as 80-grit. If your boards are especially rough, you can begin with 60-grit, then finish with 100-grit for a smoother result.
You mention using a stiff-bristled deck brush with a long handle for cleaning. Would a power washer be just as effective, or could it risk damaging certain types of decking materials like older pressure-treated lumber or composites?
A power washer can clean decks efficiently, but it does carry some risks, especially for older pressure-treated wood and composite materials. High pressure can splinter wood, strip away protective coatings, or scar composite boards. If you choose to use a power washer, opt for a low-pressure setting and keep the nozzle moving. For delicate or older decking, a stiff-bristled brush offers a safer, more controlled clean.
When checking and tightening deck hardware, is there a specific type of tool you recommend to make the process more efficient? I have a basic wrench and screwdriver set, but not sure if I should invest in anything more specialized.
Your basic wrench and screwdriver set can handle most deck hardware maintenance, especially if your deck uses standard fasteners. However, for greater efficiency, consider investing in a ratcheting wrench or a cordless impact driver. These tools speed up the tightening process and make it easier to access tight spots. If your deck hardware includes specialty bolts, a socket set with various sizes can also be helpful.
I noticed the article talks about using a stiff-bristled deck brush for cleaning, but are there any specific types of cleaning solutions that work better for different deck materials like hardwood versus composite? I want to make sure I don’t damage the surface.
For hardwood decks, it’s best to use a wood-specific cleaner or a mild soap and water solution—avoid anything with harsh chemicals or bleach, as these can damage the wood. For composite decks, look for a composite deck cleaner recommended by the manufacturer, since some cleaners for wood can be too abrasive or leave residues. Always test any cleaner on a small area first to ensure it won’t harm the surface.
For someone assembling their toolkit for the first time, do you have any advice on which tools are most important to buy up front and which ones can be borrowed or rented? I don’t want to spend too much if I’m only doing maintenance once or twice a year.
For basic DIY deck maintenance, it’s wise to invest in essentials you’ll use repeatedly, like a sturdy broom, deck brush, putty knife, and a good hose or pressure sprayer. Tools like a power washer or orbital sander, which are needed less often, can usually be rented or borrowed. That way, you keep your initial costs low while still having everything needed for routine care.
For a small business on a tight budget, are there any essential deck maintenance tools you recommend prioritizing first? I want to maintain safety and appearance but can’t afford to buy the entire toolkit at once.
For a small business starting out, focus first on tools that support both safety and essential upkeep. Prioritize a sturdy broom for debris, a quality deck brush and bucket for cleaning, and a basic screwdriver or drill for tightening loose boards or railings. If you can, also invest in safety gear like gloves and safety glasses. These basics will help maintain your deck’s appearance and safety until you’re able to expand your toolkit.
If a deck has a lot of mildew and algae buildup, is there a certain cleaning solution you’d suggest pairing with the stiff-bristled brush, or should I just use soapy water? I want to avoid damaging the wood finish.
For heavy mildew and algae buildup, you can use an oxygenated bleach solution, which is effective yet gentle on most deck finishes. Mix it according to the product instructions and apply with your stiff-bristled brush. Avoid chlorine bleach, as it can damage wood fibers and finishes. Rinse thoroughly after scrubbing to preserve the wood and its protective coating.
I’m on a tight budget—are there any specific tools from your list that can be substituted with basic household items, or are some tools absolutely essential for safe deck maintenance?
Some deck maintenance tools can be substituted with household items—for example, a stiff broom can replace a deck brush for sweeping, and an old paintbrush can work for applying sealant in small areas. However, certain tools like a sturdy safety mask, gloves, and a reliable screwdriver or drill are essential for safety and efficiency. Avoid skipping any safety gear, but for cleaning and minor tasks, you can often make do with what you have at home.
Could you explain a bit more about the best way to check and tighten deck hardware for structural stability? I’ve never done that before and am unsure what tools I should use or what signs of loosening I should look for.
To check and tighten your deck hardware, use a wrench or socket set to test all bolts, nuts, and screws, especially at joints and railings. Look for signs like wobbly railings, visible gaps, or rusted fasteners. If you notice movement or hear creaks when walking on the deck, that’s a sign hardware needs tightening. Tighten any loose fasteners, but avoid overtightening which can strip the wood. It’s helpful to inspect annually to keep your deck safe and sturdy.
When it comes to sanding rough deck surfaces in preparation for staining, do you recommend using a hand sander or is it worth investing in a powered orbital sander for an average-sized deck? Would love to know if there’s a big difference in the results or the time involved.
For an average-sized deck, a powered orbital sander is definitely worth the investment if you want to save time and effort. It smooths large areas quickly and gives more consistent results compared to sanding by hand. Hand sanders are better suited for small touch-ups or tight corners. You’ll likely notice a big difference in both the speed and the evenness of the finish when using a power sander.
I noticed you mention both pressure-treated and composite decks. Are there any cleaning tools or methods from your list that should be avoided for composite decking to prevent surface damage?
For composite decking, it’s best to avoid using stiff wire brushes or highly abrasive scrub pads, as these can scratch or dull the surface. Power washers can be used, but always keep the pressure below 1500 psi and use a fan tip held at least 8 to 12 inches from the deck surface. Stick to soft-bristle brushes and mild cleaning solutions for routine maintenance.
How often should the routine cleaning and inspection steps you listed actually be done to keep a deck in good shape? Is this something I should plan to tackle seasonally, or does it depend on my local climate?
Routine cleaning and inspection are best done at least once each spring and fall to keep your deck in good condition. However, if you live in a region with harsh winters, lots of rain, or heavy sun exposure, inspecting and cleaning more frequently—about every three months—can help catch issues early. Local climate does play a role, so adjust your schedule if you notice your deck is getting dirty or weathered more quickly.
After routine cleaning and inspecting for damage, what’s the best sequence for sanding and sealing to make sure I don’t miss any important steps? Sometimes the order of these tasks gets confusing, especially with composite materials.
After cleaning and checking for damage, let the deck dry fully. For wood decks, sand next to smooth rough spots and remove old finishes, then sweep away dust. Apply sealer or stain afterward, making sure the surface is clean and dry. For composite decks, sanding is usually not recommended; instead, clean thoroughly and use products made for composites. Always check your material’s manufacturer guidelines to avoid potential damage.
Once I’ve cleaned my deck with the brush and hose, how long should I wait before moving on to sanding or staining to make sure the wood is dry enough for the next steps?
After washing your deck, it’s important to let the wood dry thoroughly before sanding or staining. Generally, you should wait at least 24 to 48 hours, but this can vary depending on humidity, temperature, and how much direct sunlight the deck gets. To check if it’s dry enough, press your hand on the surface—if it feels cool or damp, give it more time. The wood should be completely dry to the touch before you proceed.
After routine cleaning and inspecting for damaged boards, what’s the best way to tell if I really need to sand and refinish the deck, or if cleaning alone is enough for now?
After cleaning and inspecting your deck, check the wood for rough patches, splinters, or areas where water no longer beads up but soaks in quickly—these are signs the finish is wearing off. If the surface still feels smooth, looks even in color, and repels water, cleaning alone is likely enough for now. Otherwise, sanding and refinishing will help protect your deck.
When assembling a toolkit for deck maintenance, are there budget-friendly versions of the basic cleaning supplies, like the stiff-bristled brush or the garden hose nozzle, that you would recommend for first-time DIYers?
Absolutely, you can find budget-friendly options for basic cleaning supplies. For a stiff-bristled brush, look for generic brands at local hardware stores or discount retailers—they often work just as well as pricier versions. Basic garden hose nozzles are usually available for a few dollars at big-box stores or online. Prioritize sturdy construction over brand names to get the best value for your toolkit.
If someone is on a tight budget, which tools would you say are truly essential for basic deck maintenance, and which ones could be skipped or borrowed without compromising the results too much?
For basic deck maintenance on a tight budget, focus on essentials like a stiff-bristle brush, a garden hose or basic pressure sprayer, and a screwdriver or hammer for tightening loose boards. You can often borrow or rent more expensive tools like a power washer or orbital sander, as they’re mainly for deep cleaning or refinishing. Prioritize what you need for cleaning and minor repairs, and skip specialty tools unless tackling bigger projects.
For homeowners on a tight budget, which of the tools listed do you consider absolutely non-negotiable for safe deck maintenance, and are there any items where you think DIY alternatives or rentals would work just as well?
For basic and safe deck maintenance, a sturdy broom, a scrub brush, and protective gloves are absolutely essential. A pressure washer, while helpful, can be rented instead of bought if you’re watching your budget. For tasks like sanding, a rented power sander or manual sanding block works well. You can also use household items like vinegar for light cleaning instead of specialized cleaners.
If I’m just starting out and need to stick to a budget, which of these essential tools for deck maintenance should I prioritize buying first? Are there any that can be borrowed or improvised safely without risking the quality of the results?
To stick to a budget, prioritize buying a sturdy broom, a bucket, and a good scrub brush, since you’ll need these for basic cleaning and prep. You can often borrow or rent a pressure washer from a neighbor or local hardware store instead of buying one. For applicators like paint brushes or rollers, affordable versions work fine for starters. Avoid improvising on safety gear—always use proper gloves and eye protection.
You mention sanding rough surfaces before refinishing. How do I know when sanding is absolutely necessary, and is there a difference in tool choice depending on whether my deck is hardwood or pressure-treated lumber?
Sanding is necessary if your deck boards feel rough, have splinters, or show peeling old finish. If you notice these issues, sanding before refinishing ensures a smoother, longer-lasting result. For hardwood decks, a more powerful sander like a belt or orbital sander works best, as the wood is denser. Pressure-treated lumber is softer, so a random orbital sander or even a pole sander with medium-grit paper is usually sufficient.
For small business owners on a tight budget, are there any multi-purpose tools from your list that can handle more than one maintenance task effectively, or would you recommend investing in separate, specialized equipment for each activity?
Several multi-purpose tools from the list can help small business owners save money. For example, a cordless drill can not only drive screws but also handle cleaning and sanding with the right attachments. A pressure washer is another versatile tool that works for both cleaning surfaces and prepping for sealing. Investing in a few high-quality, multi-use tools can cover most deck maintenance tasks without needing to buy separate, specialized equipment for each job.
For a small business owner trying to stay on budget, would it make sense to rent some of the more specialized deck maintenance tools, like sanders or pressure washers, rather than buying them? If so, which tools are best rented versus purchased outright?
For small business owners with budget concerns, renting specialized tools like pressure washers and power sanders usually makes more sense, especially if you’ll only use them occasionally. Basic hand tools, brushes, or screwdrivers are better to purchase since they’re needed often and aren’t expensive. Renting helps avoid upfront costs and maintenance hassles for those pricier, less frequently used machines.
When cleaning a deck with a stiff-bristled brush, do you have any advice on which cleaning solutions are safest for pressure-treated wood versus hardwoods? I want to avoid anything that could cause damage or discoloration.
For pressure-treated wood, mild soap and water or a cleaner specifically labeled for pressure-treated lumber is safest—avoid bleach, as it can damage the wood and corrode fasteners. For hardwoods, use a cleaner designed for that wood type or a mix of gentle dish soap and water. Steer clear of harsh chemicals and always rinse thoroughly to prevent residue buildup or discoloration.
When preparing to refinish a deck, is it essential to sand the entire surface, or can you focus on just the rough spots? The article mentions sanding as a preparation step, but I’m curious how thorough it really needs to be for good results.
For the best results, it’s typically recommended to sand the entire deck surface, not just the rough spots. This ensures consistent absorption of stain or sealant and removes old finishes or splinters. However, if your deck is mostly smooth and in good shape, you might get by with spot-sanding problem areas. Just keep in mind that uneven sanding can lead to patchy finish results.
After completing the cleaning and basic repairs, how long should I wait before moving on to staining or sealing the deck to ensure the best finish and durability?
Once you’ve finished cleaning and any basic repairs, it’s important to let the deck dry thoroughly before staining or sealing. Usually, waiting 48 to 72 hours is recommended, but this can vary depending on the weather and humidity. Make sure the wood feels completely dry to the touch to achieve the best finish and long-lasting protection.
When it comes to replacing damaged boards, do you recommend any specific tools to make the job easier, especially for someone who doesn’t have a lot of carpentry experience? I’m worried about accidentally damaging the surrounding boards or fasteners.
For replacing damaged boards with minimal risk to surrounding areas, a pry bar with a flat, wide edge is very helpful—look for one marketed as a deck board removal tool. A cordless drill with screwdriver bits makes removing and reinstalling screws much easier. If nails are used, a nail puller is safer than a claw hammer. Consider using a circular saw set to the board’s thickness to make a relief cut in the damaged board, which can help you lift it out without stressing nearby boards.
For a small business with a tight budget, are there any essential deck maintenance tools from your list that can be safely skipped or substituted with common household items without compromising results or safety?
You can safely skip purchasing a specialized deck cleaning brush if you have a stiff-bristled broom or scrub brush at home—these work well for scrubbing. For applying sealant or stain, a standard paint roller or brush can substitute for pricier deck pads. However, don’t skip on safety gear like gloves and safety glasses, as these are essential for protection.
For homeowners on a tight budget, are there any tools in your list that are absolutely essential, while others could be skipped or substituted for those just starting out? If so, which would you prioritize for someone who mainly needs to do routine cleaning and minor repairs?
For routine cleaning and minor repairs, focus on just a few essentials: a sturdy broom, a hose or bucket with a scrub brush, and a screwdriver or drill for tightening loose boards or screws. Items like pressure washers, specialty cleaners, or power sanders can usually be skipped or borrowed if needed. Prioritizing these basics should cover most maintenance tasks without breaking your budget.
When inspecting and replacing damaged boards, how can I tell if a board just needs a surface repair versus a full replacement, and are there any basic tools that help with this assessment beyond a visual inspection?
To determine if a deck board needs full replacement or just a surface repair, check for deep cracks, soft spots, or rot by pressing a screwdriver or awl into the wood. If it sinks in easily or the wood crumbles, replacement is needed. For surface issues like splinters or minor cracks, sanding and sealing usually suffice. A moisture meter is also helpful to detect hidden rot below the surface.
When sanding a wooden deck to prepare for refinishing, how can I tell if I need a heavy-duty sander versus a basic sanding block? My deck has some splintered spots but isn’t in terrible shape overall.
If your deck only has a few splintered areas and is mostly in good condition, a basic sanding block or handheld orbital sander should handle the job, especially for spot-sanding rough patches. A heavy-duty sander is better suited if your deck has extensive damage, thick old coatings, or uneven boards that require leveling. For your situation, focus on the splintered spots and give the whole deck a light once-over to ensure an even finish.
If I have a composite deck instead of wood, do I need to use different types of cleaning brushes or supplies? The excerpt mentions pressure-treated lumber and hardwoods, but I wasn’t sure if composite materials need anything special for maintenance.
For composite decks, it’s important to use soft-bristle brushes and non-abrasive cleaning supplies. Harsh scrub brushes or stiff bristles can scratch the surface of composite materials. Avoid using cleaners with bleach or harsh chemicals, as these can damage composites. A mild soap and water solution, along with a soft brush, works well for most general cleaning. Always check your deck manufacturer’s care instructions for any specific recommendations.
When it comes to sanding rough deck surfaces, do you recommend using a handheld orbital sander, or is a pole-style sander sufficient for most homeowner jobs? I’m trying to decide if investing in power tools is necessary for a typical pressure-treated deck.
For most pressure-treated decks with moderate wear, a pole-style sander works well for spot-sanding and lighter touch-ups. However, if your deck has large rough areas or older, stubborn finishes, a handheld orbital sander will save a lot of time and effort by giving you a smoother finish. For general maintenance, a pole sander is usually sufficient, but investing in a power sander can really help with bigger resurfacing jobs.
For someone trying to stick to a tighter budget, which tools from your list are absolutely essential to buy at first, and which ones can be borrowed or improvised without sacrificing safety or quality results?
If you’re on a budget, start by buying just the essentials: a sturdy broom, a good-quality scrub brush, a basic screwdriver, and protective gear like gloves and safety glasses. Tools like power washers, orbital sanders, or specialty deck cleaners can often be borrowed from neighbors or rented from hardware stores. For things like paint rollers or extension poles, you can improvise or buy the most budget-friendly versions, as long as they’re safe and in good condition.
For cleaning off algae and mildew, is there a specific type of cleaning solution that works best with the stiff-bristled deck brush, or is a homemade mix just as effective? I’m trying to balance results and cost.
A homemade cleaning mix using water, white vinegar, and a small amount of dish soap can be very effective for most algae and mildew on decks when used with a stiff-bristled brush. Commercial deck cleaners are available and may work faster on tough stains, but for regular maintenance, the homemade solution is both budget-friendly and effective. Just be sure to rinse thoroughly afterward.
If some of my deck boards are pretty rough and splintered, at what point should I replace them instead of just sanding? Is there a guideline for when boards are too far gone for repairs?
If your deck boards are deeply cracked, splintering badly, rotting, or feel soft and spongy, it’s better to replace them rather than just sand. Boards with surface roughness or minor splinters can usually be sanded smooth. However, if you see large chunks missing, structural damage, or signs of decay, replacement is the safest choice to maintain your deck’s safety and longevity.
I noticed you mention that each maintenance task requires particular tools. If someone is just starting out and wants to invest in the must-haves first, which tools would you prioritize for a basic annual check-up and cleaning?
For a basic annual deck check-up and cleaning, start with a stiff-bristle brush, a garden hose or pressure washer, a bucket, and a gentle deck cleaner. A putty knife is also handy for clearing debris between boards. If you plan to do minor repairs, a cordless drill and deck screws are very useful. These essentials will cover most routine maintenance tasks without requiring a big investment up front.
I noticed you mention both sanding and staining as part of the maintenance process. If I’m short on time and budget, which one could I prioritize to make the most difference in keeping my deck in good shape?
If you’re short on time and budget, prioritizing staining will make the most noticeable difference in protecting your deck. Staining helps seal the wood against moisture, sun, and mildew, which preserves its condition. Sanding is helpful for smoothing rough spots, but you can skip it if the surface isn’t splintered. Just ensure the deck is clean before staining for the best results.
I noticed that you mention using a stiff-bristled deck brush for cleaning. For someone who’s never done this before, is there a big difference between brushes with synthetic versus natural bristles, especially for pressure-treated wood?
There is a difference between synthetic and natural bristles. Synthetic bristle brushes are generally better for cleaning pressure-treated wood because they resist water, chemicals, and mildew, and they hold up well against rough surfaces. Natural bristles can break down faster when used with cleaning solutions or on damp wood. For deck scrubbing, a stiff synthetic brush is typically the better choice for durability and effective cleaning.
When it comes to removing algae and mildew from composite deck boards, is a stiff-bristled brush strong enough, or do you recommend a specific type of cleaning solution or tool to avoid damaging the surface?
A stiff-bristled brush is usually strong enough for removing algae and mildew from composite deck boards, but it’s important to avoid metal bristles, which can scratch the surface. For the best results, use a soft- to medium-bristle brush along with a cleaning solution specifically formulated for composite decking. Avoid bleach or harsh chemicals, as these can damage the material. Always follow the manufacturer’s care instructions for your decking.
For homeowners on a tight budget, which tools from your essential list would you consider absolutely non-negotiable for basic deck maintenance, and which ones could potentially be skipped or replaced with household alternatives?
For basic deck maintenance on a budget, a stiff-bristle brush, a bucket, and a garden hose are the essentials you shouldn’t skip. These handle most cleaning and debris removal tasks. You can often substitute a household broom for sweeping and use old towels for drying. More specialized tools like power washers, deck brighteners, and sanding machines are helpful but not strictly necessary for basic upkeep.
For someone on a tight budget, are there some essential tools listed here that can be swapped out for more affordable household alternatives without sacrificing safety or results?
Yes, if you’re watching your budget, you can swap out a few of the tools mentioned without compromising safety. For example, instead of a specialized deck cleaning brush, a stiff broom or old scrub brush works well for scrubbing. A garden hose with a spray nozzle can substitute for a pressure washer for basic cleaning tasks. Just make sure to always use sturdy gloves and eye protection, even if you’re using household alternatives.
You mention inspecting and replacing damaged boards as part of deck maintenance. How can a beginner tell the difference between boards that need replacing versus ones that just need sanding or sealing?
To tell the difference, look for signs like deep cracks, splintering, rot, or soft spots—these usually mean a board should be replaced. If a board just has surface roughness, gray weathering, or minor splinters, sanding and sealing are usually enough. Press on suspect boards; if they flex, feel spongy, or you can push a screwdriver into them easily, replacement is likely needed.
If I want to start with just the basics for routine cleaning and small repairs, which tools are absolutely necessary from the list? I’m on a tight budget and don’t want to buy more than I really need for my first try at maintaining my deck.
For basic routine deck cleaning and minor repairs, you only need a stiff-bristle brush, a garden hose or bucket for rinsing, a putty knife for cleaning debris from cracks, and a screwdriver or drill for tightening loose screws. These essentials will let you handle most cleaning and small fixes without spending extra.
When it comes to sanding rough surfaces before refinishing, are there any tips for choosing the right grit or type of sandpaper? I want to avoid damaging the wood but still get rid of splinters.
For deck maintenance, start sanding rough surfaces with medium-grit sandpaper, like 80-grit, to remove splinters without being too harsh. After that, switch to a finer grit such as 120-grit for a smoother finish. Always use sandpaper designed for wood, and avoid going too coarse, as that can damage the decking. Sand in the direction of the wood grain for best results.
If I’m on a pretty tight budget, are there any deck maintenance tools I can skip or improvise with household alternatives without sacrificing safety or the quality of the results?
You can definitely prioritize a few essentials and get creative with what you have at home. For example, a stiff broom can substitute for a deck brush, and an old mop works for applying cleaning solutions. Instead of a commercial pressure washer, a regular garden hose with a spray nozzle can do the job for most cleaning needs. Just make sure you don’t skip safety gear like gloves and safety glasses, as those are important for your protection.
For someone dealing with older composite decking that has gotten pretty grimy over time, do you recommend sticking with a stiff-bristled brush, or is it worth investing in a pressure washer? Are there risks to composites with either method?
For older composite decking, a stiff-bristled brush and soapy water are usually safe and effective, especially for spot cleaning. Pressure washers can be used, but make sure to use a fan tip and keep the pressure below 1,500 psi to avoid damaging the surface. Holding the nozzle too close or using too much pressure can gouge or strip the composite material, so be gentle. Regular brushing is safest, but a pressure washer can help with stubborn grime if used carefully.
Are there any suggested alternatives for some of the essential tools if you’re working within a tight budget, or should certain items always be a top priority regardless of cost?
If you’re on a budget, some tools like brooms or scrub brushes can be substituted with sturdy household brushes or old mops. However, items such as safety gear (gloves, safety glasses) and a quality deck cleaner should always be prioritized, as they ensure proper maintenance and personal safety. For specialized tools, consider renting instead of buying to save costs while still getting the job done effectively.
I’m on a tight budget, so I was wondering which tools from the list are absolutely essential for basic maintenance and which ones I could skip or maybe borrow just once a year?
For basic deck maintenance, the must-have tools are a sturdy broom, a hose or pressure washer (which you can often borrow or rent), a putty knife to clean between boards, and a scrub brush with a long handle. Items like specialized deck cleaners, sanders, or power washers are great but not essential for basic upkeep and can be borrowed or rented when needed. This way, you keep costs down while still keeping your deck in good shape.
I see you mention sanding before refinishing the deck. Is it necessary to rent a power sander for this, or would regular sandpaper and a sanding block be enough for a smaller deck on a tight budget?
For a smaller deck and if you’re working with a tight budget, using regular sandpaper and a sanding block can be sufficient, especially if the surface isn’t too rough or heavily weathered. It will take more effort and time than using a power sander, but it’s definitely doable for smaller areas. Focus on smoothing rough spots and removing old finish, and just be patient with the manual process.
I’m on a tight budget this season, so are there any tools on your essentials list that can realistically be skipped or rented instead of purchased for occasional deck maintenance?
Absolutely, for occasional deck maintenance, you can rent or borrow larger tools like a power washer and a belt sander instead of buying them. Basic items like a stiff-bristle brush, screwdriver, or protective gloves are worth owning, since they’re inexpensive and useful for other tasks. This way, you save money but still get the job done effectively.
When it comes to replacing damaged deck boards, do you recommend any particular type of tool for removing old screws or nails efficiently, especially if they’ve rusted over time? I always find this part of deck maintenance the trickiest.
For removing old or rusted screws, an impact driver with the right bit can provide enough torque to loosen them, while a screw extractor set is great if the screw heads are stripped. For nails, a cat’s paw pry bar or a claw hammer works well, but if they’re really stubborn or rusted, a reciprocating saw with a metal-cutting blade can cut right through them—just be careful to avoid damaging surrounding wood.
If I’m only able to tackle one maintenance task at a time, like staining or tightening hardware, do you have advice on which is most urgent for preventing long-term deck damage?
If you need to prioritize, tightening hardware and fixing loose boards should come first. Addressing structural issues helps keep your deck safe and prevents further damage. Once that’s done, staining or sealing is the next most urgent task, as it protects the wood from moisture and weathering. Tackling these in this order will best protect your deck in the long run.
When it comes to inspecting and tightening hardware for structural stability, do you have a checklist or suggested order for which fasteners or areas to prioritize? I want to make sure I don’t miss anything that could impact the safety of my deck.
For deck safety, start by checking all critical connections: look at ledger boards attached to your house, then inspect support posts, beams, and joist hangers. Next, examine railings, stair connections, and balusters. Prioritize bolts and lag screws in load-bearing areas, then move to deck surface fasteners and railings. Tighten loose hardware as you go, and replace any corroded or damaged fasteners to ensure lasting stability.
Could you suggest which essential tools are the best investment for someone on a budget who’s just starting to maintain their own deck? I’m hoping to cover the most important maintenance tasks without overspending.
For basic deck maintenance on a budget, start with a sturdy broom for sweeping debris, a stiff-bristle brush for scrubbing, and a quality garden hose or hose-end sprayer for rinsing. A putty knife is useful for clearing debris between boards. If you plan to stain or seal your deck, a paint roller or brush is essential. These basics should help you handle most cleaning and upkeep tasks without a big investment.
I noticed you recommend a stiff-bristled deck brush for cleaning, but are there any specific types or brands you’ve found work best on composite decking without scratching the surface?
For composite decking, it’s best to use a brush labeled as safe for composite materials or one with medium-stiff synthetic bristles, as these are less likely to scratch. Brands like OXO and Mr. LongArm offer deck brushes specifically designed for composite surfaces. Avoid wire bristles or very stiff natural fibers, and always test a small area first to ensure the brush won’t cause damage.
When it comes to replacing damaged boards or hardware, are there any recommended tools or brands that offer good durability without going over budget? I’m just starting to build my toolkit and want to avoid overspending.
For replacing damaged boards or hardware, a good circular saw, cordless drill, pry bar, and quality measuring tape are essential. Brands like DeWalt, Ryobi, and Craftsman offer reliable, affordable options. Look for combo kits—they often provide several core tools at a lower price than buying separately. For hand tools like pry bars, Stanley is a solid choice. Focus on getting the essentials now and add specialty tools as needed.
When it comes to cleaning composite decking versus wood, are there any specific types of deck brushes or cleaning solutions you recommend using, or does the same gear work for both materials?
Composite decking and wood decking have different care requirements. For composite decks, it’s best to use a soft-bristle brush and a gentle, non-abrasive cleaner specifically labeled for composite materials, since harsh chemicals can cause damage. For wood decks, a medium-bristle brush and a cleaner formulated for wood work well. Avoid using metal brushes on either surface, as they can cause scratches.
When it comes to sanding a deck before refinishing, do you recommend using a power sander or can a manual sanding block get the job done effectively? I’m wondering if investing in a power tool is really worth it for a standard-sized backyard deck.
For a standard-sized backyard deck, a power sander is generally much more effective and time-saving than a manual sanding block. While a sanding block can work for small touch-ups or tight corners, sanding an entire deck by hand is very labor-intensive and may lead to uneven results. Investing in a power sander, like a random orbital or belt sander, will give you smoother, more consistent results and make the job much easier.
When it comes to sanding rough deck surfaces, is there a particular grit sandpaper or sander type that you find works best for prepping before staining or sealing?
For sanding rough deck surfaces before staining or sealing, a random orbital sander is often the best choice because it covers large areas efficiently and provides an even finish. Start with a coarser grit sandpaper, like 60 or 80, to smooth out rough spots, then follow up with a finer grit, such as 120, for a smoother surface that’s ready for staining or sealing.
You mention using a stiff-bristled deck brush and a garden hose for cleaning, but I was wondering if a power washer is really necessary for deep cleaning, or can I get good results with just those basic supplies?
A power washer can make deep cleaning your deck faster and more effective, especially if there’s heavy grime or deep-set stains. However, you can still achieve good results with a stiff-bristled brush and a garden hose if you put in a bit more time and elbow grease. For most routine maintenance, those basic supplies are usually enough unless your deck is particularly dirty.
If I have a composite deck instead of traditional wood, are there specific cleaning solutions or brushes that are safer to use to avoid damaging the material?
For composite decks, it’s best to use a soft-bristle brush or a broom specifically labeled for composite materials. Avoid stiff wire brushes, as they can scratch the surface. When it comes to cleaning solutions, look for cleaners that are designed for composite decks or are labeled as gentle and non-abrasive. Avoid bleach or harsh chemicals, as they can cause discoloration or damage to the deck boards.
I noticed the article mentions sanding rough surfaces as part of deck maintenance. Is there a certain type of sander you recommend for someone with mostly pressure-treated lumber, or would hand sanding be enough for small areas?
For mostly pressure-treated lumber, an orbital sander is a great choice because it smooths surfaces efficiently without leaving noticeable patterns. For small areas or touch-ups, hand sanding with medium- to fine-grit sandpaper is usually enough. If you’re working on railings or tight corners, sanding sponges or detail sanders can be helpful too.
Are there particular types or brands of stiff-bristled deck brushes that hold up better when scrubbing off tough algae and mildew, especially if I’m on a tight budget? I’ve had a few brushes wear out quickly and would appreciate any suggestions before I buy new ones.
For tough algae and mildew, look for deck brushes with synthetic bristles labeled as heavy-duty or designed for outdoor use. Brands like Libman and Quickie often make affordable, durable options. Brushes with a solid wooden or metal handle also last longer under heavy scrubbing. Avoid softer or natural bristles, as they tend to wear out faster. Checking user reviews for durability before purchasing can also help you make a better choice on a budget.
I see that inspecting and replacing fasteners is part of routine maintenance. Do you have any tips for identifying which hardware needs replacement versus just tightening, especially if some parts are hard to access?
When checking deck fasteners, look for signs like rust, corrosion, missing heads, or any that feel loose even after tightening. If a screw or nail won’t tighten or spins in place, it’s likely stripped and should be replaced. For hard-to-reach spots, use a flashlight and a thin screwdriver or inspection mirror to check their condition. If you see any severe rust or wood damage around a fastener, it’s best to replace it to keep the deck safe and secure.
I noticed you emphasized using a stiff-bristled brush for cleaning. Is there any downside to using a pressure washer instead, especially on older or composite decks?
Using a pressure washer can seem convenient, but there are some risks, especially for older or composite decks. High-pressure water can damage wood fibers or cause splintering and may strip away the protective coating. For composite decks, it might void the manufacturer’s warranty or lead to surface etching. If you do use a pressure washer, choose a low-pressure setting and keep the nozzle a safe distance from the surface to minimize potential harm.
For staining or sealing, how long should I expect the process to take from prep to finish, and are there any tips for speeding things up without sacrificing quality or safety?
The entire staining or sealing process typically takes one to three days, depending on your deck’s size and weather conditions. Preparation—including cleaning and drying—can take a full day, while the actual staining or sealing might take several hours. To work efficiently, gather all supplies beforehand, use a sprayer for large areas, and stain in sections. Always let the deck dry fully between steps to ensure quality and safety.
After replacing damaged boards, should I sand and seal them right away, or is it better to wait for a certain period before refinishing? I’d like to avoid any issues with adhesion or finish consistency.
It’s best to wait before sanding and sealing new boards. Freshly replaced boards, especially pressure-treated lumber, need time to dry out and acclimate—usually a few weeks to a couple of months, depending on weather conditions. This helps prevent adhesion problems or uneven finish. Once the boards feel dry and have lightened in color, you can sand and seal them for a consistent result.
When replacing damaged boards or fasteners, do I need any special tools beyond what’s listed for basic maintenance? I’m worried about discovering a structural issue while working and not having the right equipment on hand.
For replacing damaged boards or fasteners, you may need a pry bar, circular saw, drill/driver, and possibly a nail puller, which are often included in most deck maintenance tool lists. If you uncover a structural issue, such as rotted joists or ledger problems, you might need heavier-duty tools like a reciprocating saw or jack, plus safety gear. It’s a good idea to inspect the area first so you can prepare for any unexpected repairs and rent or borrow extra tools if needed.
I usually just sweep and hose down my deck, but the article mentions inspecting and replacing fasteners. How often should a homeowner do that, and what tools would you recommend for someone who’s never done it before?
Inspecting and replacing deck fasteners like screws and nails is a good idea at least once a year, ideally during your annual deep cleaning. For beginners, a cordless drill or screwdriver, a hammer, and a pry bar are helpful tools. Start by looking for loose or rusted fasteners, tighten or replace them as needed, and always use fasteners suitable for outdoor use to prevent corrosion.
You talked about replacing damaged boards and tightening hardware for safety. If my deck is mostly in good shape but a few screws are rusty, can I just tighten them, or should I replace them completely? Also, are there specific screw types I should use for outdoor decks?
If you notice a few rusty screws, it’s best to replace them rather than just tightening. Rust can weaken screws, reducing their strength over time. For outdoor decks, use stainless steel or coated deck screws, as these are specifically made to resist corrosion and withstand weather conditions. This will help keep your deck sturdy and safe for the long term.
The article mentions using a stiff-bristled deck brush for cleaning, but I’m wondering if there are certain types or materials of brushes I should avoid so I don’t damage my composite decking. Are there any specific brushes recommended for composite decks?
For composite decking, it’s best to avoid metal or very stiff wire brushes, as these can scratch or damage the surface. Instead, choose a brush with medium-stiffness synthetic bristles, like nylon or polypropylene. These are tough enough to clean dirt and grime but gentle enough to protect your deck’s finish. Look for brushes labeled as safe for composite or synthetic decking for the best results.
Once you’ve finished routine cleaning with the brush and hose, how long should you wait before moving on to sanding or applying a stain? Is there an ideal drying time or test to know the deck is ready for the next step?
After cleaning your deck, it’s important to let it dry fully before sanding or staining. Usually, waiting at least 24 to 48 hours is recommended, but this can vary depending on weather and wood type. A good test is to press your hand on the surface; if it feels cool or damp, give it more time. Make sure the deck is completely dry to ensure the stain adheres properly.
I noticed you mention using a stiff-bristled deck brush for cleaning, but my deck has some stubborn mildew stains. Would a pressure washer be more effective for that, or could it damage certain materials like pressure-treated lumber or composite boards?
A pressure washer can be effective for removing stubborn mildew, but you need to use it carefully. For pressure-treated lumber, use a low-pressure setting (around 1,200–1,500 psi) to avoid damaging the wood fibers. For composite boards, manufacturers often recommend gentle cleaning—too much pressure may scar the surface. Always check your deck material guidelines and test a small area first to ensure safe results.
Do you have any recommendations for specific brands or types of stiff-bristled deck brushes that hold up well over multiple seasons? I’ve had trouble with cheaper ones breaking pretty quickly, so I’m curious what features to look for in a quality brush.
When choosing a stiff-bristled deck brush, look for one with a sturdy, corrosion-resistant handle (fiberglass or aluminum are great options) and dense synthetic bristles, which handle water and cleaning solutions better than natural fibers. Brands like OXO, Libman, and Ettore have solid reputations for durability. Also, brushes with replaceable heads and secure handle attachments are worth considering, since you can swap out worn parts without buying a whole new brush.
Could you clarify if the deck cleaning brushes you mention are safe to use on composite decking, or would they scratch the surface? I want to avoid damaging the material since several of my clients have different deck types.
The deck cleaning brushes discussed in the article are generally safe for composite decking, provided you use ones with soft or medium bristles. Avoid brushes with stiff or metal bristles, as they could scratch or damage composite surfaces. It’s always best to test the brush on a small, inconspicuous area first to ensure it doesn’t leave marks before cleaning the entire deck.
Do you have any advice on budget-friendly alternatives for some of the specialized tools mentioned, like power washers or sanders? I want to keep my costs down but still do a thorough job on cleaning and refinishing.
Absolutely, you can keep costs down by renting power washers and sanders from local hardware stores instead of buying them. For cleaning, a stiff-bristled brush with a bucket of deck cleaner can be quite effective if you don’t have a power washer. For sanding, hand sanding blocks or a basic palm sander also work well for small areas. These alternatives save money while still getting good results.
You mentioned using a stiff-bristled deck brush for cleaning, but are there cases where a power washer is actually better or faster for getting rid of stubborn algae? If so, do you have tips to avoid damaging the wood?
A power washer can indeed be more effective and quicker at removing tough algae and grime compared to a deck brush, especially on large or heavily soiled decks. To avoid damaging the wood, keep the pressure below 1500 psi, use a fan tip nozzle, and maintain a distance of at least 12 inches from the surface. Always move the wand in the direction of the wood grain and avoid lingering in one spot.
You mention the importance of using a stiff-bristled deck brush with a long handle to avoid back strain. Are there notable differences between brands or types of brushes that actually make cleaning significantly easier, or are they mostly similar?
There are definitely noticeable differences between deck brushes. Some have extra-sturdy bristles that help with tough grime, while others might have softer bristles better suited for lighter cleaning. Ergonomic handles and adjustable lengths can also make a big difference in comfort and efficiency. Look for brushes specifically labeled for outdoor or deck use, and consider user reviews to find models that hold up well and make cleaning less of a chore.
For someone new to deck maintenance, how do I know if my deck boards need to be sanded before staining, or is it sometimes enough to just clean them thoroughly? I want to avoid unnecessary work but still get good results.
If your deck boards feel rough, have splinters, or show peeling old stain, sanding is likely needed before staining for a smooth, even finish. However, if the boards are still smooth and free of old coatings after a thorough cleaning, sanding may not be necessary. Always run your hand over the boards after cleaning to check—if they feel smooth, you can probably skip sanding and go right to staining.
When it comes to sanding rough surfaces before refinishing, do you recommend a specific type of sander for homeowners tackling this as a DIY project? Are there notable differences in results between using a handheld orbital sander versus sanding by hand?
For most DIY deck projects, a handheld orbital sander is a great choice. It covers larger areas efficiently and gives more consistent results than sanding by hand, which can be tiring and less even on big surfaces. An orbital sander removes roughness and old finishes quickly without leaving deep scratches, making it ideal for prepping decks. Hand sanding is best for small spots or detailed edges where the sander can’t reach.
Can you clarify if the same cleaning tools work equally well for composite decks and pressure-treated wood, or should I be using different brushes or solutions depending on the material?
It’s important to choose your cleaning tools and solutions based on your deck’s material. While soft-bristle brushes generally work for both composite and pressure-treated wood, composite decks can be more sensitive to harsh chemicals and stiff brushes. Always use cleaners labeled safe for composites on those decks, and avoid anything abrasive. For pressure-treated wood, you have more flexibility, but still avoid very stiff brushes that might damage the wood fibers.
When inspecting and replacing damaged boards, do I need any special tools to remove old fasteners, or can I just use a regular hammer and screwdriver? I’m worried about accidentally splitting the wood while prying boards up.
Using just a regular hammer and screwdriver can work in some cases, but specialized tools like a pry bar or a deck wrecker make removing old boards and fasteners much easier and safer for the wood. To avoid splitting the boards, try loosening nails gently and work slowly. If screws are stripped or rusted, a screw extractor bit for your drill can help. Taking these precautions should minimize any accidental damage.
Once I finish cleaning and repairing my deck, how long do I typically need to wait before applying a stain or sealer? The article mentions preparation, but I’m not sure about timing between steps.
After cleaning and repairing your deck, it’s best to wait until the wood is completely dry before applying a stain or sealer. This usually means waiting at least 24 to 48 hours during warm, dry conditions. If the weather is humid or cool, you may need to wait a bit longer. Make sure the wood feels dry to the touch before proceeding with staining or sealing.
I noticed you mention both pressure-treated lumber and composite materials. Are there any tools or cleaning products that work great for wood but might actually harm a composite deck surface?
Yes, some tools and cleaning products that are fine for wood decks can damage composite materials. For example, wire brushes or power washers with high pressure may scratch or gouge composite decking. Also, cleaners containing bleach or harsh chemicals can discolor or weaken composite surfaces. Always use a soft-bristle brush and a cleaner specifically labeled as safe for composite decks to avoid any issues.
In your experience, is there a noticeable difference between using a regular household brush and a stiff-bristled deck brush for cleaning? I am wondering if it’s really necessary to buy a specific deck brush or if I can make do with what I have at home.
A stiff-bristled deck brush does make a significant difference when cleaning a deck. Regular household brushes usually have softer bristles and are less effective at removing dirt, debris, or algae from wood grain and grooves. A dedicated deck brush is designed to handle tougher outdoor grime and reach into textured surfaces, so cleaning is faster and more thorough. If your household brush is very sturdy, it might work for light cleaning, but for deep cleaning or prepping for staining, a deck brush is definitely worth considering.
If I’m planning to stain my pressure-treated wood deck for the first time, how long should I let it dry after a deep cleaning, and are there any signs that it’s ready for refinishing?
After deep cleaning your pressure-treated wood deck, wait at least 48 to 72 hours for it to dry thoroughly, though this can vary with weather conditions. The deck is ready for staining when the wood feels completely dry to the touch, shows no damp or dark patches, and water droplets no longer bead up but instead soak into the surface.
When it comes to staining or sealing the deck for weather protection, do you recommend any particular brands or applicators for best results? There are so many options at the hardware store and it gets a bit overwhelming.
For staining or sealing your deck, brands like Cabot, Behr, and Thompson’s WaterSeal are known for their durability and weather protection. As for applicators, a quality synthetic bristle brush or a stain pad with a handle gives good control and even coverage. For larger decks, a roller can help speed things up, but always use a brush for edges and railings. Choosing a reputable brand and the right applicator makes the job easier and helps the finish last longer.
When inspecting and replacing damaged boards or fasteners, are there any basic hand tools that work well for composite decking materials, or should I invest in more specialized equipment for those tasks?
For composite decking, basic hand tools like a pry bar, drill or driver, screw extractor, and a circular saw work well for most inspection and replacement tasks. Just use a drill with the correct bit to avoid stripping screws. You typically don’t need highly specialized equipment; however, a composite-specific blade for your saw can give cleaner cuts and help prevent chipping.
The article mentions the importance of having a stiff-bristled deck brush and a garden hose with an adjustable nozzle for cleaning. Are there certain cleaning solutions or detergents you recommend that are safe for both wood and composite decks without causing any damage?
For both wood and composite decks, it’s best to use a mild, biodegradable soap or a deck cleaner specifically labeled as safe for both materials. Avoid products with bleach or harsh chemicals, as they can damage finishes and harm nearby plants. Diluted dish soap mixed with water is a gentle, effective option for regular cleaning. Always spot test any cleaner in a small area before applying it to the entire deck.
When it comes to tightening hardware and checking for structural stability, are there specific tools recommended for composite decks versus wooden ones? Or do the same methods and tools apply regardless of deck material?
For most tasks like tightening hardware and checking structural stability, the same basic tools—such as a socket wrench, screwdriver set, and inspection mirror—apply to both composite and wooden decks. However, composite decks may have special fasteners or screws designed for their materials, so it’s a good idea to use manufacturer-recommended bits or drivers to avoid stripping or damaging them. Always double-check your deck’s specific hardware requirements before starting work.
You mentioned that skipping steps or using the wrong equipment can compromise both appearance and safety. Could you elaborate on common problems that come up when people use household cleaners instead of deck-specific products during routine cleaning?
Using household cleaners instead of deck-specific products can lead to several issues. Common household cleaners may contain harsh chemicals that can strip away protective finishes, cause discoloration, or even damage the wood fibers. They might also leave behind residues that make the surface slippery or attract more dirt. Over time, this can reduce your deck’s lifespan and compromise its safety by making the surface less stable or more prone to mold growth.
You mentioned that using the right set of tools can prevent safety hazards during deck maintenance. Can you give specific examples of common mistakes people make when they use the wrong tools, especially for cleaning or repairing damaged boards?
Using the wrong tools during deck maintenance can lead to injuries or further damage. For example, using a metal shovel instead of a plastic one to clear debris can gouge wood surfaces. Trying to pry up damaged boards with a screwdriver, rather than a pry bar or deck wrecker, often splits surrounding boards. Pressure washers set too high can erode the wood. Always match your tool to the job to reduce risks.
Could you share any tips for cleaning composite deck boards specifically? I noticed you mentioned pressure-treated lumber and hardwoods, but I’m curious if there are any tools or solutions that work better for composites without causing damage.
For cleaning composite deck boards, it’s important to avoid harsh chemicals and stiff wire brushes, as they can damage the surface. Use a soft-bristle brush or broom, along with a mild soap or composite deck cleaner diluted in water. A garden hose is usually enough for rinsing. If you use a pressure washer, keep it on a low setting (under 1500 psi) and hold the nozzle at least 8–12 inches from the boards to prevent surface damage.
Could you clarify how often I should be checking and tightening the hardware on my deck for structural stability? I want to avoid any issues but I’m not sure how frequent is considered best practice for routine inspections.
For most decks, it’s recommended to check and tighten the hardware at least once a year, ideally during spring or early summer. If your deck is exposed to harsh weather or heavy use, consider inspecting it twice a year. Regularly looking for loose bolts, screws, and fasteners will help catch potential issues early and keep your deck structurally sound.
As a small business owner who maintains properties, I’m wondering how often you should inspect and tighten deck hardware for structural stability. Is this something that should be done seasonally, or only after harsh weather events?
For the best structural stability, it’s a good idea to inspect and tighten deck hardware at least once every season, not just after harsh weather. Seasonal checks help catch issues like loosening due to temperature changes or regular use. After severe storms or extreme weather, do a quick inspection as well, since those events can sometimes cause unexpected damage.
If I don’t have a lot of space for extra tools at home, which cleaning essentials could I get by with for routine deck maintenance without sacrificing efficiency or safety?
You can keep deck maintenance simple and efficient with just a few essentials: a sturdy broom for sweeping debris, a medium-stiff bristle brush with a handle for scrubbing, and a bucket for mixing mild cleaning solutions. If space allows, a compact garden hose is also helpful for rinsing. These basics cover most cleaning needs without taking up much storage space or compromising safety.
If I plan on refinishing my deck, are there specific brands or types of sanding equipment you recommend for a larger surface area? I’m trying to decide between renting equipment or buying something affordable for repeat use.
For larger decks, a floor drum sander or an orbital sander is most effective. Renting a commercial-grade floor sander, like those from Clarke or Drum Sander brands, is common for big jobs and gives professional results. If you plan to refinish frequently, investing in a quality random orbital sander from brands like DeWalt, Makita, or Bosch is a good choice—look for models with variable speed and good dust collection. Renting tends to be more cost-effective for one-time projects, while buying is better for ongoing use.
For homeowners on a tight budget, are there any tools in your recommended list that can be safely skipped or substituted with household items without compromising the quality of the deck maintenance?
Yes, some specialized tools can be substituted if you’re trying to save money. For example, instead of a deck cleaning brush, you can use a stiff household broom. A garden hose can stand in for a pressure washer for basic cleaning, though it may take more effort. However, essentials like a quality sealant brush or roller shouldn’t be skipped, as they ensure even application and protection for your deck.
When checking and tightening hardware for structural stability, do you recommend any particular tools or methods for spotting hidden issues, like loose fasteners underneath the deck surface? I’m trying to figure out the best way to make sure everything is safe.
To check for hidden issues like loose fasteners under the deck surface, use a good quality flashlight and a mirror on an extendable handle to see into hard-to-reach spots. A cordless impact driver or a socket wrench will help tighten bolts and screws securely. For further safety, gently tap boards with a rubber mallet to listen for unusual sounds that might indicate loose or damaged connections you can’t see directly.
Is it really necessary to sand the deck before staining if it looks pretty smooth already, or can that step be skipped to save time? I’m trying to fit this project into a busy weekend.
If your deck already feels smooth and there’s no peeling or rough spots, you can sometimes skip sanding to save time. However, sanding helps the stain adhere better and gives a more even finish. At minimum, consider spot-sanding rough or weathered areas, especially on handrails or where old stain remains. This approach balances quality results with a busy schedule.
When it comes to routine cleaning versus preparing for refinishing, do I need to buy separate tools or are there any that can serve both purposes to help keep my costs down as a first-timer?
Many basic tools, like a sturdy brush, garden hose, or pressure washer, can be used for both routine cleaning and prepping your deck for refinishing. For example, a quality scrub brush is helpful for general cleaning and also for working deck cleaner into the wood before refinishing. Specialized tools, such as sanders or deck stain applicators, are mainly needed for refinishing, but you don’t need to invest in them unless you’re moving beyond cleaning. Renting certain equipment is also an option to save money.
For routine cleaning, do you recommend any particular type or brand of deck cleaner that works well for both composite and natural wood decks, or should I be using different products for each material?
For routine cleaning, it’s best to choose a gentle, non-abrasive deck cleaner labeled as safe for both composite and natural wood. Many all-purpose deck cleaners are suitable, but always double-check the label for compatibility. Avoid harsh chemicals or bleach, especially on composite decks. For a specific brand, Simple Green offers a deck and fence cleaner that’s effective on both materials. Always test a small area first to ensure good results.
Could you suggest which of the essential tools listed are absolutely necessary for someone on a tight budget who still wants to do a good job with routine deck maintenance? I’d like to know where it’s okay to save and where I shouldn’t compromise.
For routine deck maintenance on a budget, prioritize a sturdy broom or brush, a quality deck cleaner, a garden hose with a spray nozzle, and a basic putty knife for clearing debris. These are essential for cleaning and upkeep. You can save by borrowing or buying budget brands for items like gloves or buckets. Don’t compromise on the cleaner or brush quality, as these make the biggest difference in results.
When it comes to deck maintenance, how often should I be doing things like tightening hardware or restaining to keep everything in good shape? The article mentions routine tasks but doesn’t really talk about how frequently they need to be done.
For most decks, tightening hardware like screws and bolts should be done at least once a year to catch any loose fittings. Restaining depends on the type of stain and weather exposure—generally, every 2 to 3 years is recommended. However, if your deck gets a lot of sun or heavy use, you might need to restain a bit more often. Regular inspections every spring and fall can help you spot issues early.
If my deck has some hardware that’s starting to rust, is it better to just tighten and clean it or should I replace those fasteners entirely? What tools would I need for that process compared to regular tightening?
If the rust on your deck hardware is only surface-level, you can clean off the rust with a wire brush and tighten the fasteners. However, if the rust is significant or the fasteners are weakened, it’s safer to replace them. For cleaning and tightening, you’ll need a wire brush, rust remover, and the appropriate screwdriver or wrench. For replacement, you’ll also need new corrosion-resistant fasteners and possibly a drill or impact driver to remove and install them.
Could you clarify if there are any tools or methods you recommend for cleaning decks made from composite materials specifically? I want to make sure I don’t damage the finish or void my warranty while doing routine maintenance.
For composite decks, it’s best to use a soft-bristle brush and a mild, non-abrasive cleaner specifically labeled safe for composite materials. Avoid power washers unless your manufacturer approves them, as high pressure can damage the surface. Always check your deck’s warranty and care guidelines for recommended products and cleaning methods to ensure you don’t void the warranty.
For someone who’s new to deck maintenance, how much time should I realistically set aside for completing all the routine cleaning and inspection steps with the recommended tools, especially if my deck hasn’t been maintained in a couple years?
If your deck hasn’t been maintained for a couple of years, plan to spend around 4 to 6 hours on thorough cleaning and inspection. This includes removing debris, scrubbing the surface, rinsing, and inspecting for issues like loose boards or nails. If your deck is especially dirty or large, it may take longer. Regular annual upkeep afterward will be much quicker, typically 2 to 3 hours.
Do you have any advice on affordable but reliable brands for deck maintenance tools, particularly for small business owners who need to stick to a budget?
For affordable yet reliable deck maintenance tools, consider brands like Stanley, Husky, and Craftsman for hand tools such as scrapers and brushes. For power tools like sanders or drills, Black+Decker and Ryobi offer good quality at reasonable prices. These brands are widely available, have solid warranties, and are great for small businesses mindful of costs while still needing dependable equipment.
You mention that trying to clean or refinish a deck without the proper equipment can lead to subpar results or even safety hazards. Are there specific tools you recommend avoiding or, conversely, must-have brands that really make the process safer for beginners?
For deck maintenance, avoid using pressure washers with very high PSI—they can damage wood or cause injuries if not handled properly. Stick to electric models designed for home use. Must-have brands for beginners include Karcher and Sun Joe for pressure washers, and 3M or Honeywell for safety gear like goggles and gloves. These options are reliable, user-friendly, and help ensure a safer refinishing experience.
I noticed you mention sanding rough surfaces before refinishing. How do I know when it’s necessary to sand by hand versus using a power sander, especially for a large deck?
If your deck has just a few rough patches or tricky corners, hand sanding works well for precise control. However, for a large deck or if most boards are weathered or splintered, a power sander saves a lot of time and effort. You can use a power sander for the main surfaces and switch to hand sanding for edges, railings, and tight spots where machines can’t reach.
For a small business with a limited budget, are there any good multi-purpose tools that can cover several maintenance tasks on a deck, or do you really need specialized equipment for each stage like cleaning, sanding, and sealing?
You can definitely get by with some multi-purpose tools if you’re watching your budget. For example, a good-quality cordless drill with various attachments can help with repairs and even light sanding if you add a sanding pad. A stiff-bristled brush and a power washer (which you can often rent) are versatile for cleaning. For sealing, a paint roller with an extendable handle works well for applying finish. Specialized equipment can make certain tasks quicker, but for a small business, these multi-use tools should cover most maintenance needs efficiently.
Can you provide more detail on how often homeowners should inspect and tighten hardware for structural stability, especially in regions with extreme seasonal changes? I want to make sure I’m not overlooking this step.
For optimal structural stability, it’s recommended to inspect and tighten deck hardware at least twice a year—ideally in spring and fall. In areas with extreme seasonal changes, checking hardware quarterly is even better. Harsh weather can loosen bolts and fasteners, so regular inspections help catch issues early. Always focus on areas prone to movement, like ledger boards and support posts.
Could you give some advice on what to look for when choosing a deck brush? You mention using stiff-bristled brushes with long handles—are there specific brands or materials that work best for really stubborn algae and mildew, especially if I want to avoid damaging the wood?
For tough algae and mildew, choose a deck brush with stiff synthetic bristles, like polypropylene—they’re durable, effective, and less likely to damage wood compared to wire bristles. Long handles make scrubbing easier on your back. Brands like Unger, Libman, and Ettore are popular among homeowners. Avoid metal bristles, as they can scratch or splinter wood. Always test a small area first to ensure the brush isn’t too abrasive for your deck’s finish.
Could you provide more detail on the types of garden hose nozzles or deck brushes that are best for composite decks versus traditional wood decks? I want to avoid accidentally damaging the surface during routine cleaning.
For composite decks, choose a soft-bristle brush and a garden hose nozzle with a gentle spray setting, such as a fan or shower pattern. This helps avoid scratching the composite surface. For traditional wood decks, you can use a medium-stiffness brush for deeper cleaning, but still avoid metal bristles. Use a hose nozzle with moderate pressure—avoid jet settings for both deck types to prevent surface damage.
I noticed the article lists different tools for cleaning and maintaining decks, but do you have any recommendations on which brands or types hold up best for small business owners who might use them more frequently than the average homeowner?
For small business owners who need more durability, consider brands like DeWalt, Makita, or Milwaukee for power washers and drills, as they’re built for heavy, frequent use. For hand tools like scrub brushes and sanders, look for commercial-grade options from brands such as Wooster and 3M. These tend to last longer and stand up better to repeated projects than typical homeowner-grade tools.
When inspecting and replacing damaged boards, are there any specific fasteners or tools you’d recommend for pressure-treated lumber to prevent future corrosion or loosening?
For pressure-treated lumber, it’s best to use hot-dipped galvanized or stainless steel screws or nails, as these resist corrosion from the chemicals in the wood. A cordless drill with a driver bit makes installation much easier. For deck boards, deck-specific screws (coated for exterior use) provide better hold and reduce the risk of loosening over time compared to nails. Always avoid plain steel fasteners—they’ll corrode quickly in pressure-treated wood.
You mention using a stiff-bristled deck brush for cleaning. Are there any specific types or brands you recommend that work best on composite decking without damaging the surface?
For composite decking, it’s best to use a brush with medium to stiff synthetic bristles, such as nylon or polypropylene, since these materials are tough on grime but gentle on composite surfaces. Avoid metal bristles, as they can scratch. Brands like OXO, Quickie, and Libman offer deck brushes that are suitable for composite decks. Look for products labeled safe for composite or synthetic decking to ensure you won’t damage your deck.
You list using a deck brush with a long handle for cleaning, but what about cleaning composite decks that get mold or mildew? Are there any special tools or precautions that differ from working with pressure-treated wood?
For composite decks, it’s important to avoid stiff wire brushes, which can scratch the surface. Use a soft-bristle brush or a deck brush designed for composites. When dealing with mold or mildew, choose a cleaner specifically labeled as safe for composite materials and follow the manufacturer’s instructions. Avoid using pressure washers at high settings, as this can also damage composite boards. Always rinse thoroughly with water after cleaning.
When it comes to sanding rough surfaces to prep for refinishing, do you recommend a specific grit range for pressure-treated wood versus hardwood decks? I’ve noticed some sandpaper types seem to clog up faster when dealing with old stains or mildew.
For pressure-treated wood, start with 60-80 grit sandpaper to remove roughness and old finishes. For hardwood decks, begin with 80 grit, moving up to 100-120 grit for a smoother surface. If you’re encountering clogging due to stains or mildew, try using open-coat sandpaper, which is less likely to clog, and clean the surface thoroughly before sanding to reduce buildup.
How often should I plan to inspect and tighten the hardware on my deck for structural stability? Is there a way to tell if I’m overtightening bolts and causing damage, especially on pressure-treated lumber?
It’s best to inspect and tighten your deck hardware at least once or twice a year, ideally in spring and fall. When tightening bolts, stop as soon as you feel resistance and the connection is snug—don’t force it further, as overtightening can crush or crack pressure-treated wood. If the wood starts to compress or splinter around the bolt, that’s a sign you’ve gone too far.
For someone on a tight budget, which of these essential tools do you think are worth splurging on versus which ones can be improvised or borrowed when tackling routine deck maintenance?
If your budget is tight, prioritize spending on a good quality deck brush and a sturdy garden hose with a spray nozzle, since these get frequent use and make cleaning much easier. For occasional needs like power washers, orbital sanders, or specialized screwdrivers, it’s perfectly fine to borrow from friends or rent them from a hardware store. Many hand tools, like scrapers or putty knives, can also be improvised with household items.
For someone on a tight budget, are there any essential deck maintenance tools you think are worth splurging on versus ones that can be substituted with basic household items? I want to maintain my deck properly but not spend a fortune.
When working with a tight budget, it’s smart to prioritize a quality stiff-bristled brush and a reliable deck cleaner—these make a big difference and are worth spending a bit more on. Other items like buckets, garden hoses, and old rags can be substituted with what you already have at home. For sanding, if you can’t buy or rent a sander, hand sanding with sandpaper blocks will do the job, though it takes more effort.
After inspecting my deck, I have a few boards that seem warped but not broken. Can I use the same tools for removing and replacing these as I would for damaged boards, or is there a specific approach for this kind of issue?
You can generally use the same tools for both warped and damaged boards—such as a pry bar, drill, and screwdriver. However, warped boards may require extra effort to remove, especially if they’re tightly bent. You might need a claw hammer or additional leverage to lift them out. When installing new boards, make sure they’re straight and securely fastened to avoid future warping.
When it comes to replacing damaged boards or fasteners, do you have any recommendations for tools that are safe and easy to use for someone who doesn’t have a lot of carpentry experience?
For replacing damaged deck boards or fasteners, a cordless drill with a screwdriver bit is both safe and easy to handle for beginners. A pry bar or a deck board removal tool can help lift old boards without much force. For cutting boards, a handsaw is safer than a power saw for those with limited experience. Always remember to use gloves and safety glasses, and take your time with each step.
After finishing the regular cleaning and tightening hardware, what would be the best way to decide if my deck actually needs sanding and refinishing—or can I sometimes skip that step without risking damage?
Once your deck is clean and all hardware is secure, check the surface closely. If you notice rough, splintered, or gray wood, or if water doesn’t bead up but soaks in quickly, sanding and refinishing are likely needed. If the wood feels smooth, looks healthy, and your existing finish is intact, you can usually skip refinishing for now. Just keep monitoring these signs each season.
For someone on a tight budget, are there any essential tools from your list that can be borrowed or easily substituted with everyday household items, without compromising safety or the quality of the maintenance?
Absolutely, there are ways to save without sacrificing safety or results. Basic tools like a stiff broom, bucket, and garden hose can often be found at home and work well for cleaning. For scrubbing, an old brush or broom can substitute for a commercial deck scrubber. If you need a power washer, check if local hardware stores or neighbors have one to borrow or rent. Just make sure any substitute tools are sturdy and safe for use on wood surfaces.
If I’m on a tight budget and can’t get every tool on the list at once, which few items would you consider absolutely essential for basic cleaning and minor repairs so I can maintain my deck safely through the season?
For basic deck cleaning and minor repairs on a tight budget, start with a stiff-bristle broom for sweeping debris, a bucket with mild detergent for scrubbing, and a putty knife for removing dirt from gaps. If you have wooden boards that need a quick fix, a hammer and a handful of nails or screws are helpful. These essentials will let you handle most seasonal upkeep safely until you can invest in more specialized tools.
I’m on a pretty tight budget and wondering which of these tools are really essential to buy right away versus which ones I could borrow or possibly substitute with things I already have at home.
For essential deck maintenance, prioritize buying a stiff brush, a bucket, and protective gloves since they’re inexpensive and frequently needed. If you already have a garden hose or power washer, you can use those instead of buying new ones. Tools like orbital sanders or specialized deck cleaners can often be borrowed from friends or rented to save money. Review what you already have—many basic cleaning and scrubbing tools from your home can work.
You mention sanding rough surfaces as part of deck maintenance, but are there any specific tips for sanding older decks to avoid damaging the wood? Also, is a power sander worth buying for a one-time project, or is hand sanding usually sufficient?
When sanding older decks, use medium-grit sandpaper (like 80-grit) and avoid pressing too hard, as older wood can splinter or gouge easily. Sand in the direction of the wood grain for the best results. For a one-time project, hand sanding works for small areas but is tiring for larger decks. If your deck is big or very rough, renting a power sander might be a better investment than buying one outright.
Can you explain more about the best way to inspect and tighten hardware for structural stability? I’m not sure what tools are safest to use for this step or how often I should check these fasteners.
Inspecting and tightening deck hardware is important for safety. Use a socket wrench or adjustable wrench to check bolts and nuts, and a screwdriver for screws. Visually inspect for rust, corrosion, or loose fasteners under and around the deck. Carefully tighten anything that’s loose, but avoid overtightening, which can damage wood. It’s wise to check hardware at least once or twice a year, especially after winter or heavy storms.
I see you mention using a stiff-bristled deck brush and a garden hose with an adjustable nozzle for cleaning. Is it safe to use a pressure washer on all types of decking materials, or could it damage certain wood or composite boards?
A pressure washer can be too harsh for some decking materials, especially softer woods like cedar or older boards, as the force can splinter wood or strip away protective finishes. Composite decking can also be damaged if the pressure is too high or the nozzle is too close. If you use a pressure washer, keep the pressure below 1,500 psi, use a fan tip, and always test on a small area first.
For someone who’s never refinished a deck before, about how much time should I set aside for the entire maintenance process, from cleaning and repairs to staining or sealing?
For a first-time deck refinisher, it’s wise to plan for a full weekend or about two to three days. Cleaning and minor repairs usually take a day, but if your deck needs more work, add extra time. Staining or sealing requires drying time between coats, so factor in another day for that. Weather and deck size can also affect your timeline.
Could you elaborate on how often I should be doing each maintenance task, like cleaning and tightening hardware? I’m trying to figure out a practical schedule for deck upkeep so I don’t end up skipping important steps.
Absolutely! For most decks, a thorough cleaning should be done at least once a year, ideally in spring. Hardware like bolts and screws should be inspected and tightened every six months. Spot-cleaning stains or debris is good to do as needed. Sealing or staining is usually necessary every 2-3 years, depending on weather exposure. Setting calendar reminders for these tasks can help you stay on track.
When replacing damaged boards or fasteners, do you recommend any specific brands or types of tools for someone who’s just starting out and doesn’t already own a lot of equipment?
For beginners, I recommend starting with basic but reliable brands like Stanley or Craftsman for hand tools such as hammers, pry bars, and screwdrivers. For power tools like drills or impact drivers, DeWalt and Black+Decker offer user-friendly models at reasonable prices. Look for cordless options—they’re more convenient for deck work. Make sure to get a quality tape measure and a safety set with gloves and eyewear, too.
When it comes to checking and tightening hardware for structural stability, is there a particular toolkit or type of wrench that tends to work best for most deck fasteners?
For most deck fasteners, a standard socket wrench set is very effective since deck bolts and nuts are usually common sizes. Having both metric and standard sockets is helpful. An adjustable wrench is also useful for odd sizes. For screws, a cordless drill with a variety of screwdriver bits (like Phillips and square drive) makes tightening much easier. This combination should cover most hardware you’ll encounter.
I noticed you mentioned using a stiff-bristled deck brush for cleaning. Is there a specific type or brand you recommend for bigger decks, or would a pressure washer be more efficient for larger surfaces?
For larger decks, a deck brush with a long handle and stiff synthetic bristles works well, especially for scrubbing tough spots. Brands like OXO or Libman are reliable, but durability and comfort in handling matter most. However, if your deck is quite large, a pressure washer can save time and effort—just be sure to use a low-pressure setting to avoid damaging the wood. Either option works, but pressure washers are usually more efficient for big surfaces.
You mentioned inspecting and replacing damaged fasteners as part of regular maintenance. Are there specific types or brands of fasteners that hold up better in regions with extreme weather, or should I stick with what’s already used on my deck?
In regions with extreme weather, it’s wise to consider upgrading to stainless steel or coated fasteners, as they resist rust and corrosion much better than standard ones. Brands like Simpson Strong-Tie and GRK are often recommended for their durability. Matching what’s already on your deck is okay if those are weather-resistant, but switching to higher-grade fasteners can help extend your deck’s lifespan.
For someone who has never done deck maintenance before, which of these essential tools would you recommend starting with on a tight budget? Are there any good substitutes for expensive equipment, especially for things like sanding or cleaning?
If you’re new to deck maintenance and watching your budget, start with the basics: a stiff brush, a bucket, and a garden hose for cleaning. For sanding, you don’t need a power sander—manual sanding blocks with medium-grit sandpaper work well for small areas. Instead of specialized deck cleaners, a mild soap and water mixture often does the trick. This approach keeps costs down but still helps you achieve good results.
For those of us on a budget, which of the essential tools do you feel are truly non-negotiable for safe DIY deck upkeep, and which ones can be improvised with things most people already have at home?
For safe DIY deck upkeep, non-negotiable tools include a sturdy broom for sweeping debris, a stiff brush for scrubbing, and protective gloves to avoid splinters or chemical exposure. If you don’t have a power washer, a regular garden hose with a spray nozzle works for rinsing. For minor repairs, a basic hammer and screwdriver are usually sufficient, and you can often use an old paintbrush for applying sealant instead of buying specialized applicators.
For deck cleaning, you mention using a stiff-bristled brush and a garden hose, but do you find a pressure washer is really necessary for stubborn mildew, or can it damage softer woods? I’m trying to avoid splintering on my older cedar boards.
A pressure washer can be helpful for tough mildew, but with older cedar or softer woods, it can easily cause splintering or surface damage if the pressure is too high or held too close. For your situation, stick with a stiff-bristled brush, a gentle wood cleaner, and a standard garden hose. This approach is safer for delicate boards and still effective if you scrub thoroughly.
When inspecting and replacing damaged boards, do I need any special tools beyond the basics, or is a drill and a hammer enough? I have pressure-treated lumber. Also, how do I know if the fasteners I pick are right for outdoor decks?
For most board replacements on a pressure-treated deck, a drill and hammer are usually sufficient if you’re just removing and installing boards. However, a pry bar can make removing old boards easier, and a circular saw might help if you need to cut boards to size. When choosing fasteners, look for ones labeled as suitable for exterior or deck use, specifically hot-dipped galvanized or stainless steel. These will resist corrosion from weather and the chemicals in pressure-treated wood.
You mentioned the importance of inspecting and replacing damaged boards or fasteners. How can I tell if a board or fastener really needs to be replaced, or if it’s still okay to use after cleaning?
Look for signs like deep cracks, splintering, soft spots, or rot in your deck boards—these usually mean replacement is needed. For fasteners, check for rust, bending, or if they’re loose and can’t be tightened. If a board or fastener stays solid and secure after cleaning, and shows no severe damage, it’s likely fine to keep using.
The article mentions sanding before refinishing—how do I know when sanding is necessary versus just cleaning and sealing? Is there a specific way to assess if my deck needs the extra step?
To decide if sanding is needed, check your deck’s surface for rough spots, splinters, peeling finish, or stubborn stains that don’t come off with cleaning. If the wood feels uneven or the old finish isn’t coming off properly, sanding will help ensure a smooth, clean surface for the new sealant. If your deck is still smooth and the finish looks intact after cleaning, you can usually skip sanding.
For a small business owner like me with limited time, which deck maintenance tasks would you recommend prioritizing each season? I want to make sure I’m not skipping something essential that could end up being costly down the road.
For each season, focus on cleaning your deck thoroughly to prevent dirt buildup and mildew. Inspect for loose boards, nails, or screws and fix them right away. In spring or early summer, check for any needed sealing or staining, as protecting the wood can prevent costly repairs later. Fall is a good time to clear debris from between boards and around the deck to reduce moisture damage. Prioritizing these tasks will help avoid major issues and save you time and money in the long run.
If I’m just starting out and don’t have any of the tools mentioned yet, which ones should I prioritize buying on a tight budget? Can any of the basic cleaning supplies double for other deck tasks, or are there certain things I shouldn’t skip?
If you’re just starting out, prioritize a stiff-bristle broom, a bucket, and a good scrub brush—these basics handle most cleaning and basic prep. Mild soap or deck cleaner is also important. Many cleaning tools can double up; for example, a scrub brush can be used both for cleaning and for applying cleaner. However, don’t skip safety gear like gloves and eye protection, as those are essential even for basic tasks.
When it comes to sanding rough surfaces before refinishing, are there specific types or brands of sanders you suggest for decks that are especially weathered, or is a standard hand sander effective enough?
For especially weathered decks, a standard hand sander can be quite labor-intensive and may not give you the best results. An orbital or random orbit sander is usually more effective for large deck surfaces, as it covers more area and smooths out rough spots efficiently. For very uneven or splintered boards, a belt sander can help tackle the toughest areas. Look for reputable brands like DeWalt, Makita, or Bosch, which are known for sturdy, reliable sanders.
If I’m just getting started and want to stick to a tight budget, which of the essential tools from your list are the most critical for routine cleaning and maintenance? I’m hoping to avoid buying anything that’s not absolutely necessary at first.
For basic deck cleaning and maintenance on a tight budget, focus on a sturdy broom, a good scrub brush, and a garden hose. These three essentials will help you sweep debris, scrub surfaces, and rinse everything down. You can add specialized tools later, but these basics are enough to handle most routine upkeep tasks effectively.
After sanding and before staining or sealing, is it necessary to use any particular cleaners or solutions to prep the wood? I want to make sure I don’t miss any steps that could affect how well the stain or sealant adheres.
Yes, after sanding, it’s a good idea to clean the wood thoroughly before applying stain or sealant. Use a deck cleaner or a wood brightener to remove any dust, oils, and sanding residue. Rinse the surface well and let it dry completely. This step helps ensure that the stain or sealant adheres properly and gives you a longer-lasting finish.
When it comes to routine maintenance, how often should I actually be scrubbing and rinsing my deck each year if I live in a humid climate where mildew is a big issue?
In a humid climate where mildew is a frequent problem, it’s best to scrub and rinse your deck at least two to three times a year. Early spring and late summer are good times, but you may need to clean more often if you notice mildew buildup. Regular cleaning helps prevent moisture-related damage and keeps your deck looking its best.
Could you provide more detail on how to differentiate between cleaning methods or products for pressure-treated lumber versus composite decking? I want to make sure I’m not using anything that could damage my composite boards during routine cleaning.
For pressure-treated lumber, you can use wood cleaners and even mild bleach solutions, but these are too harsh for composite decking and can cause fading or surface damage. For composite boards, stick to cleaners specifically labeled for composites, and avoid anything with chlorine bleach or harsh solvents. Always use a soft-bristle brush for composites instead of stiff brushes, and rinse thoroughly with water to prevent residue buildup.
In your guide, you mention using a stiff-bristled deck brush for cleaning. Is there a specific bristle type or brand you recommend for composite decks versus pressure-treated wood, or are they interchangeable?
For composite decks, it’s best to use a soft to medium-stiff nylon bristle brush to avoid scratching the surface. Pressure-treated wood can handle a stiffer bristle, such as polypropylene or natural fiber. While some brushes are marketed as universal, choosing based on your deck material helps protect its finish. Brands like OXO and Quickie offer good options, but always check that the brush is labeled safe for your deck type.
If my deck has a lot of tight spaces and corners, are there any specific brushes or attachments you would recommend to make cleaning those areas easier, or should I just stick with the standard stiff-bristled deck brush mentioned here?
For tight spaces and corners, you might find small detail brushes or angled scrub brushes especially useful. These are designed to reach spots that a standard stiff-bristled deck brush can miss. Some people also use scrub pads or brushes with narrow heads and long handles for better access. Using a combination of these tools can make cleaning your deck’s corners and tight spots much easier.
If I am on a tight budget, are there any essential deck cleaning tools that you would suggest could be skipped or replaced with household alternatives without compromising safety or results?
You can definitely keep costs down by using some common household items. Instead of buying a special deck brush, a stiff broom can work well for scrubbing. For cleaning solutions, a mix of warm water and mild dish soap is a safe, effective substitute for commercial cleaners. Just be sure any tools you use are sturdy enough to handle outdoor surfaces for thorough cleaning.
I noticed you mention both stiff-bristled deck brushes and pressure washers for cleaning decks. Is there a risk of damaging softer woods like cedar if I use a pressure washer, and how do I decide which method is safer for different deck materials?
Pressure washers can indeed damage softer woods like cedar if used with high pressure or the wrong nozzle. For cedar or similar softwoods, it’s safer to use a stiff-bristled deck brush and gentle cleaner. If you prefer a pressure washer, use a wide-angle nozzle (like 40 degrees) and keep the pressure low—ideally under 1,500 PSI—to reduce the risk. For harder woods or composite decks, pressure washing is usually less risky, but always start with a test spot.
The article mentions inspecting and replacing fasteners, but how do I know what type or size of fasteners are best for my deck? Are there specific ones recommended for pressure-treated lumber versus composite?
To choose the right fasteners, check what your deck boards are made of. For pressure-treated lumber, use hot-dipped galvanized or stainless steel screws or nails to prevent rust and corrosion. For composite decking, go with screws specifically designed for composite materials, as they help prevent mushrooming and splitting. If in doubt, consult your deck’s manufacturer or a local hardware store for recommendations based on your deck type.
You mention both sanding and staining as important steps. If my deck is on the older side and hasn’t been maintained regularly, should I prioritize sanding every board first, or are there situations where it’s better to spot-sand only the damaged areas?
For an older deck that hasn’t been maintained regularly, it’s usually best to sand every board. This ensures a smooth, even surface for staining and helps remove old finishes, splinters, and rough spots. However, if most boards are still in decent shape, you can spot-sand only the damaged or heavily weathered areas. Assess your deck: if roughness or peeling is widespread, full sanding is worth the effort; if issues are minor and isolated, spot-sanding will suffice.
About how often should I be doing the full routine of cleaning, sanding, and sealing on a pressure-treated deck? I don’t want to go overboard, but I also don’t want to let things go too long and run into bigger repair issues.
For a pressure-treated deck, a full routine of cleaning, sanding, and sealing is usually recommended every 2 to 3 years. Light cleaning can be done more frequently, about once or twice a year. If your deck gets a lot of sun or moisture, check the wood’s condition annually and touch up as needed to avoid letting problems develop.
When it comes to replacing damaged boards or fasteners, do I need any specialized tools beyond a standard drill and screwdriver, or are there certain tools recommended for composite versus wood decks?
For basic repairs like replacing boards or fasteners, a standard drill and screwdriver will handle most tasks. However, if you’re working with composite decking, a saw with a fine-toothed blade is recommended for cleaner cuts, and you may need special fasteners designed for composites. For wood decks, a pry bar can help remove old boards, and a countersink bit is useful for a smooth finish on screws.
When it comes to sanding rough surfaces on a deck, is there a preferred grit of sandpaper or type of sander that works best for pressure-treated lumber versus hardwoods?
For pressure-treated lumber, start with a medium grit sandpaper, like 80-grit, to smooth rough areas, then finish with 120-grit for a finer surface. For hardwood decks, you may want to begin with 60-grit if there’s a lot of roughness, then go up to 120-150 grit for a smoother finish. An orbital or random orbital sander works well for both types of wood, providing even results without leaving swirl marks.
When it comes to cleaning composite deck boards, do the same stiff-bristled brushes recommended here work, or is there a risk of scratching the surface? I want to avoid damaging the finish on newer composite decking.
For composite deck boards, it’s better to avoid stiff-bristled brushes, as they can scratch or dull the surface. Instead, use a soft-bristled brush or a mop specifically designed for composite materials. These will clean effectively without damaging the finish. Always check the manufacturer’s recommendations for cleaning products or tools to ensure you protect your deck’s appearance.
If I have a composite deck instead of wood, should I use a different type of brush or cleaning solution than what’s listed here? I want to make sure I don’t damage the material during routine cleaning.
For composite decks, it’s important to use a soft-bristle brush instead of a stiff one to avoid scratching the surface. Also, choose a cleaning solution specifically designed for composite materials rather than wood cleaners, which can be too harsh. Avoid anything with bleach or strong solvents, and always follow the manufacturer’s care recommendations for your deck.
When inspecting and replacing damaged boards or fasteners, is there a certain tool that makes removal easier without damaging the surrounding wood? I sometimes struggle prying old boards out and would love some tips.
A deck board removal tool, often called a deck wrecker or board lifter, makes pulling out old boards much easier and minimizes damage to surrounding wood. These leverage under the board and distribute force more evenly than standard pry bars. For fasteners, a screw extractor or a drill with a bit specifically sized for deck screws helps back them out cleanly. Work slowly and protect nearby boards with a thin piece of scrap wood when prying for added safety.
When inspecting and replacing damaged boards, do I need any specialized tools beyond a drill or screwdriver? I’d love tips on making this repair step as straightforward as possible for a DIYer.
For most deck board replacements, a drill or screwdriver will handle the majority of the work, but having a pry bar or flat crowbar makes removing old boards much easier. A circular saw is also helpful if you need to trim replacement boards to size. Use a measuring tape for accuracy, and wear gloves to protect your hands. Mark replacement boards before cutting and pre-drill screw holes to prevent wood splitting—this keeps the repair simple and neat.
When inspecting and replacing damaged boards or fasteners, do you recommend any specific hand or power tools for composite decks versus traditional wood decks, or is there a universal toolkit that works for both?
For most deck inspections and repairs, a basic toolkit—like a pry bar, hammer, drill/driver, and screws—works for both wood and composite decks. However, when working with composite boards, it’s ideal to use a drill/driver with adjustable torque and composite-specific screws to avoid damaging the material. For wood decks, standard decking screws and a circular saw or handsaw are often sufficient. A universal toolkit covers many needs, but a few material-specific items make the job easier and help prevent damage.
When inspecting and tightening hardware for structural stability, do you recommend any particular types of tools or brands that make the job easier for someone who hasn’t done much deck work before?
For checking and tightening deck hardware, a basic ratcheting socket set and a cordless drill with screwdriver bits are very handy for beginners. Brands like DEWALT, Stanley, and Craftsman make user-friendly tools that are reliable and widely available. Look for sets that include various socket sizes and bits to match the different fasteners on your deck. Using a torque wrench can also help you avoid over-tightening bolts and screws.
I noticed you mention using a stiff-bristled deck brush for cleaning. Is there a big difference in results between that and using a pressure washer for regular maintenance, especially with composite decking?
A stiff-bristled deck brush is gentle and effective for regular cleaning, especially on composite decking where using too much force can cause damage. Pressure washers can be tempting for quicker cleaning, but if used with high pressure or incorrect technique, they can etch or even void the warranty on composite boards. For routine maintenance, a brush is generally safer and still gets great results without risking surface damage.
If my budget is pretty limited, which tools from your list are essential to buy first so I can get started with basic deck maintenance, and which ones can I wait to purchase later without compromising results?
For basic deck maintenance on a tight budget, start with a sturdy broom, a scrub brush, and a garden hose or bucket for rinsing—these will let you handle cleaning and surface prep effectively. You can wait to invest in power washers, sanders, or specialized stain applicators until you’re ready for deeper cleaning or refinishing, as they’re helpful but not immediately essential.
You mentioned tightening hardware for structural stability—are there specific tools or types of fasteners that hold up better over time in humid climates, or should I always plan to replace them during regular maintenance?
In humid climates, stainless steel or coated galvanized fasteners are best because they resist rust and corrosion far better than regular steel. Use a quality ratchet set or impact driver for tightening. If your fasteners show signs of rust or wear during inspections, it’s wise to replace them right away to maintain deck safety and longevity—you may not need to replace all regularly, just those that show issues.
For someone on a budget, which of these essential deck maintenance tools do you feel are worth investing in versus renting or borrowing for the less frequent tasks like sanding or deep cleaning?
For budget-conscious homeowners, it’s smart to invest in essentials you’ll use regularly, such as a sturdy broom, a basic scrub brush, a garden hose with spray nozzle, and a good deck cleaner. Tools like a power washer or a floor sander, which are needed only occasionally for deep cleaning or sanding, are better to rent or borrow to save money and storage space.
When it comes to replacing damaged boards on a pressure-treated deck, are there any specialized tools recommended beyond a standard drill and pry bar? I want to make sure I’m not missing something essential for safe and efficient removal and installation.
For replacing damaged boards on a pressure-treated deck, in addition to a drill and pry bar, it’s helpful to have a circular saw for cutting boards to length, a countersink bit for screw heads, and a cat’s paw or nail puller for stubborn fasteners. Wearing work gloves and safety glasses is also important for safety. A chalk line can help you keep your board placement straight during installation.
I see you mention using a stiff-bristled deck brush for cleaning, but is there a type or brand you recommend for pressure-treated lumber that won’t cause any damage? Also, do you have any tips for cleaning in between narrow deck boards?
For pressure-treated lumber, choose a deck brush with medium to stiff synthetic bristles—these clean well without scratching the wood. Brands like Libman and Quickie offer reliable options. For cleaning between narrow deck boards, try using a putty knife or a thin, flexible brush to dislodge debris. You can also use a shop vacuum with a crevice tool to remove dirt from tight spaces after brushing.
If I’m mostly interested in sealing and staining my deck on a budget, which tools would be essential to buy outright and which could I consider renting or borrowing to keep costs down?
For sealing and staining on a budget, it’s smart to buy essential items like a quality brush, roller, paint tray, and safety gear since you’ll need these for any future touch-ups. You can consider renting or borrowing larger tools like a pressure washer for cleaning the deck beforehand or a power sander if your deck needs smoothing. This approach keeps costs low while ensuring good results.
I noticed you mentioned using a stiff-bristled deck brush for cleaning, but I have a composite deck and I’m worried about scratching the surface. Are there specific brushes or cleaning tools you recommend for composite materials to prevent damage?
For composite decks, it’s best to avoid stiff-bristled brushes, as they can scratch the surface. Instead, use a soft-bristled brush or a brush specifically labeled as safe for composite decking. You can also use a microfiber mop or a non-abrasive sponge for gentle cleaning. Always check your deck manufacturer’s care instructions for recommended tools to ensure you don’t void your warranty or damage the material.
When checking and tightening hardware for structural stability, are there any signs a homeowner should look for that might indicate a bigger issue than just loose screws or bolts? I want to make sure I don’t miss something serious during my routine maintenance.
Absolutely, it’s smart to look beyond just loose screws or bolts. Watch for signs like cracked or rotting wood around the fasteners, rust or corrosion on metal parts, fasteners that won’t tighten properly, or any noticeable sagging, shifting, or separation in the deck’s structure. If you notice these issues, it could signal underlying damage, and it may be best to consult a professional for further inspection.
For homeowners on a budget, are there specific tools from your essential list that can be borrowed or rented rather than purchased outright for periodic maintenance tasks like refinishing or board replacement?
Yes, several essential tools for deck maintenance can be borrowed or rented to help save costs. For periodic tasks like refinishing or board replacement, consider renting or borrowing a power washer, orbital sander, circular saw, or even a drill if you don’t use one often. Local hardware stores, tool libraries, or community groups are great places to look for these options, making it easier to keep your deck in shape without large upfront expenses.
I noticed you mention using a stiff-bristled deck brush for cleaning. Is there a specific type or brand you would recommend for pressure-treated lumber, or are most deck brushes pretty similar? Also, does the handle length really make a big difference when doing a full deck clean?
For pressure-treated lumber, most stiff-bristled deck brushes work well, but look for ones labeled as suitable for outdoor or deck cleaning. Brushes with synthetic bristles tend to last longer and handle moisture better. As for handle length, a longer handle definitely helps reduce back strain and makes cleaning large areas much easier, so it’s worth considering for a full deck clean.
When inspecting and replacing damaged boards or fasteners, are there any specific tools you recommend for working with composite decks versus pressure-treated wood? I want to make sure I’m not using something that could accidentally damage the material.
For composite decks, it’s best to use non-marring pry bars or plastic scrapers to avoid scratching the boards, and stainless steel fasteners specifically rated for composites. Avoid metal tools with sharp edges that could gouge the surface. For pressure-treated wood, standard pry bars, hammers, and coated decking screws or nails are fine. Always pre-drill composite boards before fastening to prevent cracking, and use a torque-limited drill to avoid over-tightening.
If I’m on a tight budget, which of the essential deck maintenance tools could I safely skip or substitute with something cheaper, and which ones are absolutely critical for both safety and effective results?
For deck maintenance on a budget, you can often substitute a pressure washer with a stiff-bristle brush and hose—it takes more effort, but it works. However, safety gear like gloves, goggles, and non-slip footwear are crucial and shouldn’t be skipped. A basic hammer, screwdriver, and quality deck cleaner are also essential for safe and effective results.
When you mention using a stiff-bristled deck brush for cleaning, is there a difference between synthetic and natural bristles in terms of cleaning effectiveness or durability, especially for composite versus wood decks?
Synthetic bristles tend to be more durable and resistant to chemicals and moisture, making them ideal for both wood and composite decks, especially when using cleaners. Natural bristles can break down faster and may not hold up as well with water or strong cleaners. For composite decks, synthetic brushes are usually recommended, while either type can work on wood, though synthetic still lasts longer.
For a small business trying to keep expenses in check, are there any tools on the essential list that you feel can be rented or substituted with what we might already have, instead of buying everything new?
Absolutely, you can control costs by renting certain tools like power washers or floor sanders, which are typically used infrequently for deck maintenance. For basic items such as brushes, buckets, and protective gear, you may already have suitable versions on hand. Many hand tools, like screwdrivers or hammers, are also common in most toolkits and don’t require new purchases unless yours are worn out.
If I have both hardwood and composite boards on my deck, would I need different brushes or cleaning solutions for each surface, or can I use the same equipment for the whole area?
You’ll want to use different cleaning solutions for hardwood and composite boards, since each material has unique care requirements. For hardwood, stick to wood-specific cleaners, while composite surfaces need gentle, non-abrasive cleaners labeled safe for composites. As for brushes, a soft-bristle brush works well for both surfaces, but avoid anything too stiff on composite boards to prevent scratching.
Once I’ve cleaned and inspected my deck, how long should I wait before moving on to sanding and applying a stain or sealer? Are there specific signs I should look for to make sure the surface is ready for refinishing?
After cleaning your deck, let it dry completely before sanding or applying stain or sealer. This usually takes 24 to 48 hours, but humid or cool weather may require more time. Make sure the wood feels dry to the touch, shows no visible dampness, and doesn’t bead water on the surface. Any remaining moisture can prevent stains or sealers from adhering properly, so waiting until the deck is fully dry is important.
When it comes to routine cleaning, you mention using a stiff-bristled deck brush and a garden hose. For stubborn mildew or algae, is it advisable to use a pressure washer, or could that damage pressure-treated wood or composite decking?
A pressure washer can help remove stubborn mildew or algae, but you need to use it with care. For pressure-treated wood, use a low-pressure setting (under 1500 PSI) and keep the nozzle at least a foot from the surface to avoid splintering or gouging the wood. With composite decking, check the manufacturer’s guidelines, as too much pressure can cause surface damage or void warranties. Often, scrubbing with a deck cleaner and brush is safer for composites.
If I’m on a tight budget, are there essential deck maintenance tools that are absolutely necessary to buy, or can some of these tasks be completed effectively with common household items instead?
You can definitely handle some deck maintenance tasks using common household items. For example, a stiff broom or brush, bucket, and mild soap work well for basic cleaning. However, for more thorough jobs like sanding or sealing, it’s best to have a quality sander and a paintbrush or roller. If you don’t want to buy these, consider borrowing or renting them. Focus on the basics first and upgrade tools only when needed.
If I want to do routine cleaning and some minor repairs without spending too much upfront, which tools from your list are absolutely necessary versus nice to have? I’m on a tight budget starting out and want to prioritize.
For basic deck cleaning and minor repairs on a budget, focus on a stiff-bristle brush, a garden hose or bucket, a putty knife, and a screwdriver. These essentials let you clean, clear debris between boards, and tighten or replace screws. Tools like power washers, specialty cleaners, and orbital sanders are useful but not vital for simple upkeep when starting out.
For someone who’s new to this, how do you know if you’ve sanded enough before applying stain or sealant? Are there signs I should look out for so I don’t overdo it or miss spots?
To know if you’ve sanded enough, run your hand over the deck surface—it should feel smooth and even, without any rough patches or splinters. Visually, the wood should look consistent in color and texture. Avoid over-sanding, which can gouge the wood or create uneven spots. If you notice shiny, unsanded patches, give those areas a bit more attention before moving on to staining or sealing.
For homeowners on a tight budget, are there any common household alternatives to some of the specialized cleaning tools mentioned, or are the recommended items truly essential for getting good results and avoiding damage?
You can definitely substitute some specialized deck cleaning tools with common household items if needed. For example, a stiff-bristled broom can often replace a deck brush, and a garden hose with a spray nozzle can stand in for a pressure washer on gentler jobs. Just be cautious with metal tools, as they might scratch wood surfaces. While specialized tools can make the job easier and faster, careful work with household alternatives can still yield good results without risking damage.
When it comes to sanding rough surfaces before refinishing, is it better to use a power sander or can hand sanding be just as effective for a small deck? I’m trying to figure out what’s worth the investment.
For a small deck, hand sanding can be effective, especially for touch-ups or smoothing small areas. However, a power sander makes the job faster and more consistent, particularly if you have several rough spots or want a really smooth finish. If you only plan to do this occasionally and your deck is quite small, hand sanding is usually sufficient. For bigger projects or repeated maintenance, investing in a power sander could save you a lot of time and effort.
When it comes to sanding rough spots before restaining, are there specific types of sanders or grit levels you recommend for homeowners who have mostly pressure-treated lumber decks?
For sanding rough spots on pressure-treated lumber decks, an orbital sander is usually the best choice, as it’s easy to control and effective on large surfaces. Start with 60- or 80-grit sandpaper to smooth out rough patches, then move to 100-grit for a finer finish before restaining. Avoid very fine grits, as they can close the wood grain and reduce stain absorption.
I noticed you mentioned using a stiff-bristled deck brush and an adjustable garden hose for cleaning. Is there a particular cleaning solution that works best for removing mildew without damaging either pressure-treated wood or composite decking?
For removing mildew from both pressure-treated wood and composite decking, a mild, oxygen-based cleaner is usually the safest choice. Look for products labeled as deck cleaners that contain sodium percarbonate. Avoid chlorine bleach, as it can damage wood fibers and lighten composite colors. Mix the cleaner according to the instructions, scrub with your stiff-bristled brush, and rinse thoroughly with your adjustable hose.
When it comes to replacing damaged boards, does the guide suggest any particular type of saw or removal tool for composite decking versus pressure-treated lumber? I want to make sure I invest in the right equipment for my specific deck material.
The guide highlights that for pressure-treated lumber, a standard circular saw and a pry bar are usually sufficient for removing and cutting boards. For composite decking, it recommends using a saw with a fine-toothed carbide blade to ensure clean cuts, as well as a specialized deck board removal tool to avoid damaging surrounding boards. Choosing tools designed for your specific material will help make the job easier and protect your deck.
You mention inspecting and replacing damaged boards or fasteners as part of regular maintenance. How do I tell if a fastener needs replacing, and are there signs of damage I should look for that might not be obvious to a beginner?
To check if a fastener needs replacing, look for rust, corrosion, or if it’s loose and won’t tighten. Fasteners that pop up above the board surface or leave streaks on the wood may also be failing. Less obvious signs include squeaky boards, slight movement when walking on the deck, or boards that seem to lift at the ends. Regularly walk across your deck and pay attention to any areas that feel unstable or make unusual noises.
How much should I expect to budget for assembling all these essential tools if I’m starting from scratch? I’d like to keep costs reasonable but don’t want to skimp on quality if it would affect safety or results.
If you’re starting from scratch, budgeting $200–$400 is reasonable for quality deck maintenance tools. This range covers essentials like a power washer, safety gear, brushes, a sander, and quality cleaning products. Prioritize reputable brands for items like the sander and protective equipment to ensure safety and durability. You can sometimes save by renting larger tools like power washers if you only use them occasionally.
You mention using a stiff-bristled deck brush for cleaning, but I’m not sure if there’s a certain type or brand that works better for composite decks versus wood decks. Are there different brushes I should look for depending on my deck material?
Yes, the type of brush matters based on your deck material. For wood decks, a stiff-bristled brush (often with natural or synthetic bristles) works well to remove dirt and mildew. For composite decks, choose a softer-bristled brush to avoid scratching the surface—look for brushes labeled safe for composites. Avoid metal bristles on both types, as they can damage the finish.
When it comes to replacing damaged deck boards, should I invest in any specific tools beyond the basics listed here, like a circular saw or nail puller, or will a hammer and pry bar get the job done safely for most repairs?
For most basic deck board replacements, a hammer and pry bar will usually be enough to remove damaged boards safely. However, if you need to cut new boards to size or trim ends, a circular saw is very helpful for accuracy and clean edges. A nail puller or cat’s paw can also make removing stubborn nails much easier. Consider these extras if you want the process to be smoother and more efficient.
When it comes to replacing damaged boards or fasteners, do you recommend any specific tools for composite decking versus pressure-treated lumber, or are the essential tools pretty much the same for all materials?
The essential tools for replacing boards or fasteners—like a cordless drill, pry bar, and screwdriver—are similar for both composite decking and pressure-treated lumber. However, with composite decking, it’s best to use fasteners and blades specifically designed for composites to avoid chipping or damaging the material. Always check the manufacturer’s guidelines for recommended tools and fasteners for composite boards.
For a homeowner assembling a deck maintenance toolkit for the first time, which items would you consider absolutely essential to buy upfront, and which can be added later as needed? I’m trying to stick to a budget but don’t want to overlook anything critical.
For essential deck maintenance, start with a stiff-bristle brush, a garden hose or pressure washer, a putty knife for debris, protective gloves, and a basic screwdriver set. These will handle most cleaning and minor repairs. Items like a power sander, specialized cleaning solutions, or a deck stain applicator can be bought later if you decide on more intensive upkeep or refinishing projects.
For beginners, how much should I budget for all these essential tools if I’m starting from scratch, and are there any items that can be safely skipped or borrowed to save money without compromising safety?
If you’re starting from scratch, budgeting around $200–$350 should cover the basics like a power washer, safety goggles, gloves, a deck brush, and sander. Some pricier tools, like a power washer or orbital sander, can be rented or borrowed to save money. Don’t skip safety gear—goggles, gloves, and masks are essential. You might be able to skip specialty cleaners if you already have mild soap and a sturdy brush at home.
You listed sanding rough surfaces as a key maintenance step. For someone who’s never used a sander before, do you recommend starting with a hand sander or investing in an electric one? Also, how do I know what grit of sandpaper to use for preparing the deck for staining?
If you’re new to sanding, an electric sander is much easier and faster for deck-sized areas than a hand sander, so it’s worth the investment—even a basic orbital sander works well. For preparing your deck for staining, start with 60-80 grit sandpaper to smooth out roughness without over-polishing the wood. Avoid going finer than 100 grit, as that can make it harder for the stain to absorb properly.
For someone on a budget who’s just starting out, are there any tools from your list that could be rented instead of purchased, especially for sanding or refinishing? Or should certain things always be bought for safety or effectiveness?
For budget-conscious beginners, renting larger or more expensive tools like a power sander is a smart move since these aren’t used often and can be costly. Essential safety gear such as gloves, goggles, and dust masks should always be purchased to ensure proper fit and hygiene. Simple hand tools, like brushes and scrapers, are affordable and handy to own.
For someone who’s just starting out and has to buy most of these tools, are there budget-friendly alternatives that still get the job done safely, or are there certain tools you’d recommend not skimping on?
For beginners, some budget-friendly tools like basic scrub brushes, manual screwdrivers, and a standard garden hose can work well. However, for safety and efficiency, it’s best not to cut corners on protective gear such as gloves and safety glasses, and a decent power drill for secure fastenings. Investing in quality for these essentials helps avoid accidents and frustration, while other tools can be more basic to start.
How often should I plan to check and tighten hardware on a typical deck? Is this something I can easily work into seasonal cleaning tasks, or does it require a separate set of tools and more extensive inspection?
It’s recommended to check and tighten deck hardware at least once or twice a year, often during spring and fall. You can easily include this with your seasonal cleaning, as it usually just requires simple hand tools like a screwdriver and wrench. A thorough inspection might take a bit more time, but it’s manageable for most homeowners and helps keep your deck safe and sturdy.