
Introduction: Why Budgeting for Basement Waterproofing Matters
Basement waterproofing is often overlooked until water seepage, mold, or musty odors make the problem impossible to ignore. Yet, investing in basement waterproofing does far more than keep your lower level dry—it protects your foundation, preserves property value, and safeguards your family’s health. But how much should you budget for a reliable waterproofing job, and what should you expect to pay for materials, labor, and potential hidden costs? Many homeowners are surprised by the range of options and expenses involved. In this comprehensive guide, we’ll break down all the critical cost factors, from DIY solutions to professional systems, and address common budgeting mistakes. Whether you’re facing mild dampness or chronic flooding, understanding the true costs of basement waterproofing will help you make informed decisions and avoid unpleasant financial surprises down the road.
Understanding Basement Waterproofing: The Basics
What Is Basement Waterproofing?
Basement waterproofing refers to the various techniques and materials used to prevent water from entering your basement. This can include interior and exterior solutions, ranging from simple sealants to complex drainage and sump pump systems. The right approach depends on the source and severity of moisture problems, as well as your basement’s construction and intended use.
Common Causes of Basement Water Problems
- Poor exterior drainage: Ineffective grading or clogged gutters direct water toward foundation walls.
- Foundation cracks: Shifts or settling can open pathways for water intrusion.
- Hydrostatic pressure: Saturated soil around the home forces water through weak points.
- Condensation: High humidity inside the basement can lead to dampness and mold.
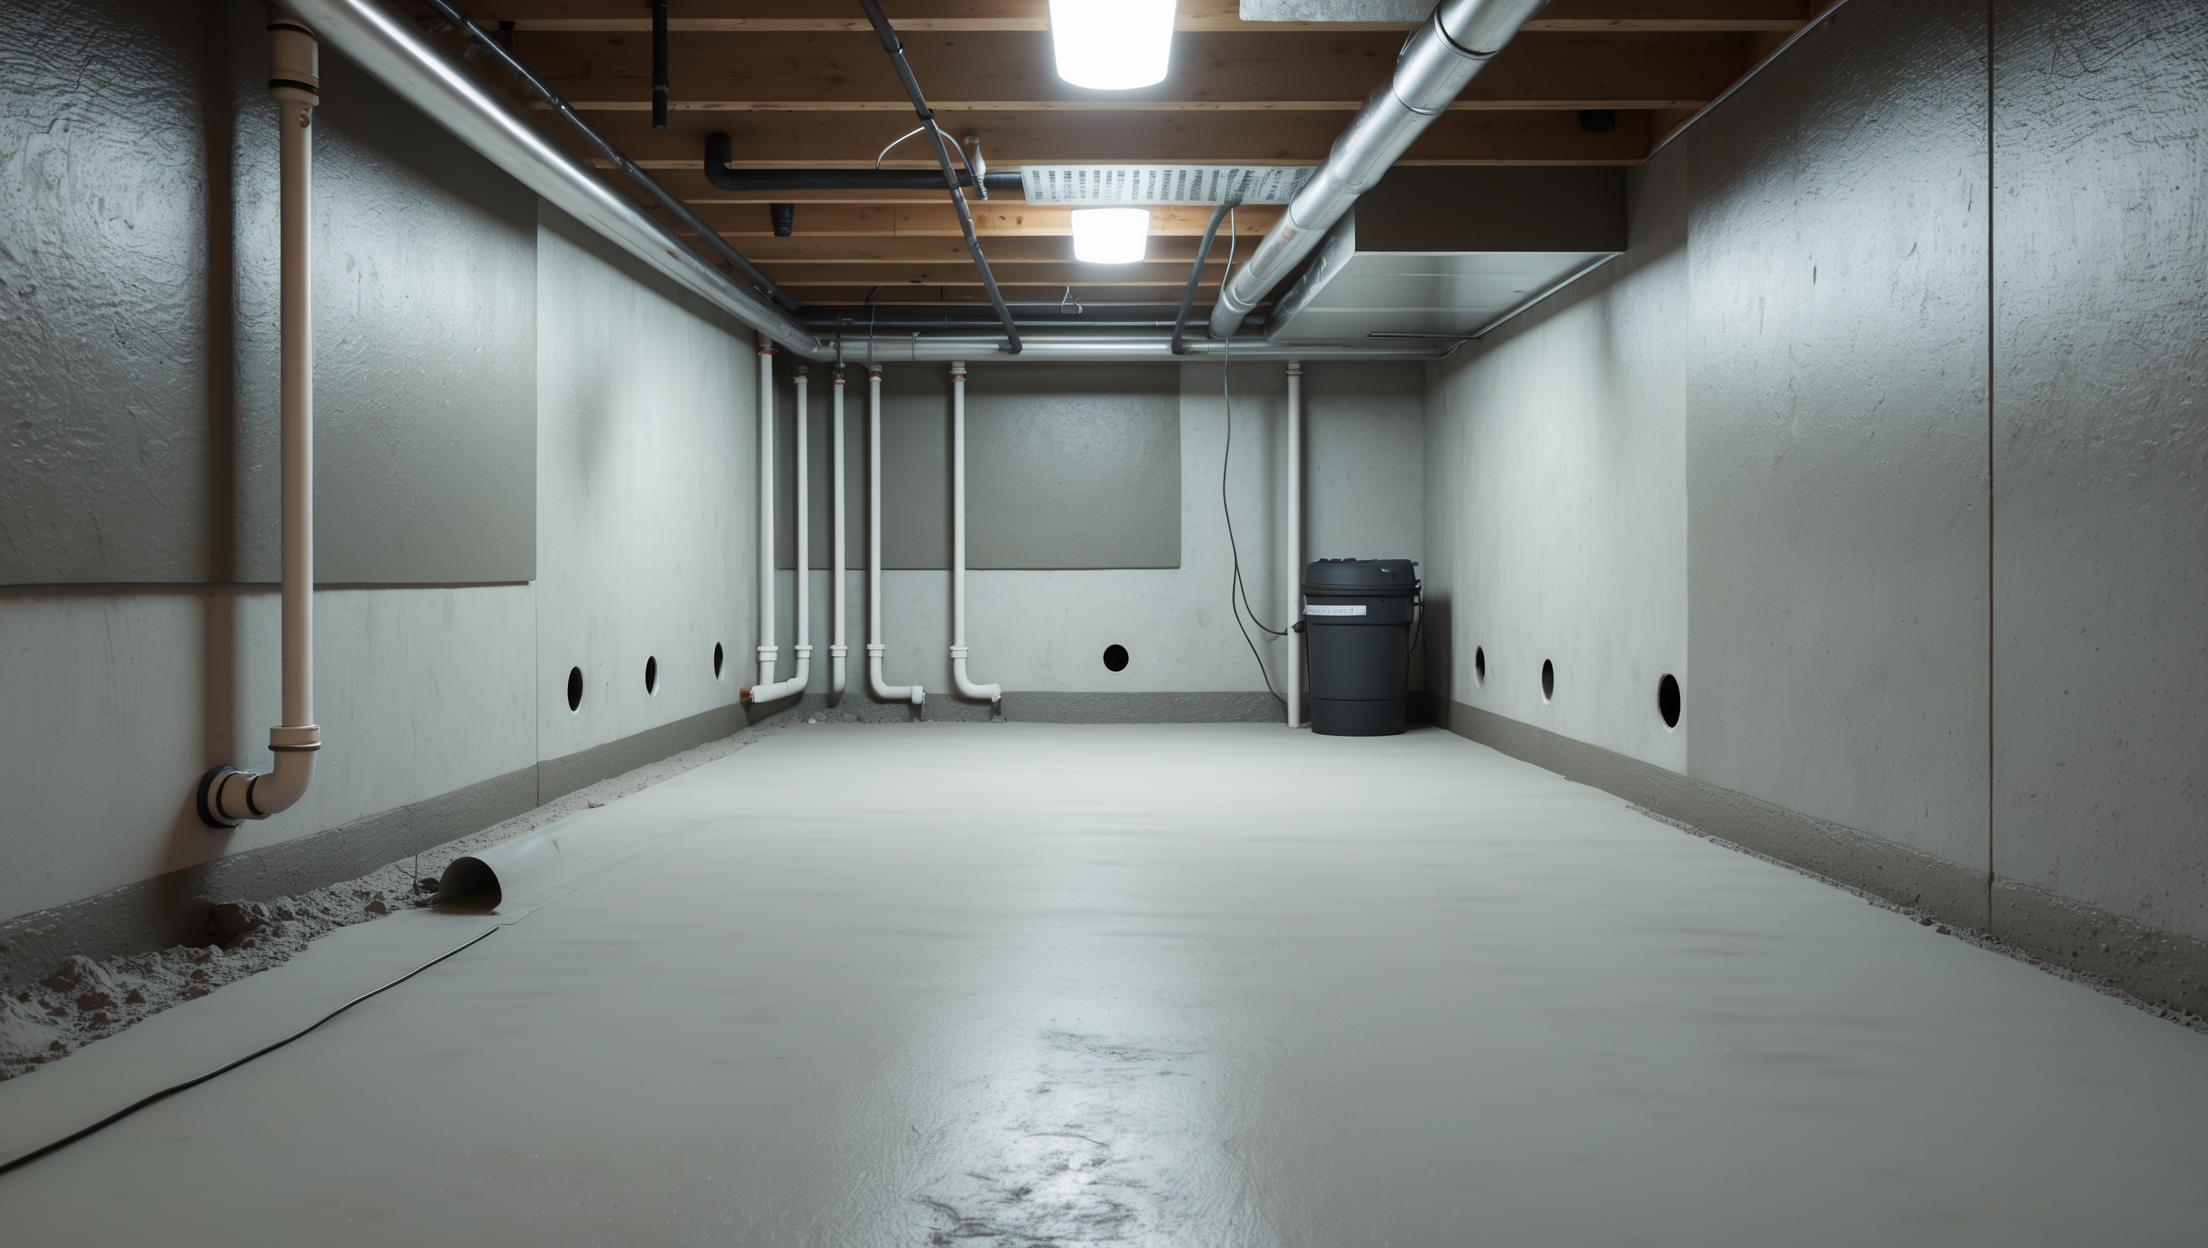
Types of Waterproofing Systems
- Interior sealants and coatings: Quick DIY solutions for minor seepage.
- Interior drainage systems: French drains or channels that collect and direct water to a sump pump.
- Exterior waterproofing membranes: Professional-grade barriers applied to foundation walls.
- Exterior drainage solutions: Footing drains, gravel backfill, and improved grading to move water away.
Cost Breakdown: What Goes Into Basement Waterproofing Expenses?
1. Assessment and Inspection
Professional waterproofing projects always start with a thorough inspection. Expect to pay:
- DIY visual assessment: Free, but limited accuracy.
- Professional inspection: $150–$500, sometimes credited toward project cost.
2. Materials
- Waterproof paints and sealants: $40–$200 per five-gallon bucket. Suitable for minor dampness but not active leaks.
- Interior drainage channels: $10–$25 per linear foot, plus connectors and accessories.
- Sump pump: $150–$500 for a standard pump; $200–$400 for battery backups or water-powered alternatives.
- Vapor barriers: $0.50–$1.50 per square foot for heavy-duty poly sheeting.
- Exterior membranes: $3–$6 per square foot for high-quality, rubberized coatings.
- Gravel and drainage pipes: $1–$3 per linear foot for pipe; $30–$50 per cubic yard for gravel.
3. Labor
- General waterproofing contractor: $60–$120 per hour, or flat rates for standard systems.
- Excavation (exterior systems): $50–$200 per linear foot, depending on depth, soil, and access.
- Interior system installation: $2,000–$7,000 for average basements (1,000–1,500 sq. ft.).
- Exterior system installation: $5,000–$15,000+ for full-perimeter jobs.
4. Permits and Compliance Costs
Many municipalities require permits for structural changes (like excavation or French drains). Permit fees range from $50 to $500, depending on your location and project scope. Skipping permits can lead to fines and insurance issues, so always check with your local building department.
5. Hidden and Unexpected Expenses
- Mold remediation: $500–$6,000+ if existing mold is uncovered during waterproofing.
- Foundation repairs: $1,500–$10,000+ for reinforcing, crack injection, or structural fixes.
- Landscaping restoration: $500–$3,000 after exterior excavation.
- Upgrading sump pump electrical: $200–$1,000 if new circuits or outlets are required.
DIY vs. Professional Waterproofing: Comparing Costs and Results
DIY Approaches: Pros, Cons, and Budgeting
For handy homeowners with minor moisture issues, DIY waterproofing can be a tempting money-saver. Common DIY projects include applying waterproof paints, caulking cracks, and improving exterior drainage by extending downspouts and regrading soil.
- Estimated DIY cost for minor sealing: $150–$800
- Time investment: 1–3 days
- Pros: Lower upfront cost, immediate results for simple problems
- Cons: May mask deeper issues, no warranty, limited effectiveness for serious water problems
Professional Waterproofing: When to Invest
Hiring a professional is recommended when you face persistent leaks, visible mold, or structural foundation cracks. Professionals have the tools and expertise to diagnose root causes and install robust, warrantied systems. While the upfront cost is higher, the investment pays off in long-term protection and peace of mind.
- Estimated professional cost (interior system): $3,000–$7,000
- Estimated professional cost (exterior system): $8,000–$20,000+
- Warranty: Typically 10–25 years, sometimes transferable to new owners
Basement Waterproofing by Method: Detailed Cost Comparison
1. Interior Sealants and Paints
- Materials: $50–$200
- DIY-friendly: Yes
- Best for: Dampness, not active leaks
- Longevity: 1–3 years
2. Crack Injections (Epoxy/Urethane)
- Materials: $80–$300 per kit
- Professional installation: $400–$1,200 per crack
- Best for: Narrow, non-structural cracks
- Longevity: 5–10 years
3. Interior Drainage Systems
- Materials and labor: $2,000–$7,000 (average basement)
- Includes: Perimeter channels, gravel, sump pump, discharge line
- Best for: Chronic water intrusion, hydrostatic pressure
- Longevity: 10–30 years (with pump maintenance)
4. Sump Pump Installation
- Materials: $200–$600
- Labor: $500–$1,200
- Best for: Areas with frequent flooding, high water tables
- Maintenance: Annual inspection and cleaning recommended
5. Exterior Waterproofing Membrane and Drainage
- Materials and labor: $8,000–$20,000+
- Includes: Excavation, cleaning and sealing foundation walls, installing membrane, new footing drains, backfill
- Best for: Severe, persistent leaks; older homes without existing drainage
- Longevity: 20–40 years
Budgeting Tips: How to Plan and Save on Waterproofing
Get Multiple Quotes
Always get at least three detailed quotes from reputable contractors. Ask for itemized costs and clarify what’s included in the warranty. Don’t be swayed by the lowest bid—check references, licenses, and insurance.
Understand the Scope
Request a written scope of work. Know whether the contractor is addressing only symptoms (like sealing cracks) or installing a comprehensive system (like a full-perimeter drain and sump pump). This will help you compare bids apples-to-apples and avoid unexpected add-ons.
Plan for the Unexpected
Set aside a contingency fund—typically 10–20% of the project total. This covers surprises like hidden mold, additional foundation repairs, or electrical upgrades for a sump pump.
DIY Where Practical
Homeowners can often handle certain prep tasks to save on labor costs. For example, you might clear out the basement, remove old wall coverings, or extend downspouts yourself before the pros arrive.
Check for Rebates and Incentives
Some municipalities and insurance companies offer rebates or premium discounts for installing certain waterproofing systems or sump pump alarms. Check local programs before starting your project.
Case Study: Budgeting for a Typical Basement Waterproofing Project
Let’s walk through budgeting for a 1,200 sq. ft. basement with moderate water seepage and minor cracks. The homeowner chooses an interior drainage system with a sump pump and vapor barrier.
- Professional inspection: $250 (credited to project)
- Interior perimeter drain (including gravel, pipe, and sump pump): $5,500
- Crack injection (2 non-structural cracks): $900
- Vapor barrier (walls only): $1,200
- Permit fee: $150
- Contingency (10%): $780
- Total estimated cost: $8,780
This project addresses both immediate water issues and long-term moisture control, with a 20-year warranty. The homeowner saves by handling basement prep and choosing a locally owned contractor with solid reviews.
How to Avoid Common Budgeting Mistakes
- Underestimating the problem: Surface fixes may not solve foundation or drainage issues. Always get a professional assessment if you’re unsure of the source.
- Ignoring hidden costs: Budget for mold remediation, landscaping, and electrical upgrades, not just the waterproofing system.
- Skipping permits: Unpermitted work can lead to fines or problems selling your home.
- Choosing unlicensed contractors: Lower bids may skip critical steps or void your homeowner’s insurance.
- Delaying repairs: Water damage gets more expensive the longer it’s ignored, especially if mold or structural issues develop.
Conclusion: Investing Wisely in a Dry, Healthy Basement
Basement waterproofing is more than a home improvement—it’s a vital investment in your property’s safety, value, and habitability. While the costs can vary widely depending on the size of your basement, the severity of your water issues, and the chosen solution, understanding where your money goes is the key to smart budgeting. Don’t fall for quick fixes that only address symptoms; instead, focus on comprehensive solutions that tackle the root causes of moisture. Always consult with licensed, reputable professionals, and insist on clear, itemized quotes and robust warranties. Remember to account for hidden costs and to set aside a contingency fund for unexpected surprises. By planning carefully and investing in the right waterproofing system for your needs, you’ll protect your home from costly water damage, mold, and foundation problems for decades to come. A dry basement doesn’t just add usable space—it brings peace of mind, healthier air, and lasting value to your home. Start with a thorough assessment, budget realistically, and take action before minor moisture becomes a major headache.
If I opt for a professional waterproofing system instead of doing it myself, what hidden costs should I watch out for during the process? Are there common expenses that tend to surprise homeowners beyond the initial estimates?
When hiring professionals, some hidden costs can include extra charges for repairing structural damage discovered during the job, addressing mold or mildew, moving or replacing utilities and fixtures, and permit fees. Sometimes, the price for restoring landscaping or interior finishes affected by the work isn’t included in the original estimate. It’s wise to ask your contractor for a detailed breakdown and to clarify what isn’t covered up front.
You talked about how the right waterproofing approach depends on both the source of moisture and the basement’s construction. How can I tell which type of solution would work best for a finished versus unfinished basement?
To choose the right waterproofing for your basement, consider how it’s used. For finished basements, interior drainage systems and sump pumps are often preferred, as they’re less disruptive and can be installed without removing finished walls. For unfinished basements, you have more flexibility for exterior waterproofing options like excavation and membrane application. Identifying the moisture source—like seepage through walls or up from the floor—will also guide your choice.
If my home has a musty smell but no visible leaks, would a DIY sealant be enough, or is it worth getting a professional assessment to look for foundation cracks or drainage problems?
A musty smell often means moisture is present, even if you don’t see leaks. While a DIY sealant can sometimes help with minor issues, it’s wise to get a professional assessment. Experts can check for hidden cracks, foundation problems, or drainage issues that might not be obvious, helping you prevent bigger problems down the line.
I notice you mention both DIY sealants and professional drainage systems as options for basement waterproofing. How do the overall costs and long-term effectiveness of these two approaches usually compare, especially if you’re starting with just mild dampness rather than major flooding?
DIY sealants are generally much cheaper upfront—often just a few hundred dollars for materials. They’re usually effective for mild dampness caused by surface leaks or minor cracks, but may need reapplication over time. Professional drainage systems cost more—often several thousand dollars—but they address water at its source and last much longer, offering better protection if moisture issues worsen. For mild dampness, DIY can be a good start, but if problems persist or escalate, a professional system is a stronger long-term solution.
Are there any common hidden costs that tend to surprise homeowners when budgeting for basement waterproofing, like repair work after waterproofing or costs related to correcting exterior grading? I’m trying to plan my finances in advance.
Yes, there are some hidden costs that often catch homeowners off guard. These can include repairing walls or floors after waterproofing work, fixing landscaping or exterior grading to direct water away from your foundation, and replacing damaged drywall or insulation. You might also encounter extra charges if mold remediation is needed or if unforeseen damage is discovered during the project. Factoring in a contingency budget of about 10–20% can help cover these surprises.
You mentioned potential hidden costs beyond materials and labor for basement waterproofing. Can you provide examples of what these hidden expenses typically include, and how homeowners might anticipate or budget for them in advance?
Hidden costs for basement waterproofing can include permit fees, disposal of old materials, repairing landscaping or walkways affected by excavation, and addressing unexpected issues like mold remediation or structural repairs found during the project. To anticipate these, ask your contractor for a detailed quote with contingencies, and set aside about 10–20% extra in your budget for surprises. Reviewing your home insurance or getting multiple estimates can also help you prepare.
When budgeting for basement waterproofing, how much should I expect to set aside for unexpected or hidden costs that might pop up during the process, like foundation repairs or mold removal?
It’s wise to set aside an extra 10% to 20% of your initial waterproofing budget to cover unexpected expenses. Hidden issues like foundation cracks, mold removal, or drainage problems can sometimes add significant costs. For example, if your main estimate is $5,000, having an additional $500 to $1,000 set aside can help you manage surprises without financial stress.
Can you clarify whether addressing poor exterior drainage is usually included in base waterproofing estimates, or is that considered a separate landscaping cost? I am wondering how much of the overall budget should be allocated to outside work versus interior solutions.
Addressing poor exterior drainage, like regrading soil or installing downspout extensions, is typically considered a separate landscaping or exterior cost and is not usually included in base waterproofing estimates. Most standard waterproofing estimates focus on interior solutions—like sump pumps or interior drains. When budgeting, set aside a separate portion for outside work, as exterior drainage improvements can significantly impact total costs.
If my basement just has high humidity and some mild dampness but no visible leaks or flooding, would an interior sealant be enough, or should I budget for a more comprehensive approach from the start?
If your basement only has high humidity and minor dampness, starting with an interior sealant could help reduce moisture. However, it’s important to also address potential causes like poor ventilation or exterior drainage issues. Monitor the results after sealing, and if dampness persists or worsens, you may need to consider a more comprehensive waterproofing solution down the line.
If hydrostatic pressure is a major cause of basement water problems, how can I find out if that’s what’s happening in my home versus just condensation or poor drainage? Are there any simple checks a homeowner can do before calling a pro?
You can check for signs of hydrostatic pressure by looking for water seeping through cracks in your basement floor or walls, especially after heavy rain. Pooled water in the middle of the floor often points to pressure from below, while condensation usually forms as droplets on cool surfaces. If you tape a piece of plastic to the wall and moisture forms behind it, it’s likely seepage, not condensation. Simple visual inspections like these can give you clues before you consult a professional.
I noticed you mentioned both interior sealants and more complex systems like sump pumps or French drains. For a basement that only gets musty odors and some dampness after heavy rain, is it better to start with DIY sealants or should we be budgeting for a professional drainage system right away?
For musty odors and mild dampness that only appear after heavy rain, starting with DIY interior sealants can be a practical first step. These are often effective for minor moisture problems and are budget-friendly. If the issue persists or worsens despite sealant application, then it may be time to consider a professional drainage system like a sump pump or French drain. Monitoring the results for a season can help you decide if a bigger investment is necessary.
If a basement already has minor dampness but no visible foundation cracks, would starting with DIY sealants be a reasonable first step, or is it better to consult a professional right away to avoid bigger issues later?
If you only notice minor dampness and don’t see any visible foundation cracks, trying DIY sealants can be a reasonable first step. These sealants may help if the issue is mild and caused by minor seepage. However, if the dampness persists after using sealants or gets worse, it would be wise to consult a professional to identify hidden problems and prevent more serious issues down the line.
You mentioned there can be hidden costs with basement waterproofing. Could you give some specific examples of what these hidden costs might be, and how a homeowner can plan ahead for them in their budget?
Some common hidden costs in basement waterproofing include repairs to drywall, flooring, or framing that may be damaged once work begins, as well as the need for mold remediation if moisture issues have been present for a while. Permits and inspections can also add to the total. To plan ahead, set aside an extra 10–20% of your budget for unexpected expenses and ask contractors for detailed quotes that outline potential add-ons.
You mentioned that hydrostatic pressure can force water through weak points in the foundation. Are there any specific warning signs I should look for that indicate this is the main problem, or does it always require a professional inspection?
You can spot some common warning signs of hydrostatic pressure, such as water seeping through cracks in the basement floor or walls, bowing or bulging basement walls, white chalky residue (efflorescence), or a musty odor from persistent dampness. While these signs strongly suggest hydrostatic pressure, a professional inspection is still recommended to confirm the cause and determine the best solution.
When budgeting for basement waterproofing, how much should homeowners typically set aside for unexpected or hidden costs? The article talks about potential surprises, and I want to avoid being caught off guard during my project.
It’s wise to set aside an additional 10 to 20 percent of your total basement waterproofing budget for unexpected or hidden costs. These surprises can include issues like hidden mold, structural repairs, or extra drainage work uncovered during the project. Factoring in this buffer helps ensure you’re financially prepared and your project runs smoothly.
I noticed the article mentions hidden costs in basement waterproofing. What are some of the most common unexpected expenses homeowners should look out for when budgeting, and is there a typical percentage you recommend adding to your initial estimate to cover surprises?
Some common hidden costs in basement waterproofing include repairing structural damage, mold remediation, relocating utilities, and addressing landscaping or exterior drainage issues. These can arise once work begins and the true extent of moisture damage is revealed. It’s wise to add about 10–20% to your initial estimate to cover such unexpected expenses, as this helps ensure your budget can handle any surprises during the project.
I noticed you mentioned hidden costs in basement waterproofing. Can you give some examples of what those might be? We are trying to budget carefully and want to avoid getting caught off guard by unexpected expenses after starting the project.
Absolutely, hidden costs in basement waterproofing can include things like repairing structural damage discovered after work begins, mold remediation if moisture has caused growth, permits or inspection fees required by your local authority, and unforeseen drainage issues that need addressing. Sometimes, additional materials or labor might be needed if the project is more complex than initially thought. It’s wise to ask your contractor for a detailed breakdown and clarify what isn’t included in the initial quote.
You mentioned both DIY solutions and professional waterproofing systems. For a basement with occasional minor seepage but no visible cracks, how do I decide which route makes more sense in the long run?
If your basement only has minor seepage and no visible cracks, starting with DIY solutions like sealing walls, improving exterior drainage, and using dehumidifiers can be a cost-effective way to manage the problem. If these steps don’t resolve the issue or if seepage worsens, investing in a professional system might make more sense for long-term peace of mind and home value protection.
You mentioned hidden costs when it comes to basement waterproofing. What are some examples of unexpected expenses to watch out for when budgeting, especially for DIY projects versus hiring a professional?
Some hidden costs in basement waterproofing include repairing any structural damage discovered during the project, disposing of old materials, and unexpected mold remediation. For DIY projects, you might run into extra expenses for specialized tools or mistakes that need fixing. If you hire a professional, permit fees or additional labor for unforeseen problems could add up. It’s helpful to set aside a contingency fund to cover these surprises.
You mentioned that the right waterproofing approach depends on the source and severity of moisture problems. How can homeowners accurately identify whether their issue is due to hydrostatic pressure, foundation cracks, or poor exterior drainage before deciding on a specific system?
Homeowners can start by observing where and when water enters the basement. Persistent dampness or water seepage along the base of the walls may indicate hydrostatic pressure, while visible cracks with water tracing through them suggest foundation cracks. Water pooling near the foundation or overflowing gutters often points to poor exterior drainage. For a thorough assessment, it’s wise to consult a professional who can identify the sources using moisture meters and inspect both inside and outside the home.
You mentioned that there can be hidden costs when waterproofing a basement. Can you give some examples of what those might be and how to plan for them in the budget?
Hidden costs in basement waterproofing can include repairing structural damage found during the process, replacing drywall or flooring that must be removed, addressing unexpected mold remediation, or updating drainage systems. To plan for these, it’s wise to set aside an extra 10-20% of your total budget as a contingency fund. This can help you cover surprises without derailing your project.
If my basement just has some musty odors and mild dampness, would a simple interior sealant be enough, or should I budget for one of those more advanced drainage systems you mentioned?
If your basement only has musty odors and mild dampness, starting with an interior sealant could help reduce moisture and odors. However, if the dampness continues or worsens after sealing, it may indicate a bigger issue that requires a more advanced drainage system. Keep monitoring the situation, but you may not need to budget for major work unless problems persist or get worse.
I’m considering trying a DIY interior sealant for some minor seepage in my basement, like the article mentions. How long do these sealants typically last before I might need to reapply, and are they really a cost-effective solution in the long run?
Interior sealants for basement seepage usually last anywhere from 1 to 5 years, depending on the product quality and how well the surface is prepared before application. While they’re inexpensive and quick to apply, sealants are generally considered a temporary fix for minor seepage and may not address the underlying moisture problem. Over time, you may need to reapply or consider more permanent waterproofing methods if issues persist.
You mentioned that basement waterproofing costs can vary widely depending on the solution chosen. Could you elaborate on which factors most often lead to unexpected hidden costs during the process? I want to avoid budget surprises later.
Hidden costs in basement waterproofing often come from issues discovered only after work begins. Common culprits include extensive water damage, mold remediation, foundation cracks, or the need to upgrade drainage systems. Unexpected repairs to plumbing or electrical lines behind basement walls can also add to the price. To minimize surprises, ask your contractor for a thorough inspection and a detailed quote that includes potential contingencies before starting.
If I’m only dealing with mild dampness and not chronic flooding, is it usually sufficient to stick with interior sealants and coatings, or is it better in the long run to invest in something more extensive like a sump pump system?
For mild dampness, interior sealants and coatings can often help reduce moisture and may be enough if the issue isn’t severe. However, if you notice the problem getting worse over time or if your basement is below the water table, investing in more extensive solutions like a sump pump system could prevent bigger issues and added costs later. It’s often wise to monitor the situation after applying sealants to see if additional steps are needed.
Is it common to run into hidden costs after starting a professional waterproofing job, and if so, what kind of unexpected expenses should I be prepared for beyond labor and materials?
Yes, hidden costs can come up during basement waterproofing projects. Common unexpected expenses include repairing structural damage, mold remediation, replacing damaged drywall or flooring, or updating sump pumps and drainage systems if issues are uncovered during the job. It’s wise to set aside an extra 10-20% of your budget for these possibilities just in case.
You mentioned that poor exterior drainage like clogged gutters can lead to basement water problems. If I fix my gutter and grading issues, will that be enough to prevent future seepage, or should I still budget for additional waterproofing treatments?
Fixing your gutter and grading issues is an important first step and can significantly reduce the risk of water entering your basement. However, depending on your local soil conditions, foundation type, and history of seepage, you might still need interior or exterior waterproofing solutions for complete protection. It’s wise to budget for a professional assessment to determine if further treatments are necessary.
If I try a DIY sealant for minor seepage, how long should I expect those solutions to last before needing professional help or more permanent measures?
DIY sealants for minor basement seepage can typically last anywhere from 1 to 5 years, depending on the quality of the product, how well you prepare the surface, and environmental conditions like moisture levels. However, if you notice the seepage returning or the sealant peeling, it may be time to consider professional waterproofing or more permanent solutions.
You mention that many people are surprised by hidden costs when they start a basement waterproofing project. Can you elaborate on what some of those unexpected expenses might be and how I can factor them into my initial budget to avoid surprises later?
Unexpected expenses in basement waterproofing often include repairing structural damage uncovered during the project, mold remediation, replacing damaged drywall or flooring, and updating sump pumps or drainage systems. To avoid surprises, set aside a contingency fund—about 10–20% of your estimated project cost—for these unforeseen issues. Also, ask your contractor for a thorough inspection and a detailed estimate up front so you have a clearer idea of potential extra costs.
I’m curious about the hidden costs you referenced. Could you provide some real-world examples of what kinds of unexpected expenses homeowners should watch out for during a basement waterproofing project?
Hidden costs in basement waterproofing projects can include things like repairing or replacing damaged drywall, flooring, or insulation that gets discovered once work begins. You might also face extra charges for mold remediation if moisture problems have been present for a while. Sometimes, unexpected foundation cracks or old plumbing issues are uncovered and need fixing before waterproofing can continue, adding to the overall expense.
You mention that budgeting for basement waterproofing can involve hidden costs. Can you share some examples of unexpected expenses homeowners should watch out for during the process, and how best to plan for them?
Hidden costs with basement waterproofing can include repairing or replacing damaged foundation walls, fixing or upgrading old sump pumps, unexpected mold remediation, or addressing landscaping that affects drainage. Sometimes, moving utilities or breaking up concrete floors to install drains adds to the expense. To plan ahead, set aside a contingency fund of about 10-20% above initial estimates and get detailed quotes that cover potential extras. A home inspection before starting work can also help uncover possible surprises.
I’m a student on a tight budget, so I’m curious how much the DIY interior sealants and coatings actually help with minor seepage. Are they just temporary fixes, or can they be a long-term solution if my basement only gets damp during heavy rain?
DIY interior sealants and coatings can be effective for controlling minor dampness, especially if your basement only gets wet during heavy rain. While they are generally considered more of a temporary fix, they can last a few years if applied carefully and the source of moisture is not too severe. For students on a budget, they’re a practical short-term option, but keep in mind that they may need reapplication over time. Regularly monitor your basement to catch any worsening issues early.
If my basement just has occasional condensation and musty smells rather than obvious leaks, which type of waterproofing system—from interior coatings to drainage options—tends to be the most budget friendly but still effective?
For occasional condensation and musty smells without visible leaks, interior waterproofing solutions like sealants or waterproof coatings on the walls are typically the most budget-friendly and effective. You might also want to use a dehumidifier and improve ventilation to control moisture. Drainage systems tend to be more costly and are usually recommended for more serious water intrusion issues.
You talked about budgeting for labor, materials, and hidden costs with basement waterproofing. Are there any common hidden expenses I should watch out for that might not be included in the initial estimate from a contractor?
Yes, some common hidden expenses can include the costs for moving or replacing utilities like HVAC systems or water heaters if they block access, repairing or upgrading damaged foundation walls discovered during the job, and additional drainage solutions if the existing grading is poor. Also, mold remediation or local permit fees can add to the overall bill but might not be listed in the first estimate. It’s a good idea to ask your contractor about possible scenarios that could increase costs before work begins.
You talk about hidden costs in basement waterproofing projects. Could you give some specific examples of what those hidden expenses might be, so I can better plan my budget before starting any work?
Certainly! Hidden costs in basement waterproofing can include repairing unexpected structural damage discovered during the project, disposing of debris or contaminated soil, relocating or replacing plumbing and electrical lines, and extra charges for permits or inspections. Mold remediation, if found, is another potential expense. Factoring in these possibilities can help you create a more realistic budget before starting.
I’m trying to get a clearer idea of what hidden costs might come up during basement waterproofing. Beyond just materials and labor, are there some unexpected expenses homeowners should really watch out for?
Beyond the main materials and labor, hidden costs can include repairing water-damaged walls or flooring, mold remediation, and fixing foundation cracks discovered during the project. Permits and inspections may add to the bill, and landscaping might need restoration if exterior work is done. It’s also wise to budget for temporary relocation if work is extensive or if heavy equipment is used. Asking your contractor for a detailed estimate can help avoid surprises.
The article talks about potential hidden costs in basement waterproofing. What are some common unexpected expenses homeowners should watch out for once the work actually starts?
Some common unexpected expenses during basement waterproofing include discovering structural damage that needs repair, finding mold or mildew that requires remediation, or realizing that your home’s drainage or sump pump system needs upgrading. Sometimes, extra excavation is needed if the foundation is deeper or more complex than expected. It’s a good idea to set aside a contingency fund for these possibilities.
When budgeting for basement waterproofing, how can homeowners account for unexpected issues like discovering foundation cracks or serious hydrostatic pressure during the project? Does the article recommend setting aside a certain percentage of the total budget for these hidden costs?
The article suggests that unexpected issues like foundation cracks or high hydrostatic pressure are common during basement waterproofing. While it doesn’t specify an exact percentage, it does recommend setting aside a contingency fund as part of your budget. Many experts suggest reserving about 10–20% of your total budget to cover surprises that might come up once work begins.
If my basement only has mild dampness but no visible cracks or flooding, would a DIY sealant be enough, or should I consider a more comprehensive system from the start? How do I know when it’s time to move beyond the basic solutions you described?
If you only notice mild dampness without cracks or flooding, starting with a DIY sealant could be a practical first step. Monitor the area after application—if dampness persists, worsens, or you spot mold or musty odors, it might be time to consider more comprehensive solutions like interior drainage or professional waterproofing. Also, be alert after heavy rains, as increased moisture could signal a hidden issue.
Can you explain how to tell if I need just a basic internal sealant or if I should be looking at a full drainage system? I am not sure how to figure out how severe the moisture problem is in my basement.
To figure out what you need, check how much water is actually getting into your basement. If you notice just minor dampness or a few water stains, a basic internal sealant may be enough. But if you see standing water, frequent puddles after rain, or water seeping through cracks, a full drainage system is probably necessary. Also, if the air is very humid or there’s a musty odor, these are signs of a more serious issue.
Could you explain more about the hidden costs you mentioned when budgeting for basement waterproofing? Are there fees or expenses that usually surprise first-time DIYers like me?
Hidden costs in basement waterproofing often catch DIYers off guard. Some common surprises include the price of tools and rental equipment, materials like sealants, drainage pipes, and sump pumps, as well as disposal fees for debris. You might also run into unexpected repairs if you discover mold, rot, or structural issues after opening up walls or floors. It’s wise to set aside an extra 10-20% of your budget for these unplanned expenses.
If my basement only has mild dampness and no active leaks, would a DIY sealant or coating actually be effective long-term, or do most people end up needing to invest in more professional systems eventually?
For mild dampness without active leaks, a DIY sealant or coating can help reduce moisture and improve comfort in the short term. However, these solutions often wear down over time, especially if underlying issues like poor drainage or humidity aren’t addressed. Many homeowners eventually need more robust waterproofing—like interior drainage or professional-grade membranes—if dampness persists or worsens. Monitoring your basement over time is key to deciding if further investment becomes necessary.
We have a finished basement that sometimes smells musty, but there’s no visible water. Do the solutions you mention, like interior sealants and drainage systems, work for finished spaces, or would that require more invasive work?
For finished basements, interior sealants can sometimes help with minor moisture issues, but they may not fully resolve the musty smell if there’s hidden moisture behind walls or under flooring. Installing drainage systems in a finished space can be more invasive, as it often requires removing drywall or flooring to access the foundation. It’s wise to have a professional assess the source of the smell before choosing a solution to avoid unnecessary disruption.
You mentioned hidden costs when budgeting for basement waterproofing. Can you provide some examples of what these hidden expenses might include, especially for someone considering a professional system?
Hidden costs for professional basement waterproofing can include things like permits and inspection fees, repairing or moving existing plumbing, electrical work if outlets or wiring are affected, and restoring landscaping or interior finishes that are disturbed during the process. It’s also possible you might need to address mold remediation or structural repairs if water damage has been ongoing. Factoring in these potential expenses helps avoid surprises and ensures your budget is more accurate.
The article mentions that hidden costs can be a surprise during a basement waterproofing project. Could you elaborate on what some of those hidden costs typically are, and how I might best prepare for them in my budget?
Hidden costs in basement waterproofing often include unexpected repairs like fixing structural cracks, replacing damaged drywall or insulation, and dealing with mold removal if it’s discovered during the project. You might also encounter fees for permits or additional drainage solutions. To prepare, it’s smart to set aside a contingency budget of 10–20% above the initial estimate and ask your contractor for a detailed breakdown of possible extra charges before work begins.
I noticed the article mentions that the right waterproofing approach depends on both the source of moisture and the basement’s construction. How can homeowners accurately determine whether their water issue is best solved by an interior solution versus a more expensive exterior system?
Homeowners should start by identifying where the water is coming from—look for signs like wall dampness, floor cracks, or water pooling. If moisture enters through wall cracks or floor joints, interior solutions like drainage systems or sealants might be enough. However, if water seeps in due to poor exterior drainage or foundation issues, an exterior system is often needed. Consulting a waterproofing professional for an inspection can provide a clear diagnosis and help you choose the most effective and cost-efficient solution.
If my basement just has a musty odor but no visible water, is it worth investing in professional waterproofing or should I try addressing condensation and humidity first? How do I avoid overspending if the issue is just minor dampness?
If your basement only has a musty smell and you don’t see obvious water leaks, it’s wise to start with lower-cost fixes like using a dehumidifier, improving ventilation, and checking for condensation. Monitor the situation over a few weeks. If the odor persists or you notice signs of moisture, consult a professional for an inspection before committing to full waterproofing. This way, you avoid unnecessary expenses for minor dampness.
If a basement has issues like foundation cracks and poor drainage at the same time, is it better to address one before the other, or should both be fixed together for the most effective and cost-efficient waterproofing outcome?
It’s usually best to address both foundation cracks and poor drainage together if possible. Fixing just one issue might not fully solve the water problem, and lingering issues could undo your repairs. Coordinating the repairs can also be more cost-effective since contractors can tackle everything in one project, potentially reducing labor and material costs overall.
You mention that basement waterproofing costs can vary a lot depending on the materials and labor involved. Could you provide a ballpark figure or average price range for a professional waterproofing job versus a DIY solution?
Professional basement waterproofing typically costs between $2,000 and $10,000, depending on the size of your basement and the specific methods used. This usually includes both materials and labor. For a DIY approach, the price can range from $500 to $2,000, especially if you’re using sealants or patching minor leaks. Larger structural repairs are best left to professionals, as they require specialized expertise and equipment.
The article mentions hidden costs that can come up during basement waterproofing projects. Can you elaborate on what some of these unexpected expenses might be, especially for older homes or properties with foundation cracks?
Hidden costs in basement waterproofing can include repairing previously undetected foundation cracks, removing or replacing damaged drywall or insulation, and addressing mold or mildew that may be discovered during the project. In older homes, you might also encounter expenses for bringing outdated drainage or electrical systems up to code. Sometimes, additional excavation or reinforcing the foundation is needed if the structure is unstable.
If my basement only gets damp during heavy rains and not year-round, would you still recommend budgeting for exterior solutions, or can interior methods like coatings and a sump pump be sufficient in cases like this?
If your basement only gets damp during heavy rains, interior solutions like waterproof coatings and a sump pump can often address the issue effectively and are usually more budget-friendly. However, if water issues worsen or you see signs of foundation cracks, exterior solutions may become necessary. Starting with interior methods is reasonable, but keep an eye on any changes in moisture levels over time.
You mentioned the importance of addressing hidden costs in basement waterproofing. Can you give some examples of unexpected expenses homeowners often encounter during the process, and how best to factor those into an initial budget?
Some common hidden costs in basement waterproofing include repairing previously unknown structural damage, replacing damaged drywall or flooring, remediating mold, and upgrading inadequate drainage systems. You might also face extra costs for permits or unexpected labor if issues are worse than anticipated. To prepare, add a contingency of 10–20% to your initial budget and get detailed inspections before starting the project. This helps minimize surprises and ensures you have funds set aside for any additional work needed.
I saw you mentioned hydrostatic pressure as a cause of basement water issues. If someone has persistent water coming in due to this, is exterior waterproofing always necessary, or are there effective interior solutions that could fit a tighter budget?
Exterior waterproofing is often the most thorough fix for hydrostatic pressure, but it can be expensive. If your budget is tight, there are interior solutions that can help. Interior drain tile systems with a sump pump are effective for managing water that seeps in due to hydrostatic pressure. Sealing cracks and using waterproof coatings may offer some relief, but for persistent issues, interior drainage is usually the most reliable budget-friendly option.
If my basement only has mild dampness and not major flooding, do you recommend starting with a DIY sealant as a temporary measure, or is it more cost-effective in the long run to invest in a professional drainage system right away?
If the dampness in your basement is mild and you don’t notice water pooling or structural issues, starting with a DIY sealant can be a reasonable short-term solution. It’s an affordable way to see if minor improvements help. However, if the dampness persists or worsens, investing in a professional drainage system is usually more effective and cost-efficient over time, as it addresses the underlying cause and helps prevent future damage.
Could you give some examples of hidden costs that might come up during basement waterproofing, aside from the obvious materials and labor? I want to avoid being blindsided if something unexpected comes up.
Absolutely, some hidden costs to watch for include repairing structural damage discovered during the project, mold remediation if moisture issues are worse than expected, updating or replacing sump pumps, the need for additional drainage solutions, and costs for moving or storing furniture. You might also face permit fees or increased costs if access to your basement is tricky. Discuss these possibilities with your contractor before starting.
Could you provide more details on the potential hidden costs that might come up during a basement waterproofing project? I’m trying to build a budget, and I want to avoid being caught off guard by unexpected expenses.
Absolutely, hidden costs in basement waterproofing can include repairing or replacing damaged drywall, flooring, or insulation that might be discovered once work begins. You may also encounter higher costs if mold remediation is needed or if structural repairs are required for foundation cracks. Unexpected plumbing issues or the need to upgrade sump pumps and drainage systems can also add to the total expense. Building permits and debris disposal fees are sometimes overlooked, so it’s wise to set aside a contingency fund, typically 10–20% of your initial budget, to handle surprises.
You mentioned that basement waterproofing costs can really vary depending on whether you go the DIY route or hire professionals. Do you have any advice on how to accurately estimate the material and labor costs before choosing between these options?
To estimate costs accurately, start by assessing the size and condition of your basement. For DIY, list required materials like sealants, membranes, or sump pumps, then check local store prices. For professional work, get itemized quotes from several contractors, making sure they include both labor and materials. Comparing the total costs—and factoring in your own time and expertise—will help you decide which option fits your budget and needs best.
You mentioned that many homeowners underestimate the hidden costs of waterproofing. Could you give some examples of unexpected expenses that often come up during basement waterproofing projects, so I can better plan my budget?
Certainly! Hidden costs in basement waterproofing can include repairing or replacing damaged drywall, flooring, or insulation discovered after opening up walls. You might also face expenses for mold remediation if moisture problems have gone unnoticed. Upgrading or repairing sump pumps, drainage systems, or electrical work are other common surprises. Permits and increased labor costs if unexpected structural issues are found can also add to your budget. Planning for a contingency fund of 10-20% can help cover these kinds of surprises.
I noticed you mention both interior sealants and more extensive drainage systems for basement waterproofing. For a small business operating out of a partially finished basement, how can I estimate whether a basic solution will suffice or if I should budget for a full professional system?
To decide between a basic interior sealant and a full drainage system, start by assessing the severity and frequency of moisture or leaks in your basement. If you notice just mild dampness or occasional minor seepage, interior sealants might be adequate. However, if water intrusion is frequent, pooled, or damaging your business assets, it’s best to consult a professional for an evaluation and possibly budget for a more comprehensive drainage solution.
If my basement only has occasional musty odors and slight dampness rather than frequent flooding, which type of waterproofing system should I start with, and how much should I realistically set aside for materials and labor?
For occasional musty odors and slight dampness, you might start with interior solutions like sealants, dehumidifiers, and possibly improving drainage around your foundation. Interior sealants and crack repairs typically cost $500 to $1,500, while a good dehumidifier ranges from $200 to $800. Professional labor may add a few hundred dollars, depending on your location and the extent of work needed. This approach often resolves mild moisture issues without the expense of full exterior waterproofing.
You mentioned that the right waterproofing approach depends on both the moisture source and the basement’s construction. How can someone figure out if their water problem is caused by poor drainage, foundation cracks, or hydrostatic pressure before choosing a solution?
To determine the source of your basement water problem, start by checking for obvious signs. Water stains or puddles near basement walls after rain often mean poor drainage outside. Cracks with moisture or visible leaks likely point to foundation cracks. If water seeps in even when it hasn’t rained, or comes up through the floor, hydrostatic pressure may be to blame. Observing when and where water appears, along with a careful inspection outside and inside, can help you identify the likely cause before choosing a waterproofing solution.
If my basement is experiencing just some mild dampness and the occasional musty odor but no visible water leaks, would a DIY sealant really be effective, or should I budget for a professional inspection and possible upgrades?
For mild dampness and a musty odor without visible leaks, a DIY sealant can sometimes help, especially if the issue is minor and limited to surface moisture. However, persistent odors could indicate underlying moisture problems that DIY products might not fully address. If the dampness continues after sealing, or if you notice any worsening, it’s wise to budget for a professional inspection to identify any hidden issues and prevent bigger problems later.
I’m starting to notice some musty odors and a bit of dampness in my basement, but no major leaks yet. Based on your breakdown, would interior sealants and coatings be enough for a DIYer like me, or should I be looking into more advanced options even for minor issues?
For minor dampness and musty odors without visible leaks, interior sealants and coatings can be a reasonable starting point for a DIY approach. However, these solutions mainly address surface moisture and may not resolve underlying issues if water is seeping in from outside. If the problem persists or worsens, you might need to consider exterior waterproofing or proper drainage to prevent long-term damage.
You mentioned that budgeting mistakes are common when it comes to basement waterproofing. Could you give some examples of what these mistakes usually are and how homeowners can avoid them?
Common budgeting mistakes for basement waterproofing include underestimating repair costs, neglecting hidden damage like mold or structural issues, and failing to get multiple quotes from contractors. Homeowners sometimes overlook routine maintenance costs as well. To avoid these mistakes, thoroughly inspect the basement, factor in possible extra repairs, request itemized estimates from several professionals, and set aside a contingency fund for unexpected expenses.
I’m budgeting for some repairs after spotting musty odors in our basement. Besides the obvious costs for labor and materials, what are some common hidden expenses homeowners like me should be on the lookout for during a waterproofing project?
When budgeting for basement waterproofing, be sure to account for possible hidden expenses like mold remediation, repairing water-damaged framing or drywall, upgrading drainage systems, and unexpected structural repairs. You might also need to pay for permits or inspections, and costs can rise if obstacles like old wiring or plumbing are uncovered during the project. Setting aside a contingency fund can help manage these surprises.
You noted that many people overlook budgeting until they experience water seepage or mold. Is there a recommended maintenance routine or early warning signs that could help catch these basement issues before they become major expenses?
Absolutely, keeping an eye out for early warning signs can help you avoid costly repairs later. Look for damp spots on walls or floors, musty smells, white powdery residue (efflorescence), or rust on appliances. A regular routine should include checking gutters and downspouts for clogs, inspecting basement walls for cracks, and ensuring sump pumps work properly. Addressing these issues early can prevent bigger problems down the road.
You mentioned that basement waterproofing costs can really vary depending on whether you go with a DIY solution or hire professionals. Could you give a realistic price range for each approach, and maybe explain when hiring a pro is actually worth the extra expense?
DIY basement waterproofing typically ranges from $200 to $1,500, depending on materials and scope, like sealing cracks or applying waterproof paint. Professional waterproofing usually costs between $2,000 and $10,000, especially for extensive issues like foundation drainage or sump pump installation. Hiring a pro is worth it if you have persistent leaks, structural cracks, or water entering during heavy rain, since these problems often require specialized tools and expertise to solve properly.
Our basement sometimes has a musty smell but never standing water. If we decide to tackle waterproofing ourselves, what kind of hidden costs should we keep in mind beyond just materials?
When doing basement waterproofing yourself, consider hidden costs like tool rentals (such as concrete drills or sump pumps), disposal fees for old materials, protective gear, sealants or patching supplies beyond your initial estimate, and possibly higher utility bills if you use heavy-duty fans or dehumidifiers during the project. You might also need to repair or repaint walls after waterproofing, which can add to your budget.
If my basement only has condensation problems and not actual water seepage, do the same waterproofing methods and cost estimates apply, or are there different, more affordable approaches I should consider?
If your basement issues are limited to condensation rather than water seepage, you likely don’t need the full-scale waterproofing methods discussed in the article. Instead, focus on affordable steps like improving ventilation, using a dehumidifier, insulating pipes, and sealing cracks. These approaches usually cost much less and can effectively manage condensation without the need for costly waterproofing systems.
When considering basement waterproofing, how can I accurately estimate the hidden costs you mention, especially if I’m not sure how severe my water problem is? Are there common expenses homeowners forget to account for when setting a budget?
To estimate hidden costs, start by getting a professional inspection to assess the extent of your water issue—this will help avoid underestimating repairs. Homeowners often overlook expenses like mold remediation, fixing damaged drywall or flooring, and upgrades to drainage systems or sump pumps. Also, budget for possible electrical work if outlets or wiring have been affected by moisture. Having a contingency fund of 10–20% above initial quotes can help cover surprises.
If I have just minor dampness and musty odors instead of serious flooding, is it usually enough to address interior sealants and coatings, or would I risk missing some hidden expenses or problems down the line?
If your basement only has minor dampness and musty odors, interior sealants and coatings can help, but they may not solve the root cause. Sometimes, moisture seeps in through cracks or poor drainage outside, which sealants alone can’t fix. If you don’t look for these underlying issues, you might face more costly repairs later. It’s wise to identify and address any hidden sources of moisture before relying solely on interior solutions.
You mention that the right waterproofing approach depends on the source and severity of moisture problems. How should I identify whether my water issues are caused by poor grading, cracks, or hydrostatic pressure before choosing a system?
To identify the source of your basement water issues, start by inspecting the exterior grading—look for soil sloping toward your home, which can direct water to the foundation. Check for visible cracks in basement walls or floors, as these can let water seep in after rain. If water appears without clear entry points, especially during heavy rain or when groundwater is high, hydrostatic pressure is likely the cause. Observing when and how water enters will help you determine which waterproofing solution fits your situation.
When you talk about hidden costs in waterproofing, could you give some examples of what those might be? I’m trying to plan my budget and don’t want to get caught off guard by unexpected expenses.
Absolutely, some hidden costs in basement waterproofing can include things like repairing water-damaged drywall or flooring discovered during the project, mold remediation if moisture issues are worse than expected, extra excavation fees if soil conditions are difficult, or permits required by your local municipality. Unexpected plumbing repairs or upgrades are another common surprise. Factoring in a contingency of 10-20% beyond the initial estimate can help cover these possibilities.
I have an older home with a stone foundation that’s starting to show some minor cracks. Can you give more insight on how much I should budget for repairing those cracks before considering a full basement waterproofing system?
For minor cracks in a stone foundation, repair costs typically range from $500 to $1,500, depending on the number and size of the cracks. If you address these early, it can help prevent larger issues and may delay the need for a full waterproofing system, which is usually a much bigger investment. Getting a professional assessment can give you a more accurate estimate for your specific situation.
The article talks about potential hidden costs in waterproofing projects. Can you explain what some of these hidden expenses might be and how to plan for them in a budget?
Some hidden costs in basement waterproofing projects can include repairing unexpected structural damage, removing mold or mildew, replacing damaged drywall or flooring, or needing additional drainage solutions if issues are worse than expected. To plan for these, set aside a contingency fund—typically 10–20% of your total budget—and get detailed estimates from contractors, asking them to specify what is and isn’t included so surprises are minimized.
You mention both interior and exterior waterproofing methods, but how do I determine which one is actually necessary for my situation? Are there warning signs that suggest exterior solutions are required over basic sealants or interior drainage?
To decide between interior and exterior waterproofing, look for specific warning signs. Persistent damp spots, peeling paint, or mildew inside typically suggest interior solutions may help. However, if you notice frequent flooding, water seeping through foundation walls, or visible exterior cracks, exterior methods are likely needed. A professional inspection can pinpoint the source of moisture and recommend the best approach for your basement’s unique situation.
If my basement only gets damp during heavy rain and I don’t have visible foundation cracks, how do I figure out which waterproofing solution is best without spending money on unnecessary labor or materials?
Since your basement dampness only occurs during heavy rain and there are no visible foundation cracks, start by checking for common sources of moisture like clogged gutters, improper grading, or missing downspout extensions. Addressing these exterior issues is often inexpensive and effective. If the problem persists, consider a professional assessment focused on identifying moisture entry points, rather than committing to major waterproofing work right away.
The article mentions hidden costs as part of basement waterproofing. Could you give examples of what some of these unexpected expenses might be, and how homeowners can plan for them when setting their budgets?
Hidden costs in basement waterproofing can include fixing structural damage discovered during the project, mold remediation, replacing damaged drywall or flooring, and extra drainage solutions if water issues are worse than expected. To plan for these, homeowners should get thorough inspections beforehand, ask contractors about possible contingencies, and set aside an extra 10–20% in their budget for surprises.
I’m looking to fix some minor damp spots in my basement and saw that you mentioned interior sealants as a quick DIY solution. How effective are these sealants long term, and is there a chance I’d still need a drainage system later on?
Interior sealants can help with minor damp spots and provide a quick, affordable solution for surface moisture. However, they typically don’t address the root cause, such as water seeping in from outside. Over time, if moisture problems persist or worsen, you might still need to invest in a more robust drainage system or exterior waterproofing to fully resolve the issue and protect your basement.
Could you give a rough estimate of what percentage of the waterproofing cost usually goes toward labor versus materials? I am debating whether it would be cost-effective to try a DIY approach, especially for interior drainage systems.
For basement waterproofing projects, labor typically accounts for about 60% to 70% of the total cost, with materials making up the remaining 30% to 40%. Interior drainage systems can be labor-intensive, so going the DIY route could save you a substantial amount on labor expenses. Just keep in mind that proper installation is crucial to avoid future issues.
If my basement only has mild dampness and occasional musty odors, would a DIY interior sealant be a reliable long-term fix, or would I eventually need to invest in a full drainage system?
A DIY interior sealant can help reduce minor dampness and odors in the short term, but it’s generally not a permanent solution if moisture continues to enter your basement. Over time, sealants may wear away or fail to address underlying water issues. If you notice the problem persists or worsens, investing in a full drainage system may become necessary to ensure lasting dryness and prevent potential damage.
Can you explain more about when a DIY solution like a sealant is actually effective versus when I really need to consider hiring a professional for interior drainage or a sump pump? I don’t want to overspend if my problem is just mild dampness.
If your basement only has mild dampness or occasional surface moisture, using a DIY waterproofing sealant can often be effective, especially for hairline cracks or small problem areas. However, if you notice persistent water leaks, pooling, strong musty odors, or signs of mold, these are indicators of a more serious issue. In those cases, investing in professional help for interior drainage systems or a sump pump is usually necessary to prevent long-term damage.
If my basement only has occasional mild dampness and not actual flooding, are DIY waterproofing solutions usually sufficient, or would it still be wise to consult a professional? I’m trying to understand the point at which going pro becomes necessary.
For occasional mild dampness, DIY solutions like improving drainage, sealing cracks, and using dehumidifiers can often be effective. However, if these fixes don’t resolve the issue or if you notice signs like persistent musty odors, mold growth, or worsening dampness, it’s a good idea to consult a professional. Basically, if simple fixes aren’t enough or problems return, professional advice is warranted.
If my basement mostly just smells musty but I haven’t seen actual water, would a simple DIY sealant be enough? Or should I still consider more extensive drainage systems as mentioned in the article?
A musty smell without visible water often points to moisture entering through walls or floors. A DIY sealant can help if the issue is minor and the basement is otherwise in good shape. However, if the smell persists or you notice dampness, mold, or peeling paint, it may be worth having a professional assess whether a more extensive drainage system is needed. Start with the sealant, but keep an eye on any changes.
If my basement only has minor dampness and no visible cracks, would a DIY sealant be sufficient, or should I still consider a professional assessment before choosing a solution?
If your basement only has minor dampness and there are no visible cracks, a DIY sealant could be a reasonable first step to try. However, if the dampness persists after sealing or worsens over time, it would be wise to get a professional assessment. Sometimes moisture issues can have hidden causes that aren’t obvious at first glance.
If my basement only has mild dampness from condensation and not actual seepage, is it usually effective to just use DIY sealants and dehumidifiers, or would you still recommend a more professional system to prevent future problems?
For mild dampness caused by condensation, using DIY sealants on walls and floors, combined with a good dehumidifier, is often enough to improve conditions and prevent mold. Just make sure the space is well-ventilated and watch for any changes. However, if you notice water stains, increased dampness, or musty odors over time, it might be worth consulting a professional to rule out hidden seepage or more serious issues.
How long does a typical professional waterproofing system last before it needs maintenance or replacement? I’m interested in understanding whether the upfront investment pays off in the long run compared to DIY solutions.
A professionally installed basement waterproofing system typically lasts 10 to 25 years or even longer, depending on the method and materials used. Routine maintenance, like checking sump pumps or cleaning drains, can extend its lifespan. While upfront costs are higher than DIY solutions, professional systems generally offer greater durability and reliability, making them a better long-term investment for most homeowners.
You mention hydrostatic pressure forcing water into basements—does adding exterior drainage always deal with this, or are there situations where even proper grading and gutters aren’t enough? Would you suggest a different approach if the house is older?
Exterior drainage, proper grading, and gutters are essential for managing hydrostatic pressure, but sometimes they aren’t enough, especially in older homes or areas with high water tables. In these cases, interior solutions like sump pumps or interior drain tiles might also be necessary. For older houses, it’s wise to combine both exterior and interior measures to ensure effective long-term waterproofing.
If I choose to go with a professional interior drainage system versus handling it myself with sealants, how much extra should I set aside for hidden costs or potential surprises during the project?
When hiring professionals for an interior drainage system, it’s wise to budget an additional 10-20% above the initial quote to cover hidden costs. Common surprises can include unexpected mold remediation, structural repairs, or the need for sump pump upgrades. DIY sealant projects typically have fewer hidden expenses, but professional jobs can uncover issues once the basement floor or walls are opened.
If my basement only has damp walls but not any obvious leaks or standing water, do I still need a full waterproofing system, or would improving exterior drainage and using a sealant be enough based on your guide?
If your basement walls are just damp without visible leaks or standing water, you might not need a full waterproofing system right away. Improving exterior drainage—like extending downspouts, grading soil away from the foundation—and applying a quality sealant on interior walls can often control minor moisture issues. Keep an eye on conditions, though, and consider professional advice if dampness persists or worsens.
You mentioned that professional waterproofing can involve a range of systems and costs, but how big of a price difference is there between tackling minor seepage with DIY sealants versus hiring pros for a full drainage system? I’d like to get a sense of when it’s worth spending more upfront.
DIY sealants for minor seepage usually cost between $20 and $100, mainly for materials like waterproof paint or caulk. In contrast, hiring professionals for a full drainage system can range from $2,000 to $10,000 or more, depending on your basement’s size and the complexity of the job. If you notice persistent water problems or structural concerns, investing in professional solutions is often worthwhile to prevent future damage and costly repairs.
You mention that homeowners are often surprised by hidden expenses in basement waterproofing projects. Can you give some examples of these hidden costs I should be aware of before I start budgeting for my own basement?
Some common hidden costs in basement waterproofing include repairing any structural damage discovered once work begins, the need to remove and later reinstall finished walls or flooring, extra charges for dealing with mold or mildew, and permits or inspection fees required by your local authorities. You might also encounter unexpected expenses for upgrading drainage or sump pump systems if your existing ones are outdated or inadequate.
You mention potential hidden costs when budgeting for basement waterproofing. Can you give some examples of what unexpected expenses homeowners commonly run into during these projects?
Homeowners often encounter unexpected costs like repairing structural damage discovered during the waterproofing process, replacing or upgrading sump pumps, and addressing mold or mildew problems that surface once walls are opened. There may also be extra charges for hauling away debris, repairing landscaping disrupted by exterior work, or fixing hidden plumbing leaks uncovered during the project.
The article mentions hidden costs that can come up during basement waterproofing. Could you give a few examples of what those unexpected expenses might be, especially for someone trying to stick to a tight budget?
Hidden costs during basement waterproofing can include things like discovering mold or mildew that needs removal, repairing or replacing damaged foundation walls, relocating plumbing or electrical systems, and extra excavation if the soil conditions are worse than expected. These surprises can add up quickly, so it’s smart to set aside a small contingency fund in your budget just in case.
You mention hidden costs when budgeting for basement waterproofing. As a business owner trying to plan ahead, what are some common unexpected expenses I should look out for during the installation process?
When budgeting for basement waterproofing, some hidden costs to watch for include repairs to unseen foundation damage discovered during the installation, extra labor if your basement has difficult access or thick flooring, and potential electrical or plumbing work if systems need moving. You might also face disposal fees for debris, or costs for bringing the area up to code if issues are uncovered. Factoring in a contingency of 10–20% can help cover these kinds of surprises.
Could you provide more information about the hidden costs mentioned in the article? For a small business located in an older building, what unexpected expenses should I look out for during a waterproofing project?
Hidden costs during basement waterproofing can add up, especially in older buildings. For a small business, watch for expenses like repairing structural damage discovered during the project, replacing outdated or damaged plumbing and electrical systems, asbestos or mold remediation, and disposing of old materials. Permits and inspection fees can also increase your total cost. Planning for these possibilities in your budget can help you avoid surprises as the project progresses.
You mentioned hidden costs associated with basement waterproofing. Can you give some examples of what these unexpected expenses might be so I can factor them into my budget from the start?
Certainly! Hidden costs in basement waterproofing often include repairing or replacing damaged drywall, insulation, or flooring after water issues are addressed. You might also encounter extra charges for mold remediation, structural repairs, or updates to plumbing or electrical systems if problems are uncovered during the project. Permits and increased labor costs for unexpected complications can also add to your final bill, so it’s wise to set aside a contingency fund.
If I attempt a DIY solution with sealants for minor water intrusion, how long can I realistically expect it to last before needing a more professional approach? Are there signs I should watch for that indicate it’s time to upgrade?
DIY sealant solutions for minor water intrusion typically last anywhere from 1 to 5 years, depending on the product quality and the underlying issue. Keep an eye out for recurring damp spots, peeling paint, musty odors, or increased water seepage—these are signs the sealant may be failing and it’s time to consider a more comprehensive, professional waterproofing approach.
You mentioned that interior sealants are a quick DIY fix for minor seepage, but there are also professional systems for more serious problems. How do you decide which approach is appropriate, and is there a risk of making things worse if you choose the wrong system for your basement?
Choosing between DIY interior sealants and professional waterproofing depends on the severity and source of your basement’s moisture. If you notice only slight, occasional dampness or minor leaks after heavy rain, a sealant might suffice. However, persistent water, visible cracks, or signs of mold suggest a deeper issue that likely needs expert attention. Using a sealant in situations that require more robust solutions can trap moisture and worsen foundation problems, so assessing the issue thoroughly or consulting a specialist is wise.
For a busy family with limited DIY skills, how do interior drainage systems like French drains compare to hiring a professional for an exterior solution in terms of cost and ongoing maintenance?
Interior drainage systems like French drains typically cost less upfront than exterior waterproofing solutions installed by professionals. They’re also less disruptive to your yard and can often be maintained with occasional checks to keep drains clear. Exterior solutions, while more expensive and complex to install, can be more effective for severe water issues and usually require less day-to-day maintenance. For a busy family with limited DIY skills, starting with interior drainage might be more affordable and manageable, but hiring a pro for either option ensures proper installation and peace of mind.
The article mentions both interior and exterior waterproofing methods, but does not go into detail about which situations call for each. Can you clarify what factors would make exterior waterproofing a better investment than just addressing issues from inside the basement?
Exterior waterproofing is generally the better investment when the basement has recurring water seepage, significant foundation cracks, or if the outside grading and drainage are poor. It’s most effective for homes with ongoing moisture problems or when building a new house. Interior methods are more suited for minor dampness or as a temporary fix, but they don’t address the root cause—water entering from outside. Exterior solutions prevent water from ever reaching your basement walls, offering long-term protection and potentially increasing your home’s value.
If my basement only has occasional dampness and musty odors rather than visible flooding, would a DIY approach typically suffice, or is it better to consult a professional from the start?
For occasional dampness and musty odors without visible flooding, you can often start with DIY methods like improving ventilation, using a dehumidifier, and sealing minor cracks. However, if these steps don’t resolve the issue or if you notice worsening conditions, it’s wise to consult a professional. This helps ensure there’s no hidden water intrusion or mold problem that needs expert attention.
You mentioned hidden costs when budgeting for basement waterproofing. Could you give some examples of what those hidden expenses might be, especially for someone considering professional systems versus tackling some parts as DIY?
Hidden costs in basement waterproofing can include permit fees, repairs to previously unseen water damage, mold remediation, and disposal of debris from the work. If you hire a professional, there could be charges for inspections or unexpected complications once work begins. For DIY projects, you might face extra tool rentals or the need for specialty materials you hadn’t planned for. Planning for these possibilities helps avoid surprises.
I’m curious about the difference in cost and effectiveness between DIY interior sealants and hiring professionals for more complex drainage systems. How do I decide which approach makes sense for a basement with just mild dampness?
DIY interior sealants are generally less expensive, often costing just a few hundred dollars, and work best for mild dampness since they mainly block minor moisture. Professional drainage systems are more costly—ranging from a couple thousand dollars upward—but they address water at its source and offer longer-lasting protection. If your basement only has mild damp spots, starting with DIY sealants could be sufficient. However, if problems persist or worsen, consulting a pro for more comprehensive solutions is wise.
I am curious about the potential hidden costs you referenced in the budgeting section. Could you elaborate on what some of these unexpected expenses might be when hiring a contractor for basement waterproofing?
Some hidden costs when hiring a contractor for basement waterproofing might include repairs to previously undetected foundation cracks, mold remediation if water damage is worse than expected, or upgrades to your drainage system. You might also face extra charges for moving large furniture or appliances, obtaining permits, or disposing of debris after the job. It’s a good idea to ask contractors about these possibilities upfront.
When budgeting for basement waterproofing, are there any hidden costs homeowners often overlook—such as repairs to landscaping or foundation after the work is done—that should be factored into the initial estimate?
Yes, homeowners often overlook additional costs like repairing landscaping, walkways, or driveways that may be disturbed during exterior waterproofing. Sometimes, minor foundation repairs or patching inside the basement are needed after waterproofing work. It’s also wise to budget for any necessary mold remediation or replacing damaged drywall and flooring after leaks are fixed. Factoring these potential expenses into your initial estimate helps prevent budget surprises.
The article mentions budgeting for both DIY solutions and professional systems, but how do I know when a basement water issue is bad enough that I should skip DIY and call in a pro? Are there signs or severity levels I should look for?
If you notice persistent or large amounts of water, foundation cracks, mold growth, or repeated flooding, it’s time to call a professional. DIY fixes can work for minor dampness or small leaks, but if the water problem keeps coming back or you see structural issues, expert assessment is important to prevent bigger damage. Trust your instincts—if it feels overwhelming or unsafe, get a pro involved.
When considering hydrostatic pressure as a cause for basement water issues, how much more should I expect to budget if the fix requires complex drainage or sump pump systems compared to just using interior sealants or coatings?
Addressing hydrostatic pressure with complex drainage systems or sump pumps usually adds a significant cost compared to basic sealants or coatings. While sealants may cost a few hundred dollars, installing interior drainage or a sump pump system can range from $2,000 to $10,000 or more depending on basement size and local rates. The higher cost reflects the labor and materials needed for proper water management beyond just surface treatment.
How should homeowners factor in potential hidden costs if the waterproofing project uncovers additional problems, like structural foundation issues? Are there warning signs that can help estimate the risk of unexpected expenses before starting the job?
Homeowners should set aside a contingency fund—typically 10 to 20 percent of the waterproofing budget—to handle hidden costs like structural repairs. Warning signs to watch for include large or widening wall cracks, doors or windows that stick, uneven floors, or visible bowing in basement walls. If you notice any of these before starting, an inspection by a structural specialist can help you better estimate potential extra expenses.
You mention hidden costs that can come up during waterproofing projects. Can you give some specific examples of what kinds of unexpected expenses I should look out for so I can budget accurately from the start?
Some unexpected expenses to watch for during basement waterproofing include discovering mold that requires remediation, finding structural damage like cracks that need repair, needing to upgrade your sump pump or drainage system, or having to move utilities and pipes to complete the work. These issues might only become apparent once the project begins, so it’s wise to set aside a contingency fund in your budget for such surprises.
If a homeowner is dealing mainly with condensation and minor dampness rather than actual water seepage, would focusing on sealants and coatings be sufficient, or is it still important to consider more comprehensive waterproofing systems?
If the issue is limited to condensation and minor dampness without active water seepage, starting with sealants, coatings, and improving ventilation could resolve the problem. However, it’s wise to monitor the situation—if dampness persists or worsens, exploring more comprehensive waterproofing systems may be necessary to prevent future damage and ensure long-term dryness.
The article mentions budgeting for potential hidden costs with basement waterproofing. Can you give examples of what some of those hidden costs might be, especially if you’re dealing with older homes?
Hidden costs in basement waterproofing, especially with older homes, can include repairing or replacing outdated plumbing, addressing unexpected mold or mildew issues, and fixing structural damage like cracks in the foundation. You might also uncover problems with old electrical wiring or need to upgrade drainage systems that aren’t up to code. It’s smart to set aside extra funds for these possibilities when planning your project.
In your breakdown, you mention both DIY solutions like sealants and more complex professional drainage systems. How can a homeowner tell when a water issue is minor enough for a DIY fix versus when it’s time to call in professionals for a full system?
Homeowners can usually handle minor issues like small cracks or slight dampness with DIY sealants if water appears only during heavy rain or there’s no standing water. However, if you notice persistent leaks, pooled water, mold growth, or foundation cracks, these are signs of a more serious issue. In those cases, it’s best to consult professionals for a thorough assessment and potential drainage system installation.
If my basement only has occasional dampness rather than flooding, would starting with interior sealants be enough, or is it more cost-effective long-term to invest in a more robust system right away?
For occasional dampness, interior sealants can be a good first step and are usually less expensive upfront. However, if moisture persists or worsens, you might need a more comprehensive solution like a sump pump or exterior waterproofing. Investing in a robust system from the start can be more cost-effective long-term if you anticipate ongoing issues, as it helps prevent potential damage and repeated repair costs.
I noticed you mentioned both DIY solutions like sealants and more complex professional systems for basement waterproofing. Could you give a rough comparison of how much homeowners typically save doing it themselves versus hiring a contractor, and what risks come with the DIY route?
Homeowners who choose DIY basement waterproofing methods, like applying sealants, often spend a few hundred dollars, while hiring professionals for comprehensive systems can cost several thousand dollars. However, DIY solutions typically only address surface-level issues and may miss underlying problems, increasing the risk of leaks or damage later on. If mistakes occur or moisture problems persist, fixes can end up costing more than hiring a pro from the start.
You mention that basement waterproofing costs vary a lot depending on the approach. For someone just noticing some musty odors and occasional dampness, how can I tell if a DIY interior sealant would be enough, or if it’s worth paying for a professional drainage system?
If you’re only noticing musty odors and occasional dampness, a DIY interior sealant could help as a first step, especially if there are no visible cracks or standing water. Try sealing interior walls and monitor if the dampness improves. If you continue to have moisture issues, see water pooling, or notice mold growth, it’s a sign of a bigger problem—at that point, consulting a professional for a drainage system would be worthwhile.
The article mentions common causes like hydrostatic pressure and condensation leading to basement moisture. If I notice only a slight musty odor but no visible water, should I focus on interior sealants first, or is it worth investing in a drainage system right away?
If you’re only noticing a slight musty odor and no visible signs of water, starting with interior solutions like sealants and a dehumidifier can be a sensible first step. Monitor the situation closely—if odors persist or moisture becomes visible, then considering a more substantial investment like a drainage system would be worthwhile. Addressing humidity early can often prevent bigger issues later.
You talk about hidden costs in basement waterproofing. Could you give some examples of what those unexpected expenses might look like? I’m trying to budget for a small project but don’t want to get caught off guard if there’s stuff most homeowners forget.
Some common hidden costs in basement waterproofing include repairing or replacing damaged drywall, flooring, or insulation after water issues are fixed. You may also need to budget for mold remediation if moisture has been present for a while. In some cases, contractors discover foundation cracks or plumbing leaks during the process, which can add to the total cost. It’s helpful to set aside a contingency fund—about 10–15% extra—for these possibilities.
If I tried using interior sealants as a DIY fix for minor seepage, how often would I likely need to reapply them or check for effectiveness compared to more permanent solutions like a sump pump?
Interior sealants can provide a temporary fix for minor basement seepage, but they typically need to be checked and possibly reapplied every 1 to 3 years, depending on moisture levels and the type of sealant used. In contrast, solutions like sump pumps are designed for long-term use and generally require only routine maintenance, not frequent replacement or reapplication.
The article mentions both DIY solutions and professional systems for basement waterproofing. For someone on a tight college budget, what are the risks of trying to fix minor seepage with sealants rather than paying for a professional inspection and repair?
Using sealants as a DIY fix for minor basement seepage can be budget-friendly, but it does carry risks. Sealants often only address surface symptoms and may not stop water from entering through cracks or hidden gaps. This means problems can return or worsen over time, possibly leading to mold growth or structural damage. If you go the DIY route, monitor the area closely and consider saving up for a professional inspection if issues persist.
The article mentions both interior and exterior waterproofing solutions, like sealants and sump pump systems. How do you decide which method is the most cost-effective or appropriate if your basement only has minor damp spots but no actual flooding?
If your basement only has minor damp spots and no flooding, starting with interior solutions is usually more cost-effective. Applying waterproof sealants to walls and floors can often solve minor moisture issues. You might also check for and fix any cracks or gaps. Exterior solutions or sump pumps are generally needed only for persistent or severe water problems. Monitoring the situation after interior treatments can help you decide if any further action is necessary.
The article talks about both DIY solutions like sealants and professional systems such as sump pumps and drainage. For a busy parent with limited time, is it really worth trying the DIY route, or is it better to budget for a professional fix from the start?
For a busy parent with limited time, hiring a professional is usually the better choice. While DIY methods like sealants may be less expensive upfront, they often require ongoing upkeep and may not address the root cause. Professionals can provide long-term solutions, saving you time and stress in the long run. If your schedule is tight, budgeting for a reliable fix right away is generally more practical.
When comparing interior sealants and coatings versus installing a full interior drainage system, is there a big difference in long-term effectiveness and maintenance costs? I’m trying to decide which approach would be wiser for my mildly damp basement.
Interior sealants and coatings are typically less expensive upfront, but they mainly address surface moisture and may only provide a temporary fix—especially if water pressure increases over time. A full interior drainage system costs more initially, but it’s much more effective long-term at managing water and reducing maintenance needs. For a mildly damp basement, sealants could work for minor issues, but if you want a lasting solution with less future maintenance, an interior drainage system is the wiser investment.
The article mentions hidden expenses when budgeting for basement waterproofing. Could you give some real examples of these hidden costs that homeowners often overlook during planning, and any tips to avoid them?
Some hidden expenses in basement waterproofing often include repairing damage discovered during the job, like rotting framing, mold remediation, or replacing damaged drywall and flooring. Drainage system upgrades and landscaping repairs after excavation can also add to your costs. To avoid surprises, ask contractors for a detailed inspection and itemized estimate up front, and set aside a contingency fund—about 10–20% extra—for unexpected issues.
If my basement only has mild dampness rather than major flooding, would it make sense to start with DIY sealants and coatings, or could skipping straight to a professional system be more cost-effective in the long run?
If your basement just has mild dampness, starting with DIY sealants and coatings can be a sensible and budget-friendly first step. These products often help with minor moisture issues. However, if the dampness returns or gets worse, investing in a professional waterproofing system may be more cost-effective long term, since it addresses underlying causes and reduces the chance of future repairs. Monitoring the situation over time can help you decide when a professional solution might be necessary.
The article mentions hidden costs in basement waterproofing. Could you give some specific examples of these, especially ones that tend to surprise small business owners like me when budgeting for a professional installation?
Some hidden costs in basement waterproofing that often surprise small business owners include permit fees required by local authorities, unexpected repairs for damage uncovered during installation (like mold removal or fixing structural cracks), and the cost of moving or storing inventory temporarily. You might also encounter extra charges for re-routing plumbing or electrical systems, and for restoring the space after the work is done, such as repainting or replacing flooring.
The article mentions that many homeowners are surprised by the range of options and expenses involved in basement waterproofing. Could you clarify which specific hidden costs are most common when hiring a professional, and how homeowners can best prepare for them in their budget?
Some common hidden costs in professional basement waterproofing include unexpected repairs (like fixing foundation cracks or replacing damaged drywall), permit fees, mold remediation, and the expense of moving or replacing items during the process. To prepare, homeowners should set aside a contingency fund—typically 10-20% above the initial estimate—and ask contractors to provide detailed quotes that list all possible extra charges.
I noticed you mentioned both interior and exterior waterproofing solutions with different levels of complexity and cost. How can a homeowner tell which approach is actually necessary for their specific moisture problem before investing in a full system?
To determine whether you need interior or exterior waterproofing, start by identifying where the moisture is coming from. If you see water stains or dampness on basement walls after heavy rain, it may suggest an exterior issue. If moisture appears without recent rain or is limited to condensation, interior solutions might suffice. Consider consulting a professional who can inspect your basement and diagnose the source of moisture. Sometimes, a combination of both approaches is necessary depending on the severity and origin of the problem.
I noticed you mention both DIY solutions and professional systems for basement waterproofing. How much of a cost difference should I expect between doing it myself with sealants versus hiring someone for a complete drainage system?
DIY basement waterproofing with sealants and patching products typically costs between $100 and $500, depending on the size of the area and materials you choose. In contrast, hiring professionals for a full drainage system and sump pump installation can range from $2,000 to over $10,000. The big difference comes from the labor, materials, and scope of work involved—DIY is less expensive but may only address minor moisture, while professional systems tackle more serious or ongoing water issues.
You talk about budgeting for potential hidden costs during basement waterproofing. What are some common unexpected expenses that homeowners should be prepared for when starting this kind of project?
Some common unexpected expenses in basement waterproofing projects include discovering mold or mildew that needs remediation, repairing structural damage like cracks in the foundation, relocating plumbing or electrical lines, and replacing damaged drywall or flooring. Sometimes, old sump pumps may need updating, or additional drainage solutions become necessary after work begins. Setting aside a contingency fund, typically 10-20% of your estimated budget, can help handle these surprises without stress.
You mention that hydrostatic pressure can force water into the basement through weak spots. How can I tell if that’s what’s happening in my home, and does it usually require professional waterproofing, or are there effective DIY methods for this kind of issue?
Signs of hydrostatic pressure include water seepage through cracks, damp walls, or even standing water after heavy rain. You might also notice white mineral deposits (efflorescence) on the walls. Small cracks or minor seepage can sometimes be managed with DIY sealants and improving drainage around your home. However, persistent leaks, bowing walls, or widespread dampness usually mean professional waterproofing is needed to fully address the problem and protect your basement.
You mention potential hidden costs that can pop up during basement waterproofing. Could you elaborate on what some of those unexpected expenses tend to be, and how homeowners can plan ahead to avoid budget overruns?
Hidden costs in basement waterproofing often include repairing structural damage discovered during the project, dealing with mold remediation, or replacing damaged drywall and flooring. Sometimes, unexpected plumbing or electrical issues arise once walls are opened. To plan ahead, set aside an extra 10–20% in your budget for surprises and ask your contractor for a detailed inspection before starting work.
If a basement has minor seepage but no visible foundation cracks, would interior sealants alone be enough, or is it usually necessary to look into things like sump pumps or French drains even for minor problems?
For minor seepage without visible foundation cracks, interior sealants can sometimes help reduce moisture. However, they often only address the symptoms, not the source. If the seepage continues or worsens, it’s wise to investigate further solutions like sump pumps or interior French drains to manage water before it causes bigger issues. Monitoring the situation over time is important to ensure the problem doesn’t escalate.
How do I know if my situation just calls for a simple interior sealant versus a full drainage system or sump pump installation? Are there signs I should look for that indicate one type of solution over another?
You can usually tell which solution you need by the severity and source of your basement moisture. If you only see minor damp spots or occasional condensation, an interior sealant might be enough. However, if you notice standing water, persistent leaks after rain, or water entering through foundation cracks, a full drainage system or sump pump is likely necessary. Also watch for mold, musty odors, or peeling paint, as these signs often point to a more serious water intrusion problem that needs more than just sealing.
If my basement only smells a little musty after it rains but there isn’t visible water coming in, does that mean a DIY solution like interior coatings would be enough, or should I be looking at more extensive options right away?
A slight musty smell after rain, without visible water, often points to minor humidity or condensation issues rather than major leaks. You might start with DIY solutions like improving ventilation, running a dehumidifier, and using interior waterproof coatings. However, if the smell persists or worsens, it’s wise to investigate further for hidden moisture problems or consider consulting a professional before investing in larger projects.
The article mentions that costs can vary a lot depending on the waterproofing system chosen. Can you provide a ballpark range for professional installation versus DIY solutions, including any hidden expenses that homeowners often overlook?
Professional basement waterproofing typically ranges from $2,000 to $10,000 or more, depending on the system and size of your basement. DIY solutions, like sealants or crack fillers, are much cheaper—usually between $100 and $1,000. However, homeowners often overlook costs like permits, mold remediation, repairs to finished areas, and ongoing maintenance, which can add significantly to the total expense.
Besides the upfront materials and labor costs, are there any hidden expenses—like permits or unexpected foundation repairs—that homeowners often overlook when budgeting for basement waterproofing?
Homeowners often overlook costs like building permits, which may be required depending on your local codes. Unexpected foundation repairs can arise if damage is found once work begins. You should also consider expenses for mold remediation if moisture has caused problems, as well as potential costs to restore landscaping or interior finishes after the waterproofing work is done.
You mentioned hidden costs in basement waterproofing—are there any specific surprise expenses I should watch out for when hiring a contractor, like permits or follow-up maintenance?
Yes, there are a few potential hidden costs to keep in mind. Permit fees may be required depending on your local regulations, and some contractors do not include these in their initial quote. Also, after the work is done, you might need follow-up maintenance or inspections to ensure everything stays dry, and those costs can add up over time. It’s smart to ask your contractor upfront about permits, warranties, and any recommended maintenance.
You mentioned hidden costs when budgeting for basement waterproofing. Could you give some real-world examples of unexpected expenses homeowners should be prepared for during the process, especially if they live in older homes with existing foundation cracks?
Absolutely, hidden costs can catch homeowners off guard, especially in older homes. Common unexpected expenses include addressing previously unseen foundation damage, repairing or replacing rotten wood or moldy drywall, relocating plumbing or electrical lines, and dealing with asbestos or lead paint remediation. Sometimes, excavation uncovers additional cracks or drainage issues that weren’t visible initially. It’s wise to set aside a contingency fund to handle these surprises during your waterproofing project.
The article talks about both DIY solutions and professional systems for basement waterproofing. How do you know when it’s better to call in the pros rather than trying to tackle it yourself, especially for minor dampness?
If your basement has only mild dampness or a bit of condensation, DIY fixes like improving ventilation or applying waterproof paint can be enough. However, if you notice persistent water seepage, musty odors, mold growth, or visible cracks in the foundation, it’s wise to consult a professional. These signs often point to underlying issues that DIY methods might not fully resolve.
I see you brought up hidden costs with basement waterproofing. Can you give some examples of what those hidden expenses might be, beyond just the materials and labor?
Absolutely, hidden costs with basement waterproofing can add up. Examples include the need for repairing or replacing damaged drywall, flooring, or insulation after the work is done. You might also encounter expenses for mold remediation if moisture has been present for a while, or fees for permits and inspections required by your local area. Hauling away debris and unexpected structural repairs are also common hidden costs.
You mentioned potential hidden costs in basement waterproofing. Could you give examples of what unexpected expenses homeowners should prepare for beyond materials and labor, especially if their basement already has some mild dampness?
Homeowners often encounter hidden costs like the need to repair or replace damaged drywall, insulation, or flooring that’s been affected by dampness. Mold remediation can also be necessary if moisture has been present for a while. Additional expenses may include upgrading sump pumps, improving drainage systems, or even addressing foundational cracks that were uncovered during the waterproofing process.
You talk about budgeting and mention potential hidden costs in professional waterproofing jobs. Can you share examples of unexpected expenses that usually catch homeowners off guard during the process?
Unexpected expenses in basement waterproofing often include repairing hidden structural damage, like cracks or rot, discovered once walls or floors are opened up. Mold remediation is another common surprise if moisture issues have lingered. Homeowners sometimes also face extra costs for upgrading sump pumps, improving drainage systems, or bringing older homes up to current building codes. These can add to the overall project budget, so it’s wise to set aside a contingency fund.
If my home already has some foundation cracks and occasional musty odors, is it better to invest in a full professional system right away, or are there effective DIY methods I should try first to keep initial costs down?
If you’re seeing foundation cracks and musty odors, it’s important to address the root issues early. Small cracks and mild odors can sometimes be managed with DIY steps like sealing visible cracks with epoxy and using a dehumidifier. However, if the problems are recurring or worsening, a professional assessment is recommended to prevent more serious damage. Starting with DIY can keep costs down, but don’t delay professional help if you notice water intrusion or worsening smells.
You mentioned both DIY solutions like sealants and more complex professional systems for basement waterproofing. For someone on a tight student budget but wanting to avoid future issues, is there a middle ground option that balances cost and long-term reliability?
Yes, there are middle-ground options that balance affordability and long-term effectiveness. You could start with DIY approaches like applying waterproof paint or sealants to cracks, which are low-cost. To boost results, consider investing in a good quality dehumidifier and improving exterior drainage with simple grading or extending downspouts—these steps are budget-friendly and can help prevent moisture issues without the high cost of full professional systems.
You mentioned potential hidden costs when budgeting for basement waterproofing. Can you give examples of what those hidden expenses might be, especially for older homes?
Hidden costs in basement waterproofing for older homes can include things like repairing or replacing damaged foundation walls, dealing with outdated or insufficient drainage systems, removing hazardous materials like asbestos or lead paint, and addressing mold or rot behind finished walls. Sometimes, you might also find old plumbing or electrical lines that need updating once the area is exposed. These extras can add up, so it’s wise to set aside a contingency in your budget.
Could you go into more detail about the hidden costs you mention when budgeting for basement waterproofing? For people on a college student budget, I want to know what unplanned expenses might pop up beyond just the materials and labor.
Absolutely, hidden costs can catch people off guard. Beyond materials and labor, you might face expenses like repairing or replacing drywall, flooring, or insulation if water has already caused damage. Mold remediation, increased utility bills from running dehumidifiers, or fees for permits and inspections could also arise. It’s wise to set aside a contingency fund, even on a tight budget, to cover these surprises.
As a small business owner considering basement waterproofing, I’m concerned about hidden costs. Beyond materials and labor, what are some potential unexpected expenses I should factor into my budget to avoid going over what I planned?
When budgeting for basement waterproofing, it’s wise to include possible costs for permits, mold remediation if moisture is already present, and repairs to damaged structural elements uncovered during the process. You might also face expenses for disposing of old materials, re-landscaping if exterior work is needed, and temporary relocation or business interruption if access to your basement is restricted during the work.
Can you offer advice on whether it’s worth trying a DIY interior sealant for minor seepage, or is it usually better to invest in a professional drainage system up front, even if the moisture problems don’t seem severe yet?
For minor seepage, a DIY interior sealant can be a quick and low-cost fix, especially if the moisture is limited and not recurring. However, sealants usually only address surface issues, not the root cause. If you notice persistent dampness or if you want long-term peace of mind, investing in a professional drainage system is a more reliable solution. Assess the extent of the problem first; if in doubt, getting a professional assessment can help you decide the best course of action.
If your basement just has some minor dampness and no obvious cracks or water coming in, would starting with DIY sealants be enough, or is it worth getting a professional inspection first to avoid any bigger issues down the line?
If the dampness is minor with no visible cracks or leaks, starting with DIY sealants on walls and floors is a reasonable first step. Make sure to address any obvious sources of moisture, like humidity or poor ventilation. However, if the dampness continues after your efforts, or you notice mold or a musty smell, a professional inspection is a good idea to rule out hidden issues before they become bigger problems.
You mention that foundation cracks and hydrostatic pressure are common causes of basement water issues. How can I figure out which of these is the main culprit in my home before deciding on a waterproofing method?
To identify whether foundation cracks or hydrostatic pressure is causing your basement water issues, start by inspecting your basement walls and floors for visible cracks or damp spots—these usually point to foundation cracks. If water appears mainly after heavy rains or snowmelt and you don’t see cracks, hydrostatic pressure is likely the issue. For a thorough assessment, consider having a professional inspection to determine the root cause before choosing a waterproofing solution.
You talked about hidden costs when budgeting for basement waterproofing. Could you list some examples of what those unexpected costs might be, especially if I find foundation cracks or need to switch from sealants to a drainage system?
Unexpected costs can include repairing foundation cracks, which often require professional assessment and structural fixes. If you switch from basic sealants to a full drainage system, you might also face costs for excavation, sump pump installation, and possible relocation of utility lines. Mold remediation, permits, or upgrading your electrical system to handle sump pumps can also add to the total. Each of these extras depends on the condition of your basement and local regulations.
When you mention hidden costs in basement waterproofing, what are some examples that homeowners often overlook? I’m trying to put together a realistic budget and don’t want to be caught off guard.
Some commonly overlooked hidden costs in basement waterproofing include repairs to interior finishes like drywall or flooring that may need to be removed and replaced, addressing mold remediation if moisture has already caused issues, and potential landscaping or exterior repairs if digging is required. You might also encounter permit fees or unexpected structural repairs if damage is discovered during the process. Factoring in a contingency amount can help cover these surprises.
You mention that there are both DIY solutions and professional systems for waterproofing. How can I realistically estimate the costs and effectiveness of each option for my own home before deciding which route to take?
To estimate costs and effectiveness, start by identifying your basement’s specific issues, such as minor leaks or major water intrusion. Research local prices for DIY materials like sealants or drainage mats, and compare them to professional quotes for full systems. Consider your skill level—DIY fixes are cheaper but may not address severe problems. Professional installations cost more upfront but offer greater reliability and warranties. Assess the scale of your problem and get multiple professional assessments to make an informed decision.
If my basement only has occasional mild dampness and not chronic flooding, would a DIY sealant usually suffice, or do most people end up needing more involved systems to prevent future problems?
For occasional mild dampness, a high-quality DIY sealant can often help, especially if the moisture is limited to a few areas like walls or floors. Many homeowners have success with this approach. However, if dampness persists or worsens after sealing, it may be necessary to consider more comprehensive solutions like improving drainage, adding a sump pump, or installing interior drainage channels. Monitoring the situation after using a sealant will help you decide if further action is needed.
How much of a difference in cost should I expect between tackling foundation cracks myself versus hiring a professional? Are there risks of causing more damage if I go the DIY route for minor cracks?
DIY repair kits for minor foundation cracks typically cost between $50 and $200, while a professional repair can range from $500 to over $1,500 depending on severity. While handling small, hairline cracks yourself can save money, there’s a risk of improper sealing or missing underlying structural issues, which could make the problem worse. For peace of mind and lasting results, consulting a pro for at least an assessment is a safe approach.
The article refers to DIY solutions for minor seepage, but how do I know if a problem is small enough for a DIY fix versus needing a full professional drainage system? Is there a threshold or warning sign that homeowners should watch out for?
If you see only occasional damp spots or minor water stains after heavy rain, DIY solutions like sealing cracks or applying waterproof paint may be enough. However, if you notice standing water, musty odors, mold growth, or repeated seepage after every rainfall, these are signs that the issue is more serious and likely needs a professional drainage system. Persistent moisture or structural cracks are definite warning signs to consult an expert.
If my basement only has mild dampness but no standing water or big cracks, would a DIY sealant be enough, or should I still consider more extensive professional solutions?
For mild dampness without standing water or major cracks, a DIY sealant can often be a practical first step. Make sure to clean and dry the walls thoroughly before applying the sealant. Monitor your basement after the application—if dampness persists, or if you notice musty odors or mold, it may be time to consult a professional for a more in-depth solution.
You mention that costs can vary a lot depending on whether you choose DIY solutions or professional systems. Could you provide some ballpark figures for the most common professional waterproofing options versus basic DIY approaches?
Professional basement waterproofing can range from about $2,000 to $10,000 or more, depending on the method and the size of your basement. For example, interior drainage systems typically cost $3,000 to $7,000, while exterior waterproofing is usually $5,000 to $10,000. Basic DIY options like sealants and crack repairs might cost $100 to $500, but these are generally suited for minor issues rather than major leaks.
For someone who notices only mild dampness but wants to prevent future serious issues, what are the common mistakes to avoid when choosing DIY versus professional waterproofing solutions?
When dealing with mild dampness, a common mistake is underestimating the cause. DIY fixes like sealants or paints may only mask symptoms instead of addressing underlying issues such as poor drainage or cracks. Another pitfall is skipping a thorough inspection—professionals can spot warning signs that DIYers may miss. If you go the DIY route, avoid using quick fixes without understanding the source of moisture, and make sure to use proper materials and preparation techniques.
The article mentions both interior and exterior waterproofing solutions. How do the costs and effectiveness compare between the two? Are there certain situations where exterior options are the only practical choice, even if they’re more expensive?
Interior waterproofing is typically less expensive and involves solutions like sump pumps and interior drainage systems. It works well for managing minor leaks or groundwater issues. Exterior waterproofing, though more costly due to excavation and foundation sealing, offers a more permanent fix by keeping water out before it gets inside. Exterior methods are often necessary for severe leaks, persistent seepage, or when the foundation is seriously compromised. In such cases, despite the higher cost, exterior solutions are the most effective and lasting option.
If hydrostatic pressure is a possible cause of water problems in my basement, does that usually require hiring a professional, or are there effective DIY methods to handle that issue without breaking the bank?
Hydrostatic pressure is a common but tricky cause of basement water problems, often pushing water through walls or floors. While simple issues can sometimes be managed with DIY fixes like sealing cracks and improving exterior drainage, significant hydrostatic pressure typically requires professional solutions such as interior drain systems or exterior waterproofing. If water infiltration is persistent, it’s safer and more effective to consult a specialist, though you can try basic steps first if the problem seems minor.
If a basement has minor seepage and only occasional dampness, is it typically necessary to invest in a full drainage system, or are sealants and coatings usually sufficient for long-term results?
For minor seepage and occasional dampness, sealants and coatings can often provide adequate protection, especially if the moisture isn’t persistent or severe. However, these solutions may only be temporary if there’s underlying water pressure. If the problem worsens over time or if you notice increasing dampness, a full drainage system might become necessary. It’s wise to monitor the situation and address any exterior water issues, such as grading or gutters, to help keep your basement dry.
Could you explain a bit more about hidden costs? Besides materials and labor, what common budgeting mistakes should first-time homeowners like me watch out for when planning basement waterproofing?
Hidden costs in basement waterproofing often include permits, debris removal, and repairs to landscaping or walls after the work is done. First-time homeowners sometimes forget to budget for these extras. Another common mistake is underestimating the cost of fixing any pre-existing damage, like mold or structural issues found during the project. Make sure to get detailed quotes and ask contractors about potential surprises before starting.
Does the article cover the potential hidden costs that might show up after a project starts, such as uncovering foundation cracks or needing extra drainage? I am trying to avoid budget issues down the line.
Yes, the article does mention that unforeseen issues like hidden foundation cracks or the need for additional drainage can emerge during a basement waterproofing project. It suggests setting aside a contingency fund in your budget to handle such surprises. This way, you can better manage unexpected costs and avoid financial stress as the work progresses.
I noticed the article mentions both interior sealants and more complex systems like drainage and sump pumps. If my basement only has mild dampness and no visible cracks, would starting with a DIY sealant be effective, or is it usually just a temporary fix?
For mild dampness without visible cracks, a DIY interior sealant can help reduce moisture and might offer some short-term relief. However, sealants typically address only surface-level issues and may not solve the underlying cause if moisture persists. If the dampness continues after using a sealant, it could be a sign to consider more comprehensive solutions like improving drainage around the foundation or consulting a professional for further assessment.
You mentioned that potential hidden costs can surprise homeowners during a basement waterproofing project. Can you give some examples of these hidden expenses I should watch out for when planning my budget?
Absolutely, some hidden costs in basement waterproofing projects can include repairing mold or mildew that’s discovered once work begins, fixing structural issues like cracks in the foundation, addressing drainage or plumbing problems, replacing damaged drywall or insulation, and obtaining necessary permits. It’s wise to leave a buffer in your budget for these types of unexpected expenses, as they might only become apparent after the project is underway.
If my basement mostly has issues with condensation and high humidity rather than direct water intrusion, are there specific waterproofing methods or materials you recommend prioritizing to keep costs reasonable?
For condensation and high humidity, you can usually focus on moisture control rather than more expensive waterproofing. Prioritize using a quality dehumidifier, improving basement ventilation, and installing vapor barriers on walls or floors. Make sure gutters and downspouts direct water away from your foundation as well. These methods are often much more cost-effective than full-scale waterproofing systems.
If my basement only gets wet after heavy rainstorms and not year-round, is it still worth considering a full drainage system or is there a seasonal fix that could work just as well?
If your basement only gets wet during heavy rainstorms, you might start by addressing issues like gutters, downspouts, and grading to direct water away from your foundation. Sometimes, sealing cracks or applying waterproof coatings can also help. A full drainage system offers permanent protection, but for occasional water, targeted seasonal fixes may be enough. If problems persist or worsen, investing in a drainage system could prevent future damage.
Can you give an idea of what hidden costs homeowners often overlook when budgeting for basement waterproofing? I’m concerned about going over budget if there are unexpected repairs once the work starts.
Homeowners sometimes forget to factor in costs like repairing or replacing drywall, flooring, or trim that might get damaged during the waterproofing process. Mold remediation, addressing structural issues uncovered during the work, or upgrading old plumbing and sump pump systems can also add to the bill. It’s a good idea to set aside an extra 10–20% in your budget for these potential surprises.
If my basement is only showing occasional mild dampness rather than major flooding, would investing in a full professional waterproofing system be overkill, or could DIY sealants and minor fixes actually be effective and long-lasting?
For occasional mild dampness, starting with DIY solutions like sealants and ensuring gutters and grading direct water away from your foundation can be effective. If these minor fixes control the issue and no further symptoms appear, a full professional system might not be necessary. However, keep monitoring for signs of worsening moisture, as persistent or spreading dampness could eventually require professional intervention.
As a business owner with a finished basement, I’m worried about how long the waterproofing process might disrupt my operations. On average, how much downtime should I expect when having professional basement waterproofing done?
For a finished basement, professional waterproofing typically takes anywhere from 2 to 7 days, depending on the size of your space and the specific methods used. Interior systems tend to be less disruptive than exterior excavation. You may need to restrict access to the basement during this period, but businesses often schedule work during off-hours or less busy days to minimize operational impact.
If someone is dealing with musty odors and minor dampness rather than major leaks, does it make sense to start with DIY sealants or is it usually worth investing in a more comprehensive drainage system right away? I’m trying to weigh initial costs against future risks.
If you’re only noticing musty odors and minor dampness, starting with DIY sealants and improving ventilation can be a cost-effective first step. Monitor the results over a few months. If issues persist or worsen, it may be wise to invest in a more comprehensive drainage system to prevent future, more expensive problems. This approach helps you address immediate concerns without a large upfront investment.
You mention potential hidden costs with basement waterproofing—can you give examples of what those are? I want to make sure I don’t go over budget if the issue turns out bigger than I expect.
Hidden costs with basement waterproofing can include things like repairing unexpected foundation cracks found during the project, addressing mold or mildew if moisture has been present for a while, replacing damaged drywall or insulation, and moving or temporarily disconnecting plumbing or electrical work. Sometimes, extra excavation or permits may also be needed. Factoring in a contingency amount of 10–20% can help cover these surprises.
If I want to tackle some waterproofing work myself before calling in a pro, are there mistakes homeowners often make that end up costing more in the long run? For example, is using the wrong type of sealant on certain basement walls a common issue?
You’re right to be cautious—using the wrong type of sealant is a common mistake, especially on walls that need to breathe, like older masonry. Applying non-breathable sealants can trap moisture and worsen problems. Homeowners also sometimes overlook exterior drainage issues, thinking interior fixes are enough. Prepping surfaces incorrectly or ignoring cracks that need proper repair can also lead to bigger expenses later on. Careful surface prep, using the correct products, and addressing outside drainage will help you avoid costly missteps.
The article points out that foundation cracks and hydrostatic pressure are frequent causes of basement water issues. If a homeowner isn’t sure of the main cause in their own basement, what would be the best first step to diagnose it before selecting a waterproofing method?
If you’re unsure about the exact cause of water issues in your basement, the best first step is to schedule a professional inspection. An experienced basement waterproofing contractor can assess your foundation for cracks, check for signs of hydrostatic pressure, and identify other sources of moisture. This evaluation will help you choose the most effective and targeted waterproofing solution for your situation.
If I wanted to start with a DIY approach for minor dampness before calling in professionals, which type of sealant or coating should I look for, and are there any common mistakes to avoid with DIY waterproofing?
For a DIY approach to minor dampness, look for a high-quality masonry waterproofing paint or sealant designed specifically for basement walls, such as acrylic or epoxy-based products. Make sure to clean and dry the surface thoroughly before applying. Common mistakes to avoid include skipping surface prep, ignoring cracks (which should be filled with hydraulic cement), and applying sealant to walls with active leaks or severe moisture, as these require professional help.
You mentioned hidden costs that can come up during basement waterproofing projects. Can you give some examples of what these unexpected expenses might be? I want to be sure I’m accounting for everything before setting my budget.
Absolutely, hidden costs in basement waterproofing often include repairing damage discovered during the project, such as mold remediation or fixing rotten wood. You might also face extra charges if contractors find structural issues, need to relocate plumbing or electrical lines, or encounter unforeseen permit requirements. It’s a good idea to leave some wiggle room in your budget for these possibilities.
The article talks about hidden costs in basement waterproofing. Could you elaborate on what some of the most common unexpected expenses are, especially for homes with foundation cracks or poor exterior drainage?
Some of the most common unexpected costs in basement waterproofing include repairing foundation cracks, which sometimes require structural reinforcement or epoxy injections. If your home has poor exterior drainage, you might face extra expenses for regrading the landscape, installing or upgrading gutters and downspouts, or adding exterior French drains. Mold remediation and replacing damaged insulation or drywall can also add to the overall cost if water issues have persisted for a while.
The article notes that hidden costs can surprise homeowners during waterproofing projects. Could you specify what some of these unexpected expenses might be and how best to plan for them in a basement waterproofing budget?
Some common hidden costs in basement waterproofing include repairing or replacing damaged drywall and flooring, addressing mold remediation if it’s discovered, and fixing foundation cracks that are found during the project. Permits and disposal fees can also add to the total. To plan for these, it’s wise to add a 10-20% contingency to your budget and get detailed estimates from contractors about what is and isn’t included in their pricing.
You mention that the right waterproofing approach depends on the source and severity of moisture problems. How can homeowners accurately determine whether their issue is due to hydrostatic pressure, poor drainage, or just condensation before choosing a solution?
Homeowners can usually spot the cause by checking where and when moisture appears. Water seeping in during heavy rain often points to poor drainage or hydrostatic pressure, especially if the water enters through floor cracks or joints. Dampness on walls or pipes with no actual leaks, especially in humid weather, usually signals condensation. For certainty, consider using a moisture meter or consulting a professional to identify the exact source before deciding on waterproofing work.
The article mentions both DIY and professional waterproofing options. For a homeowner on a tighter budget, how do the costs and effectiveness of DIY sealants compare to hiring a pro to install a full drainage system?
DIY sealants are much cheaper—typically costing between $50 and $500 for materials—making them appealing for smaller budgets. However, they mainly address minor surface leaks and aren’t as durable or comprehensive. Professional drainage systems, while much pricier (often $2,000 to $10,000), tackle underlying water issues and last longer. For minor dampness, DIY might work, but bigger or recurring problems usually need a pro solution for lasting effectiveness.
If my basement only has mild dampness and I am considering a DIY sealant versus a professional drainage system, how do I determine which option is truly cost-effective in the long run?
To decide which option is more cost-effective, consider both the upfront costs and the potential for future repairs. A DIY sealant is cheaper initially but may only offer a short-term fix if underlying moisture issues persist. Professional drainage systems cost more but address the root cause and can prevent future water damage, potentially saving money over time. Assess the source of dampness and compare expected lifespans and warranties before making your choice.
When trying to choose between interior sealants and a full drainage system like a French drain, how can I determine which solution is truly necessary for my situation and avoid overspending on unnecessary work?
To decide between interior sealants and a full drainage system, first assess the source and severity of moisture—sealants can help with minor surface dampness, but recurring leaks or standing water usually require a drainage system like a French drain. Consulting a reputable waterproofing professional for a thorough inspection can clarify the root cause and appropriate fix, helping you avoid unnecessary expenses.
If my basement only has minor dampness instead of serious flooding, is it usually enough to just use interior sealants, or would it still be smart to consider investing in more advanced waterproofing methods to avoid future problems?
If your basement only has minor dampness, interior sealants can help reduce moisture and are an affordable first step. However, sealants are often a temporary solution and may not address the underlying cause. For lasting protection, especially if the dampness persists, you might want to consider more advanced waterproofing like improving drainage or installing a sump pump. This can help prevent bigger issues down the road.
The article mentions hidden costs in basement waterproofing. Could you give some examples of what those unexpected expenses might be, especially for someone trying to stick to a student budget?
Hidden costs in basement waterproofing can include things like repairing damaged drywall or flooring after the waterproofing is done, fixing or relocating plumbing and electrical systems that are in the way, or addressing mold removal if it’s discovered once work begins. For students on a tight budget, it’s wise to build in a little extra for these surprises when planning your project.
The article talks about the importance of budgeting for waterproofing. For a small business operating out of a basement space, are there certain materials or systems that are both reliable and cost-effective, or does it usually mean paying top dollar for good protection?
You don’t always have to pay top dollar for solid basement waterproofing. For a small business, interior solutions like sump pumps and interior French drains tend to be reliable and more cost-effective than exterior systems. Using high-quality waterproof paints and sealants on walls can also help. The key is choosing materials suited to your space and moisture problem, and getting professional advice to avoid unnecessary expenses.
You mention that budgeting mistakes are common when it comes to basement waterproofing. What are some specific hidden costs homeowners should watch out for during the process, especially those that might not be obvious at the start?
Some hidden costs in basement waterproofing can include unexpected structural repairs if damage is discovered during work, mold remediation if moisture issues have persisted, and the cost of relocating utilities or finishing materials to access problem areas. Permits or required inspections can also add to expenses. It’s wise to set aside a contingency budget for surprises that may only become clear once work is underway.
Could you give more details about the hidden costs involved in basement waterproofing? I’m trying to set a realistic budget but am worried about surprise expenses that might not be obvious upfront.
Hidden costs in basement waterproofing can include repairing or replacing damaged drywall and flooring that’s discovered during the process, addressing unexpected mold or mildew issues, or dealing with structural repairs if foundation cracks are found. You might also need permits depending on local regulations. It’s wise to set aside an extra 10–20% of your budget to cover these potential surprises, so you’re not caught off guard.
My basement only has occasional mild dampness instead of major flooding. Would DIY interior sealants be enough, or should I still consult a professional to avoid long-term issues and higher costs down the road?
For occasional mild dampness, DIY interior sealants can help reduce moisture, especially if the issue is minor and not persistent. However, it’s wise to monitor the area closely. If dampness returns or worsens, consulting a professional is a good idea to identify the source and prevent more expensive repairs in the future. Starting with a DIY approach is reasonable, but don’t ignore recurring issues.