
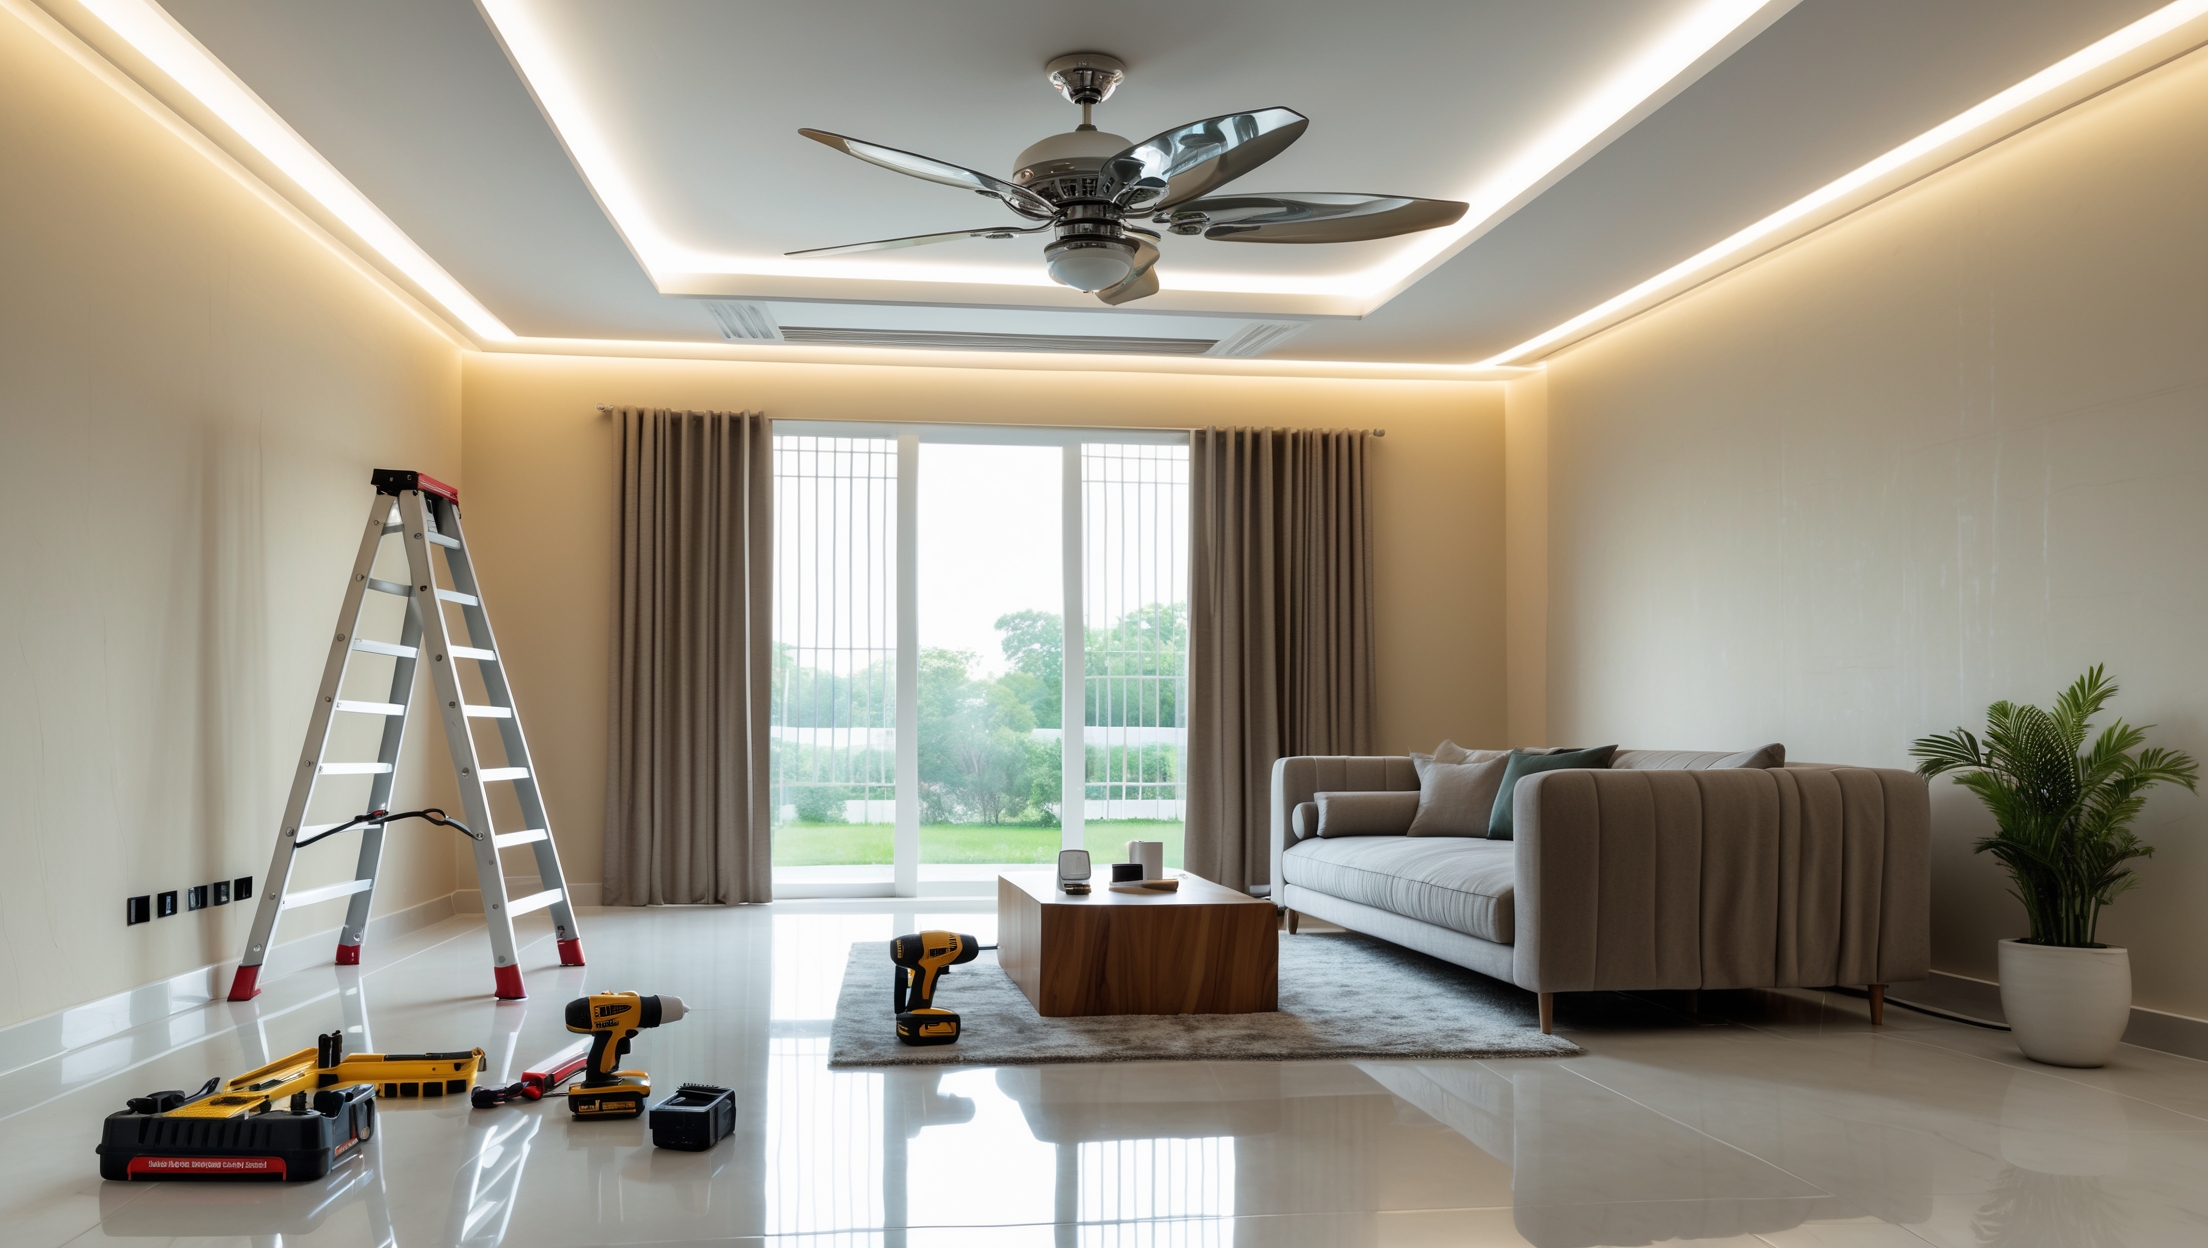
Introduction: Why Ceiling Fan Installation Deserves Careful Planning
Ceiling fans are one of the most practical upgrades homeowners can make to improve energy efficiency, airflow, and comfort. Whether you’re hoping to save on energy bills by supplementing your HVAC system or simply want to add a stylish focal point to a room, ceiling fans offer an impressive return on investment. However, installing a ceiling fan is not as simple as swapping out a light fixture. The process involves electrical work, structural considerations, and strict adherence to safety protocols. Improper installation can lead to serious hazards, from short circuits and falling fixtures to code violations that complicate future home sales. That’s why it’s essential for even experienced DIYers to approach ceiling fan installation with careful planning, the right tools, a realistic budget, and a precise safety checklist. In this comprehensive guide, we’ll break down the complete costs involved, outline the tools and materials you need, demystify the process with practical tips, and provide a step-by-step safety checklist to ensure your installation is both efficient and code-compliant.
Cost Breakdown: Understanding the Real Expenses of Ceiling Fan Installation
1. Ceiling Fan Unit
- Standard Models: $50–$150. Basic fans with pull chains and simple designs.
- Mid-Range Models: $150–$350. Integrated lights, remote controls, and improved efficiency.
- High-End Models: $350–$800+. Designer finishes, smart home compatibility, and superior airflow.
2. Electrical Box and Mounting Hardware
- Fan-Rated Electrical Box: $10–$25. Essential for supporting the weight and vibration of a ceiling fan.
- Mounting Bracket/Hardware: Often included with the fan; replacement kits $5–$15.
3. Wiring and Accessories
- Electrical Wire: $10–$30. For new installations or extending reach.
- Wire Connectors (Wire Nuts): $3–$6 per pack.
- Wall Switches/Remote Kits: Optional, $15–$60.
4. Tools (If Not Already Owned)
- Voltage Tester: $10–$20
- Cordless Drill: $50–$150
- Screwdrivers (Phillips & Flathead): $10–$20
- Wire Strippers: $10–$20
- Stepladder: $50–$120
5. Professional Help (If Needed)
- Electrician Labor: $75–$200 per hour. If you’re uncomfortable with wiring or need a new circuit, factor this in.
Total Estimated DIY Cost
Simple replacement (existing fan-rated box): $75–$250 (fan + minor supplies).
Full installation (new box, wiring, tools): $200–$500+.
Professional install: $200–$600+ (including labor and materials).
Essential Tools and Equipment: Don’t Start Without These
Basic Tools
- Stepladder (tall enough to reach ceiling comfortably)
- Phillips and flathead screwdrivers
- Cordless drill with driver bits
- Wire strippers and cutters
- Voltage tester or non-contact circuit tester
Safety Equipment
- Safety glasses
- Work gloves (especially when handling metal boxes and wire)
- Dust mask (for cutting drywall or working in attics)
Specialty Items
- Fan-rated electrical box (marked for ceiling fans, not just lights)
- Mounting bracket (usually included with the fan)
- Electrical tape
Safety Checklist: Before, During, and After Installation
Pre-Installation Safety
- Turn off power at the breaker panel. Never rely solely on a wall switch.
- Test wires with a voltage tester to ensure circuit is dead.
- Verify ceiling box rating: The electrical box must be clearly marked as suitable for ceiling fan support (UL-listed).
- Inspect the mounting location: Ensure the ceiling can support the fan’s weight and vibration.
- Read manufacturer’s instructions thoroughly before starting.
During Installation
- Use a stable ladder on a flat surface. Never overreach—move the ladder as needed.
- Support the fan: Most fans are heavy; have a helper or a secure way to hold the fan while connecting wires.
- Connect wires correctly: Match colors (black to black, white to white, green/copper to ground). Secure all connections with wire nuts and electrical tape.
- Securely attach the mounting bracket and fan: Tighten all screws fully—loose hardware is a leading cause of wobble and eventual failure.
- Double-check all fasteners before attaching fan blades.
Post-Installation
- Restore power and test fan and light functions.
- Check for wobble: If the fan shakes, use the included balancing kit or adjust blade screws.
- Confirm all switches and remotes are working as intended.
- Clean up tools and debris to prevent tripping hazards.
Step-by-Step Process: How to Install a Ceiling Fan Safely
Step 1: Remove the Existing Fixture
After shutting off power and confirming with a voltage tester, remove the old light fixture. Unscrew the fixture and disconnect wires, noting which were connected where. If the existing box is not rated for a fan, it must be replaced.
Step 2: Install a Fan-Rated Electrical Box
- Use a retrofit brace if the ceiling is finished; these expand to grip joists from above.
- Secure the new box firmly—ceiling fans typically weigh between 15–50 lbs and create vibration.
Step 3: Assemble the Fan (As Much as Possible on the Ground)
- Attach mounting bracket to the electrical box.
- Assemble downrod and motor housing if required (follow manufacturer’s instructions).
Step 4: Mount the Fan Motor
- With help or a hook on the bracket, suspend the motor while you connect wires.
- Connect ground, neutral, and hot wires, matching color to color. Use wire nuts and electrical tape for secure connections.
Step 5: Attach Blades and Finishing Touches
- Secure fan blades and light kit (if included).
- Install included bulbs and covers.
- Double-check all screws and attachments.
Step 6: Test and Balance
- Turn power back on at the breaker.
- Test all speeds, directions, and lights.
- If the fan wobbles, use the balancing kit.
Common Mistakes to Avoid
- Using a non-fan-rated box: Standard plastic boxes will not support a fan and are a major safety hazard.
- Ignoring local codes: Some municipalities require permits or inspections for electrical work. Always check before starting.
- Overtightening blade screws: This can crack blade arms or cause wobble.
- Incorrect wiring: Crossing wires can result in shorts or non-functioning controls. Double-check before restoring power.
- Not balancing the fan: Unbalanced fans cause noise, wear out bearings, and may damage the ceiling box over time.
Ceiling Fan Compliance and Permit Considerations
While most ceiling fan replacements in existing boxes do not require a permit, installing a new circuit, running new wires, or making structural changes often does. Check your local building department’s website or call to clarify. Always use UL-listed products and follow the National Electrical Code (NEC) for residential installations. If you live in a multi-family building or historic home, additional rules may apply. Keep receipts and instruction manuals; some home insurance policies require documentation for electrical upgrades.
Maintenance Best Practices for Long-Term Performance
- Dust fan blades at least once a month to prevent buildup that causes wobble and noise.
- Tighten screws on blades and mounting brackets annually.
- Check balance every season, especially after cleaning.
- Replace bulbs with manufacturer-recommended wattage only.
- Listen for unusual noises: Clicking or humming can indicate loose parts or wiring issues.
Conclusion: Ceiling Fan Installation—A Smart DIY That Rewards Preparation
Installing a ceiling fan is a rewarding, energy-conscious upgrade that can deliver year-round comfort and substantial savings. However, it’s a project that demands respect for detail, safety, and compliance. From selecting a fan that fits your room and budget, to ensuring robust mechanical and electrical support, every step plays a critical role in the long-term success of your installation. By investing in the right materials, using essential tools, and following a thorough safety checklist, you significantly reduce the risk of electrical hazards, costly mistakes, and future repairs. Remember to consult local codes before starting, keep all documentation for insurance purposes, and don’t hesitate to call a licensed electrician if you encounter any uncertainty with wiring or box support. With careful preparation and attention to best practices, you’ll not only enjoy the comfort and style a ceiling fan brings but also the peace of mind that comes from a safe, code-compliant installation. Whether you’re a seasoned DIYer or new to home improvement, taking the time to do this project right ensures your investment spins smoothly for years to come.
I noticed wiring and wall switch upgrades are listed as optional costs. If I want to use a remote control instead of installing a new wall switch, does that make wiring any simpler, or will I still need to do just as much electrical work?
Using a remote control for your ceiling fan can simplify things a bit. Typically, you won’t need to run new wires or install a wall switch if you use a remote, since the receiver fits inside the fan housing and is controlled wirelessly. However, you’ll still need to connect the fan to your home’s existing wiring, so basic electrical work is still required. You can usually use the existing switch or keep it always on.
If my existing ceiling light fixture isn’t connected to a fan-rated electrical box, how difficult is it to replace that myself versus hiring an electrician? I want to make sure the ceiling can handle the weight and vibration, but I’ve never swapped out an electrical box before.
Replacing a standard light fixture box with a fan-rated electrical box can be moderately challenging if you haven’t done electrical work before. Fan-rated boxes are essential for safely supporting the weight and movement of a ceiling fan. If your ceiling is finished and you’re not comfortable working with wiring or structural supports, hiring an electrician is usually safer and ensures code compliance. If you decide to DIY, make sure you can turn off the power, access attic space if needed, and securely anchor the new box to a ceiling joist.
You mention a safety checklist for installing the fan. Could you clarify how to determine if the existing wiring in older homes meets code for ceiling fan installation, or if a licensed electrician should always inspect before starting?
To determine if your existing wiring is up to code, check that the electrical box is fan-rated (marked ‘suitable for fan support’) and securely attached to a ceiling joist. Wiring should be insulated and show no signs of wear. If your home is older or you’re unsure about the box’s rating, grounding, or overall wiring condition, having a licensed electrician inspect it is the safest route. This helps prevent safety hazards and ensures compliance with code.
For new installations where there isn’t existing wiring, what’s a realistic estimate for the added labor or complexity, especially if you’re going through attic spaces or dealing with older homes?
When installing a ceiling fan where no wiring exists, you can expect added labor costs, typically ranging from $200 to $500 or more, depending on your home’s layout and wiring accessibility. Running new wiring through attic spaces or older homes with plaster walls or outdated electrical systems can increase both complexity and price. Electricians may also need to upgrade or modify your electrical panel or boxes, which adds to the total cost and effort.
I saw that a fan-rated electrical box is essential, but is this something that can easily replace an existing light fixture box, or does that usually require opening up the ceiling and more advanced electrical work?
Swapping a standard light fixture box for a fan-rated box is often more involved because fan-rated boxes are heavier and need secure attachment to a ceiling joist or support bar. Sometimes, you can install a retrofit fan box from below without opening up the ceiling, but if the joist is far from the box or access is tight, you might need to open the ceiling for proper installation. If you’re not comfortable with electrical work, it’s best to consult a professional.
You mentioned that improper installation can cause code violations affecting future home sales. Are there specific codes or permits homeowners should review before starting this project to make sure everything is up to standard from the start?
Yes, before starting a ceiling fan installation, homeowners should check their local building codes, as these can vary by city or county. Electrical work, including ceiling fan installation, often requires compliance with the National Electrical Code (NEC) and may need a permit, especially if new wiring is involved. It’s a good idea to contact your local building department to confirm permit requirements and any specific code provisions before you begin.
For those of us considering a mid-range ceiling fan with smart home features, are there any hidden costs with installation or compatibility issues to look out for, especially if we want to control it with existing smart switches?
When installing a smart ceiling fan, hidden costs can include the need for a compatible wall switch or hub, and sometimes extra wiring if your current setup lacks a neutral wire. Compatibility can be an issue if your existing smart switches aren’t designed for fan control—some only handle lights or may not support variable speeds. Always check both the fan and switch specs to ensure they work together before purchasing.
Could you clarify if a fan-rated electrical box is required even when replacing an old light fixture with a ceiling fan of similar weight, or is it only necessary for new installations? Also, are there easy ways to tell if an existing box is appropriately rated for fans?
A fan-rated electrical box is required any time you install a ceiling fan, even if you’re replacing an old light fixture, because standard light boxes aren’t designed to support the movement and weight of a fan. To check if your existing box is rated for fans, look for metal boxes labeled ‘For Ceiling Fan Support’ or boxes made of heavy-duty plastic marked ‘fan-rated.’ If in doubt, it’s safest to replace it with a certified fan-rated box.
The article mentions that improper installation can lead to code violations. How can I make sure I’m following local electrical codes when installing a ceiling fan myself, especially regarding the electrical box and wiring?
To ensure you follow local electrical codes, start by using an electrical box rated specifically for ceiling fans, as standard boxes may not support the fan’s weight or movement. Double-check that all wiring connections match the fan and home wiring instructions, and always turn off power at the breaker before starting. If you’re not sure about any code requirements, contact your local building department or consult a licensed electrician, as codes can vary by location.
I’m curious about the mounting hardware—if my current ceiling light uses a standard electrical box, do I always need to swap it for a fan-rated box, or are there cases where the existing box is sufficient?
If your current electrical box is only rated for light fixtures, it likely won’t support the weight and movement of a ceiling fan. Most installations require a fan-rated electrical box, which is specially designed to handle the extra stress. Unless your existing box is clearly marked as fan-rated, it’s safest to replace it before installing the fan.
Your breakdown mentions that improper installation can cause code violations. Can you clarify how I can ensure my ceiling fan installation meets local building codes, especially if I’m replacing an existing light fixture and not adding new wiring?
To stay compliant with local codes when replacing a light fixture with a ceiling fan, use a fan-rated electrical box, not the one meant for light fixtures. Always switch off power at the breaker before starting. Double-check that your wiring connections match what’s approved in your area. If you’re unsure, contacting your local building department or a licensed electrician will help ensure everything meets code.
If my ceiling already has a light fixture but not a fan-rated electrical box, how complicated is it to upgrade the box myself? What are the main safety concerns I should look out for during this part of the installation?
Upgrading to a fan-rated electrical box is a moderate DIY task if you’re comfortable working with electricity. The main challenges are accessing and securing the new box to a ceiling joist, which may involve working in tight spaces or the attic. Key safety concerns include turning off power at the breaker, double-checking wires with a voltage tester, and ensuring the new box is rated for ceiling fans and firmly attached to support the fan’s weight and motion.
Can you clarify if the budget estimates cover hiring an electrician, or are those just for a DIY installation? I only have a few tools at home and might need a pro if the wiring is complicated.
The budget estimates in the article cover both DIY and professional installation scenarios. We break down costs for materials and basic tools if you do it yourself, but also provide a typical price range for hiring a licensed electrician. If you’re unsure about the wiring or lack the necessary tools, it’s safer and often worth the extra cost to hire a pro, which is reflected in the higher end of the estimates.
I noticed the cost ranges a lot for different fan models and accessories. For a busy family room, is it really worth spending extra on a high-end fan with smart controls, or would a mid-range fan do just as well in terms of airflow and efficiency?
For a busy family room, a mid-range fan often provides strong airflow and efficient performance without the higher price tag of luxury models. High-end fans with smart controls are convenient, letting you adjust settings remotely or automate schedules, but these features aren’t essential for everyone. If reliable cooling and quiet operation are your main needs, a good-quality mid-range fan should work very well.
With the cost breakdown for different fan models and accessories, could you provide an estimate of the average total cost a DIYer could expect if they already have most basic tools? I’m trying to figure out how much of the budget is typically spent on tools versus actual equipment and hardware.
If you already own most of the basic tools, your main expenses will be the ceiling fan itself (typically $50–$300 depending on features and quality) and any necessary accessories like mounting kits or downrods ($10–$50). Basic hardware like wire nuts or screws might add another $5–$15. So, most DIYers spend $65–$365, with the overwhelming majority of the budget going to the actual fan and accessories rather than tools.
How much DIY experience is realistically needed to handle the installation safely, especially when it comes to electrical work and making sure the fan-rated box is in place? I have basic tools but limited electrical knowledge.
For a safe ceiling fan installation, it’s ideal to have some experience with basic home wiring, such as turning off power at the breaker and identifying hot, neutral, and ground wires. If your electrical knowledge is limited, you can still handle the basics, but installing or verifying a fan-rated box may require more confidence and know-how. If you’re unsure, it’s safest to consult an electrician, especially for any electrical connections or upgrades.
The cost breakdown lists a pretty big range for ceiling fans, from $50 to over $800. Beyond just design and smart features, are there noticeable performance differences in airflow or energy efficiency between the basic and high-end models that would make the extra cost worth it?
Yes, higher-end ceiling fans often offer better performance beyond just looks and smart features. Premium models usually have more efficient motors, better blade design, and higher airflow (measured in CFM), which can cool rooms more effectively and quietly. They also tend to be more energy efficient, sometimes carrying ENERGY STAR certification, which could lower your electricity costs over time. So, if you need strong airflow or want long-term efficiency, investing in a higher-end fan can be worth it.
When considering the cost breakdown, is there a significant difference in labor costs if I’m replacing an existing light fixture with a fan compared to installing a fan where there was none before? I’m trying to figure out if I can get away with a simpler install.
Yes, there is typically a noticeable difference in labor costs. Replacing an existing light fixture with a ceiling fan is usually simpler and less expensive because the wiring and electrical box are already in place. Installing a fan where none existed before often requires running new wiring, installing a support box, and possibly patching drywall, which increases both time and labor costs.
Can you provide more information on the kinds of tools I might need if my current wiring setup isn’t compatible with the new fan? I’m worried about unexpected costs when upgrading from a standard light fixture.
If your existing wiring isn’t compatible with the new ceiling fan, you may need additional tools. Besides the basics like a screwdriver, pliers, wire stripper, and voltage tester, consider having a fish tape for routing new wires, an electrical box rated for ceiling fans, a drill with bits, and possibly a drywall saw. You might also need wire nuts and electrical tape. If you discover aluminum wiring or need to run new circuits, hiring a licensed electrician may be safer and can affect your total cost.
The cost breakdown has quite a range for ceiling fans and accessories. If I’m trying to stick to a budget but still want decent airflow and durability, which features are most important to prioritize in a mid-range model?
To get good airflow and durability in a mid-range ceiling fan, focus on features like a high CFM (cubic feet per minute) rating, which indicates strong airflow, and blades made from quality materials such as solid wood or durable ABS plastic. Also, look for fans with a sturdy motor (preferably with a long warranty), metal downrods, and simple, reliable controls. Extras like smart features can often be skipped to stay within budget.
I noticed the article mentioned smart home compatible ceiling fans on the higher end of the price range. Are there any special installation steps or added safety checks for those models compared to standard fans?
Smart home compatible ceiling fans usually require some extra steps during installation. You’ll often need to connect the fan to your home Wi-Fi or a smart hub, following the manufacturer’s instructions. Also, there might be an additional module or receiver to install in the canopy. As for safety, make sure the power is off before connecting any smart modules, and double-check wiring compatibility with both the fan and your home’s electrical system.
The safety checklist sounds important, especially with kids around. Could you share a few key steps from that checklist that busy parents should never skip, even if we’re rushing through the installation on a tight weekend schedule?
Absolutely, safety is crucial, especially with kids in the home. Parents should always turn off the power at the breaker before starting, use a sturdy ladder, and double-check that the fan mounting bracket is securely anchored to a ceiling joist or appropriate support. Also, make sure all wires are properly connected and covered with wire nuts. These steps help prevent accidental shocks and ensure the fan is safely installed.
I’m working with a pretty tight budget and noticed your cost breakdown includes optional wall switches or remote kits. Are those really necessary if my fan already comes with pull chains, or is it worth spending extra on them for convenience or safety?
If your ceiling fan already has pull chains, you don’t need to buy wall switches or remote kits unless you want extra convenience. Pull chains are perfectly functional and safe for basic operation. Upgrading to a remote or wall switch just makes control easier, especially if your fan is hard to reach or you want more features, but it’s not required for safety.
If my ceiling only has a regular electrical box from an old light fixture, is it absolutely necessary to replace it with a fan-rated box, or are there cases where the existing box would be enough for a standard fan?
If your ceiling has a standard electrical box meant for a light fixture, it really is necessary to replace it with a fan-rated box before installing a ceiling fan. Standard boxes aren’t designed to support the weight and movement of a fan. Using the proper fan-rated box ensures safety and prevents potential accidents or damage.
When installing a ceiling fan in place of an old light fixture, do I always need to replace the existing electrical box with a fan-rated one, even if the old box feels sturdy? Just want to avoid unnecessary extra work if the current setup is sufficient.
Even if your current electrical box feels sturdy, it’s important to replace it with a fan-rated box. Ceiling fans are heavier and produce more movement than typical light fixtures, so standard boxes often aren’t designed to handle the extra weight and vibration. Using a fan-rated box ensures your installation is safe and up to code, preventing potential hazards down the line.
What’s the safest way to handle the wiring if I’m replacing an old light fixture with a new ceiling fan? The article mentions code compliance and safety, so I’m curious if there are common mistakes homeowners should avoid.
When replacing a light fixture with a ceiling fan, always turn off power at the breaker first, not just the wall switch. Double-check with a voltage tester that wires are dead before handling them. Use a fan-rated electrical box, as ordinary boxes may not support the fan’s weight or movement. Avoid mixing wire types or leaving exposed copper. Connect wires by color and secure wire nuts tightly. Common mistakes include working with live wires, reusing non-fan-rated boxes, and not grounding the fan. If unsure, it’s safest to consult a licensed electrician.
Can you provide ballpark labor costs if I decide to have a professional do the installation instead? Your cost breakdown covers the DIY expenses, but I’m worried about unexpected charges if I end up hiring an electrician.
Hiring a professional electrician to install a ceiling fan typically costs between $75 and $200, depending on your location and the complexity of the job. If new wiring or a ceiling box is needed, costs can rise to $300 or more. Always ask for a detailed estimate upfront and check if the price covers both labor and materials to avoid surprises.
When figuring out my total budget, do the cost ranges listed for wiring and accessories cover everything I’d need for a typical one-room install, or are there other hidden expenses I should watch for if my wiring is older?
The listed cost ranges for wiring and accessories are meant to cover most typical one-room installs, including necessary wires, boxes, and mounting hardware. However, if your home’s wiring is older, you might face extra costs for repairs or code updates, like replacing outdated wires or installing a new electrical box. It’s wise to have an electrician inspect your setup beforehand to spot any possible additional expenses.
You mentioned the risks of code violations with improper installation. Are there any particular electrical codes or local rules I should research before getting started, or is following the included instructions with the fan usually enough to stay compliant?
It’s a good idea to check both national and local electrical codes before installing your ceiling fan. The National Electrical Code (NEC) sets basic safety standards, but your city or region might have additional requirements, such as the type of electrical box you use or specific wiring methods. While the manufacturer’s instructions are helpful, always confirm they align with local codes to avoid issues down the line.
I noticed you mention that installing a ceiling fan isn’t as simple as swapping out a light fixture, especially because of the electrical and structural considerations. If my current ceiling light uses a regular box, do I absolutely need to replace it with a fan-rated box, and how hard is that step for someone with only basic DIY skills?
Yes, you do need to replace a regular electrical box with a fan-rated box because standard boxes aren’t designed to support the weight or movement of a ceiling fan. Swapping the box usually involves removing the old one, securing the new fan-rated box to a ceiling joist or using an expandable brace, and making sure all wiring connections are safe. If you’re comfortable turning off the power and following instructions, it’s manageable for a basic DIYer, but it can be a bit tricky in tight spaces or with older wiring.
With regard to budgeting, is it common for homeowners to underestimate the cost of tools if they don’t already own them? Could you provide an example of the most essential tools that someone new to DIY might need to buy for this project?
Yes, homeowners often underestimate tool costs, especially if they’re new to DIY projects. For ceiling fan installation, some essential tools you might need to purchase include a voltage tester, wire stripper, screwdrivers (both flathead and Phillips), a drill with bits, a ladder, and possibly a circuit tester. These can add to your budget if you don’t already own them, so it’s helpful to account for these expenses upfront.
The article talks about mid-range and high-end fans with remote kits and smart features. Is there any extra complexity in the installation process for these types compared to a basic pull chain model, or does the safety checklist remain essentially the same?
Installing mid-range or high-end fans with remote kits or smart features does add some complexity compared to basic pull chain models. You’ll need to wire and possibly mount the receiver unit for the remote or smart system, and sometimes pair the fan with an app or remote. However, the core safety checklist—shutting off power, using a secure electrical box, and double-checking all connections—remains the same. Just allow extra time for the added setup steps.
You mentioned mid-range fans include features like remote controls and better efficiency. How much of an impact do those features have on energy savings compared to the standard models? I’m trying to decide if the extra cost is worth it in terms of utility bills.
Remote controls themselves don’t directly affect energy use, but mid-range fans often come with more efficient motors and better blade designs. These upgrades can reduce electricity consumption by 20–30% compared to basic models. Over time, especially if you use your fan frequently, these savings can add up and help offset the higher upfront cost.
The cost breakdown lists a wide range for ceiling fans, from basic to high-end models. In your experience, do the more expensive fans really offer better longevity or energy savings for the extra investment in a business setting?
Higher-priced ceiling fans often come with more efficient motors, better materials, and advanced features like smart controls or variable speeds, which can improve both longevity and energy savings. In a business environment where the fans may run for long hours, investing in a quality model can pay off over time through reduced maintenance and lower energy bills. However, whether the extra cost is justified depends on your specific usage and budget.
Can you clarify how much time a typical installation might take for someone with basic DIY skills? I need to know if this is a project I can realistically tackle in one afternoon while juggling kids’ activities, or if I should set aside a full weekend.
For someone with basic DIY skills, installing a ceiling fan usually takes about 2 to 3 hours, assuming there’s already an existing ceiling box and wiring in place. If you can dedicate a solid afternoon and have all the tools and parts ready, you should be able to finish the project in one day, even with some interruptions from kids’ activities.
For older homes, are there extra safety steps or costs to consider during ceiling fan installation, especially if the existing wiring might not be up to current code? I want to make sure I’m budgeting and planning safely.
For older homes, it’s important to check if the existing wiring is up to code and can safely support a ceiling fan. You may need to hire a licensed electrician to inspect and possibly upgrade the electrical box and wiring, especially if they’re outdated or not grounded. This can add to the installation cost, so it’s wise to budget extra for inspections, possible rewiring, and code-compliant electrical boxes.
The article mentions that improper installation can cause code violations. How can a homeowner check if their ceiling fan installation will meet local code requirements, especially for older homes with non-standard wiring?
To ensure your ceiling fan installation meets local code requirements, start by contacting your local building department for the specific codes in your area. For older homes with non-standard wiring, it’s a good idea to have a licensed electrician inspect the wiring before installation. They can confirm if your setup is safe and up to code, or recommend any necessary updates.
The article mentions the importance of adhering to safety protocols—do you have recommendations for specific safety certifications or code requirements I should double-check before starting the installation?
It’s wise to check your local building codes, as requirements can vary by area. In the U.S., ceiling fan installations typically need to follow the National Electrical Code (NEC). For safety, it’s helpful to have basic electrical safety knowledge or even an OSHA 10 certification if you’re new to this kind of work. Always make sure your electrical box is rated for ceiling fans and turn off power at the breaker before starting.
If my existing light fixture doesn’t have a fan-rated electrical box, how tricky is it to swap that out myself? Are there signs to watch for that indicate the current box couldn’t safely support a ceiling fan?
Replacing a standard electrical box with a fan-rated one can be moderately tricky, especially if you’re not experienced with electrical work. Signs your current box isn’t safe for a fan include plastic construction, small size, or visible labels stating ‘not for fan support.’ Fan-rated boxes are generally metal and labeled for ceiling fan use. If you’re unsure about wiring or structural support, it’s safest to call a licensed electrician.
The article mentions that improper installation can cause code violations that might impact future home sales. How can I check if my ceiling fan installation meets local codes, and who would certify that the work is compliant if I do it myself?
To make sure your ceiling fan installation follows local building codes, start by checking your city’s or county’s building department website for specific requirements, like electrical box ratings and wiring standards. If you installed the fan yourself, a licensed electrician can inspect your work and provide official certification or documentation showing it’s up to code. Some areas also allow for city inspections, especially if you pulled a permit before starting the project.
I noticed you mention fan-rated electrical boxes are essential for supporting both weight and vibration. How can I tell if the box currently in my ceiling is strong enough for a fan, or if I need to replace it before starting?
To check if your ceiling box is fan-rated, look inside the box for labels or markings that say ‘fan-rated’ or ‘for ceiling fan support.’ Fan-rated boxes are usually metal or heavy-duty plastic and are securely attached to a ceiling joist or a support bar. If your current box feels flimsy, is only attached to drywall, or is marked for ‘light fixture only,’ it should be replaced with a properly rated box before installing a fan.
Could you explain more about the potential code violations that might arise if I try to install a ceiling fan myself? I’m concerned about passing inspections if I decide to sell my home in the future.
Installing a ceiling fan yourself can lead to code violations if shortcuts are taken or requirements are overlooked. Common issues include not using a fan-rated electrical box, improper wire connections, or failing to properly ground the wiring. These violations can cause safety hazards and may prevent your home from passing inspection when selling. Always check your local electrical codes and, when in doubt, consult a licensed electrician to ensure compliance.
When estimating the total budget for a DIY ceiling fan installation, are there any hidden expenses or unexpected tools that homeowners often miss, especially in older homes with outdated wiring?
Homeowners often overlook the cost of updating old wiring or electrical boxes in older homes, which may not support the weight or wiring needs of a new ceiling fan. You might also need a voltage tester, wire nuts, or a junction box rated for ceiling fans. Hiring an electrician for inspection or minor rewiring can add to the budget, so it’s wise to factor in these potential extra expenses.
If my ceiling currently just has a regular light fixture, do I need to replace the existing electrical box with a fan-rated one, or are there certain cases where the current box could be sufficient? I’m a little confused about what’s actually required to safely support the weight and motion of a ceiling fan.
If your ceiling currently has only a standard light fixture, you almost always need to replace the existing electrical box with a fan-rated box. Regular boxes aren’t designed to support the weight and vibration of a ceiling fan. Fan-rated boxes are built specifically to handle both. Even if your current box feels sturdy, it’s not considered safe or code-compliant for fan installation unless it’s labeled for ceiling fan support.
If I want to replace an old ceiling light with a new fan, do I always need to upgrade to a fan-rated electrical box, or are there certain fixtures that are already compatible? I want to be sure I don’t miss any hidden costs or safety steps.
When replacing a ceiling light with a fan, it’s crucial to check if the existing electrical box is rated for ceiling fans—not all are. Many ceiling light boxes aren’t designed to support the weight or motion of a fan. Look for a label inside the box that says “fan-rated” or “for ceiling fan support.” If it’s not clearly marked or feels flimsy, you should upgrade to a fan-rated box for safety and stability, which may add a bit to your budget but is required for safe installation.
You said improper installation can cause code violations. Could you provide more detail on the specific code requirements for ceiling fan installations? For example, are there common regulations related to mounting height or wiring that I should be aware of before starting the project?
Ceiling fan installations must follow the National Electrical Code (NEC) and local building codes. Key requirements include using an electrical box rated for ceiling fans, not just light fixtures, and ensuring secure mounting to support the fan’s weight. Wiring should use the correct gauge and connections. Mounting height often needs the blades to be at least 7 feet above the floor, and fans shouldn’t be installed where blades are less than 18 inches from walls. Always check your local codes for any additional specifics.
If my ceiling only has a regular electrical box for a light fixture, how hard is it to upgrade to a fan-rated box? Do I need any special skills or permits for that part of the installation?
Upgrading to a fan-rated electrical box is an important safety step, as regular boxes aren’t designed to support the weight or movement of a ceiling fan. The process involves disconnecting power, removing the existing box, and securely installing a fan-rated box, often anchored to a ceiling joist. Basic electrical and handyman skills are helpful. Some locations require a permit for electrical work, so it’s a good idea to check your local codes. If you’re unsure, consider hiring a licensed electrician.
The cost breakdown says fan-rated electrical boxes are essential. My house already has light fixtures on the ceiling—will I always need to replace the existing box, or are some older boxes usually compatible with ceiling fan weight and vibration?
Not all existing ceiling boxes are rated to support the weight and movement of a ceiling fan, even if they currently hold a light fixture. Many older boxes are only designed for lightweight fixtures. To be safe, check if your box is labeled as ‘fan-rated’ or ‘for ceiling fan support.’ If it isn’t, or you can’t confirm its rating, it’s recommended to replace it with a fan-rated box to ensure safety and compliance with building codes.
For someone with a packed schedule, how long should I realistically set aside to install a ceiling fan, considering both prep work and the actual installation?
For someone with a busy schedule, it’s practical to set aside about 2 to 3 hours for the entire ceiling fan installation process. This time frame includes gathering tools, reading instructions, preparing the workspace, and performing the installation itself. If you’re replacing an existing fan or light fixture, it might take less time, but for a completely new installation, allow a bit longer to handle wiring and mounting.
I noticed the article mentions that improper installation can lead to code violations. How can I be sure the electrical box and mounting hardware I choose will meet local building codes, especially in an older house?
To ensure your electrical box and mounting hardware meet local building codes, especially in an older house, first check that the electrical box is rated for ceiling fan support, not just light fixtures. Look for boxes labeled as ‘fan-rated’ or ‘UL-listed for fans.’ It’s also a good idea to contact your local building department or a licensed electrician, as codes can vary by location and older homes may have unique requirements.
Could you clarify if the $10–$25 fan-rated electrical box is always necessary, even if my existing light fixture already has a metal electrical box? Just want to be sure I’m not missing a hidden safety issue or code requirement.
A fan-rated electrical box is important because ceiling fans are heavier and create more vibration than light fixtures. Even if you have a metal box, it must be specifically rated to support ceiling fans (usually marked as such). Standard boxes—even metal ones—often aren’t strong enough by code. Double-check the labeling on your current box. If it isn’t rated for fans, it’s safest and code-compliant to replace it with a $10–$25 fan-rated box.
Is there a big difference in energy efficiency between mid-range and high-end ceiling fans, or is it mostly about design and smart features at the higher prices?
When comparing mid-range and high-end ceiling fans, the energy efficiency differences are usually not dramatic. Both types often have efficient motors and good airflow ratings. Higher-end fans tend to stand out more for their premium materials, advanced controls, and smart features like app or voice integration. If your priority is energy savings, focus on looking for Energy Star ratings and airflow efficiency numbers instead of just price.
If I already have a light fixture in my ceiling, can I reuse any of the existing wiring for a new ceiling fan, or should I plan on replacing all the wires mentioned under wiring and accessories?
You can usually reuse the existing wiring if your current light fixture is on a standard ceiling electrical box and the wiring is in good condition. Most ceiling fans use the same basic wiring as a light fixture. However, make sure the electrical box is rated to support the extra weight and movement of a fan. If you’re unsure about the wiring’s condition or if the wires look old or damaged, it’s best to replace them for safety.
Based on your breakdown, the cost of just the fan unit can range from $50 up to $800 depending on features and design. In your experience, does investing in a mid-range or high-end model noticeably impact energy efficiency or installation complexity compared to a standard one?
Choosing a mid-range or high-end ceiling fan often brings better energy efficiency, since many models are designed with advanced motors and features like DC motors or smart controls. These can help lower your electricity usage over time. However, installation complexity tends to be similar unless you pick a fan with integrated smart features or special mounting requirements, which might call for extra steps or expertise.
When it comes to replacing an older light fixture with a ceiling fan, do most homes already have a fan-rated electrical box in place, or is it likely that you’ll need to swap this out before starting the installation?
Most homes do not have a fan-rated electrical box installed when replacing an older light fixture, as standard boxes are typically only rated for lightweight fixtures. Before installing your ceiling fan, it’s important to check if your current box is marked as fan-rated; if not, you’ll need to replace it with one designed to support the weight and movement of a fan for safety.
Could you provide more detail on what’s included in a standard installation budget for a DIYer who already owns some tools? I’m trying to figure out what extra supplies I might need besides the fan and mounting hardware.
For a DIY ceiling fan installation, if you already have basic tools like a screwdriver, ladder, and wire stripper, your extra supplies may include electrical tape, wire nuts, a voltage tester, and possibly a fan-rated electrical box if your current one isn’t compatible. Budget a bit for these items, plus any patching materials if you need to adjust the ceiling opening.
You mention the importance of proper planning and safety, especially regarding electrical work. For someone who’s never done electrical wiring before, are there any specific risks or mistakes to watch out for when attempting this as a first DIY project?
If you’re new to electrical work, some common risks include not turning off the power at the breaker, using the wrong type or size of wire nuts, and incorrectly matching wires, which can cause short circuits or shocks. Reading wiring diagrams carefully and double-checking all connections is essential. If you feel unsure at any step, it’s safest to consult a licensed electrician.
When looking at the different ceiling fan price ranges listed, is there a big difference in how difficult they are to install yourself, especially for models with extra features like remotes or integrated lights? I’m trying to budget both money and time before I commit.
Yes, the complexity of installation often increases with additional features like remotes or integrated lights. Basic fans usually have simpler wiring and faster setup, while models with remotes or lights may require extra wiring, pairing remotes, or assembling more parts. These features can add time and may need careful reading of instructions. If you’re comfortable with electrical work, it’s manageable, but budgeting extra time for more advanced models is wise.
The article mentions structural considerations, but how can I tell if my ceiling joists can support the weight and vibration of a new fan, especially in older homes? Are there any red flags to look for before starting installation?
To check if your ceiling joists can handle a new fan, look for signs like sagging, cracks, or previous water damage in the ceiling area. Try to locate the joist with a stud finder and see if it’s solid wood, not just drywall or a weak brace. In older homes, ceiling boxes often aren’t rated for fans—if you see a plastic or thin metal box, it will need to be upgraded to a fan-rated one. If the joist flexes or seems weak, consult a professional before proceeding.
You mentioned that improper installation can cause code violations which might affect selling a house later on. Could you explain what kind of electrical or mounting mistakes might trigger those code violations during a ceiling fan install?
Improper ceiling fan installation can lead to code violations in a few ways. Common issues include using a standard electrical box instead of a fan-rated one, failing to secure the fan properly to a ceiling joist or support brace, not grounding the fan correctly, or making unsafe wire connections. Any of these mistakes could be flagged during a home inspection, potentially complicating a future home sale.