
Introduction
Creating an organized, accessible, and safe tool storage system is a cornerstone of any successful home improvement journey. Whether you’re an enthusiastic DIYer, a hobbyist, or a homeowner looking to tackle occasional repairs, the way you store your tools can dramatically impact your project outcomes, your budget, and your safety. Yet, many homeowners underestimate the importance of thoughtful tool storage. Too often, tool organization is an afterthought, leading to cluttered spaces, misplaced equipment, unnecessary tool damage, and even injuries. In this article, we’ll explore the most common mistakes beginners make when setting up tool storage—and, more importantly, offer pro-level strategies for creating a storage solution that evolves with your needs, preserves your investment, and boosts your productivity. Expect actionable advice on layout planning, storage systems, maintenance, security, and safety. By the end of this guide, you’ll be equipped with the knowledge to design a tool storage setup that’s not just tidy, but truly functional and future-proof.
Common Beginner Mistakes in Tool Storage
1. Underestimating Storage Needs
One of the biggest mistakes is failing to assess your current and future tool collection. Many homeowners purchase a small toolbox or a single shelving unit, only to outgrow it within months. This leads to overcrowding, makes it hard to find items, and increases the risk of tools being damaged as they are stacked or jammed together.
- Why it matters: Inadequate storage leads to clutter, lost tools, and repeated purchases of items you already own but can’t find.
- Pro Tip: Before investing in storage, lay out all your tools and categorize them. Consider your most-used items and anticipate future acquisitions.
2. Ignoring Tool Accessibility
A common pitfall is focusing solely on storage capacity without considering ease of access. Tools that are packed away in deep drawers or stacked bins hinder workflow and discourage regular cleaning and maintenance.
- Why it matters: Poor accessibility slows down projects, increases frustration, and can lead to unsafe workarounds.
- Pro Tip: Store frequently used tools at eye level or within arm’s reach. Reserve harder-to-reach spots for seasonal or rarely used items.
3. Overlooking Safety and Security
Storing sharp or heavy tools haphazardly can result in injuries, especially in households with children or pets. Additionally, neglecting security leaves expensive tools vulnerable to theft.
- Why it matters: Injuries and theft are costly and preventable with a well-thought-out storage plan.
- Pro Tip: Use lockable cabinets for hazardous tools and install wall-mounted racks with childproof latches when needed.
4. Using Inadequate Storage Materials
Storing tools in cardboard boxes, unlined metal bins, or damp areas accelerates rust and deterioration. Failing to account for weight can also cause shelves or hooks to fail.
- Why it matters: Poor-quality storage damages tools and can lead to accidents if shelving collapses.
- Pro Tip: Invest in moisture-resistant, heavy-duty shelving and bins. Use liners or protective padding where necessary.
5. Not Labeling or Categorizing Tools
Without a clear system for sorting and labeling, even the best storage units become chaotic over time. This is especially problematic for small parts, fasteners, and specialty tools.
- Why it matters: Misplaced items waste time and money, and duplicating purchases is common.
- Pro Tip: Use drawer dividers, clear containers, and label makers to create clearly defined zones for each tool type.
Planning Your Tool Storage Layout
Mapping Your Workspace
Begin by evaluating your available space: garage, basement, shed, or a dedicated room. Measure the area and note permanent fixtures, power outlets, and windows. Sketch a rough floor plan to visualize where larger storage units and workbenches will fit.
- Zone Your Space: Create zones for different activities (e.g., woodworking, automotive, gardening) to minimize the need to move items between projects.
- Leave Walkways: Ensure there’s enough clearance for movement, and avoid blocking exits or electrical panels.
Lighting and Ventilation Considerations
Good lighting is essential for safety and efficiency—overhead LEDs, task lights above benches, and even natural light where possible. Adequate ventilation prevents dust buildup and tool corrosion.
- Install exhaust fans if you routinely use paints or solvents.
- Use dehumidifiers in damp basements or garages to protect metal tools.
Choosing the Right Storage Solutions
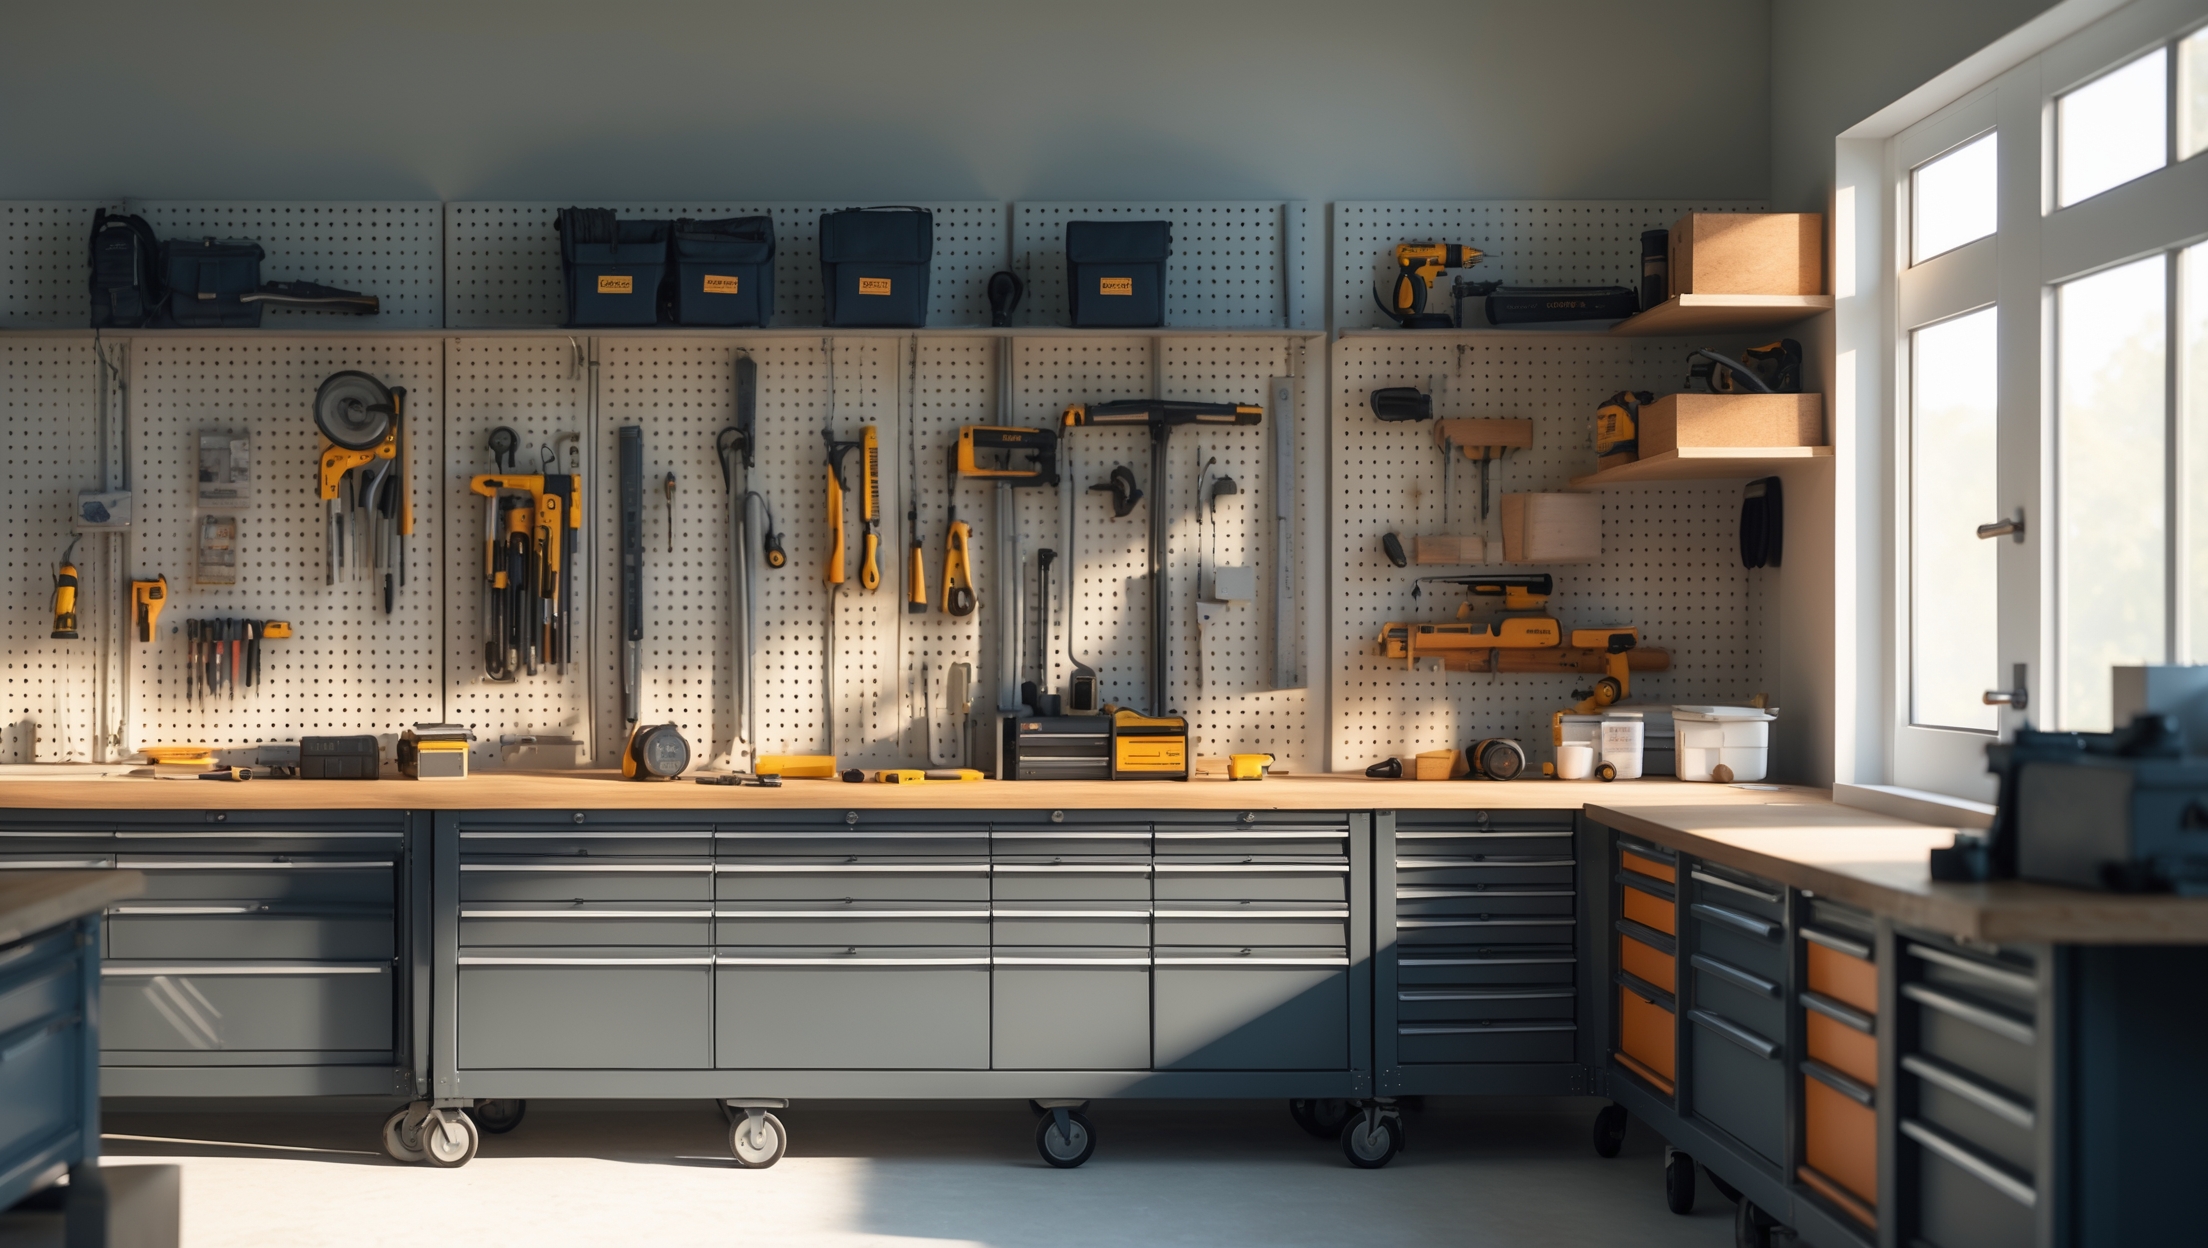
Wall-Mounted Systems
Pegboards, slatwalls, and magnetic strips are versatile solutions for organizing hand tools. They maximize vertical space and keep tools visible and accessible.
- Pegboards: Affordable and easy to customize. Use different hooks for various tool shapes.
- Slatwalls: Support heavier items with a range of brackets and baskets.
- Magnetic Strips: Perfect for screwdrivers, pliers, and drill bits.
Cabinets and Drawers
Lockable cabinets protect valuable or hazardous tools. Shallow drawers with dividers are ideal for small parts and precision tools.
- Modular drawer systems can be stacked or rolled under workbenches for flexibility.
- Label each drawer for quick identification.
Shelving and Bins
Adjustable shelving accommodates toolboxes, power tools, and bulky items. Clear plastic bins let you see contents at a glance, while stackable bins save floor space.
- Heavy-duty shelving is crucial for supporting the weight of power tools.
- Use bins with lids to keep out dust and moisture.
Mobile Storage
Rolling tool chests, carts, and portable toolboxes are essential if you work in multiple areas of your home. They allow you to bring your most-used tools directly to the project site.
- Choose lockable wheels for stability.
- Keep a basic toolkit in a portable box for quick repairs throughout the house.
Pro-Level Organization Strategies
The Shadow Board Technique
Create outlines of each tool on your pegboard or drawer liner using paint or marker. This visual cue ensures every tool has a dedicated spot, making it obvious when something is missing—and discouraging clutter.
Tool Grouping by Function
Arrange tools by project type (plumbing, electrical, woodworking) or frequency of use. This minimizes time spent searching and reduces the chance of misplacing items.
- Project bins: Prepare a bin with all the tools and parts needed for a recurring task, such as picture hanging or furniture assembly.
Color Coding
Use colored tape, paint, or labels to code tools and storage bins by category or owner (if sharing a workspace). This technique improves visual organization and reduces mix-ups.
Digital Inventory Tracking
For advanced organization, use a spreadsheet or a tool inventory app to log tool names, purchase dates, and storage locations. Attach QR codes to tools for quick lookup.
Maintenance and Upkeep Best Practices
Regular Cleaning Schedules
Set a monthly or quarterly reminder to clean your storage area. Remove dust, debris, and check for signs of pests or moisture. Wipe down tools before returning them to storage to prevent rust and grime buildup.
Periodic Audits
At least twice a year, review your tool inventory. Donate, sell, or recycle duplicates and tools you no longer use. Reorganize to accommodate new acquisitions and adjust labels as needed.
Rust and Moisture Prevention
Use silica gel packs or rust-inhibitor strips in drawers and cabinets. Store power tools in their original cases if possible. Consider a small heater or dehumidifier in humid climates.
Inspect Storage Hardware
Check that shelves, hooks, and fasteners remain secure and undamaged. Replace any corroded or sagging components promptly to avoid accidents.
Safety and Security Checklist
- Install childproof locks where applicable.
- Separate sharp tools (blades, chisels) in lockable drawers.
- Store flammable materials (paints, solvents) in approved fire-resistant cabinets.
- Keep a first-aid kit and fire extinguisher accessible in the workspace.
- Install motion-sensor lights and a security camera if tool theft is a concern.
Budgeting for Tool Storage Upgrades
Setting Realistic Expectations
Tool storage solutions range from DIY shelves to high-end modular systems. Set a budget based on your needs, factoring in space constraints, tool value, and long-term growth.
- DIY options: Building your own shelves or pegboards can be cost-effective but requires basic carpentry skills.
- Mid-range: Pre-made shelving units, modular drawer systems, and wall panels offer a balance of cost and convenience.
- Premium: Custom cabinetry and professional installations provide maximum durability, security, and aesthetics.
Cost-Saving Tips
- Repurpose old furniture (dressers, cabinets) for tool storage.
- Shop during seasonal sales or at local hardware store clearance events.
- Invest gradually, upgrading your system as your tool collection grows.
Case Study: Transforming a Cluttered Garage into a Pro-Level Workshop
Consider the story of Linda, a DIY enthusiast who struggled with a cluttered garage. Her tools were scattered, making every project a frustrating scavenger hunt. After inventorying her collection, she zoned her garage for woodworking and general repairs. She installed pegboards above her workbench, lockable cabinets for power tools, and stackable bins for screws and fasteners. By labeling and color-coding everything, Linda cut project setup time in half and hasn’t misplaced a tool since. Her maintenance routine—quarterly cleaning and annual audits—keeps her setup efficient and safe. The transformation inspired neighbors and improved her project outcomes.
Conclusion
Thoughtful tool storage is far more than an organizational nicety—it’s a practical investment in your home improvement success, safety, and peace of mind. Avoiding common beginner mistakes—like underestimating your needs, overlooking accessibility, or skimping on materials—will save you time, money, and frustration. By taking a systematic approach to layout, choosing the right mix of wall-mounted, cabinet, and mobile storage solutions, and implementing pro-level organization strategies, you can transform even the most chaotic workspace into a model of efficiency and safety.
Regular maintenance is just as critical as initial setup. Clean, audit, and adjust your storage system as your tool collection evolves. Prioritize safety by securing hazardous items and maintaining a tidy, well-lit environment. And don’t overlook the value of a well-organized space: not only will you complete projects faster and with better results, but you’ll also extend the life of your tools and reduce the risk of accidents or losses.
Whether you’re starting from scratch or upgrading an existing setup, remember that tool storage is an ongoing process. Invest thoughtfully, stay organized, and your workspace will serve you—and your projects—for years to come.
I noticed you recommend laying out all your tools before investing in storage. For a small home repair business that’s constantly adding new tools, how often should I reassess my setup to avoid outgrowing my system too quickly?
For a small home repair business, it’s smart to reassess your tool storage setup every three to six months or whenever you notice your system feeling cramped. As you add new tools, take time to reorganize, purge duplicates, and update your storage plan so you can scale smoothly. Staying proactive helps prevent clutter and ensures your setup keeps pace with your growing toolkit.
For keeping tools both accessible and organized, what’s your opinion on open shelving versus closed cabinets, especially in a garage setting where dust and temperature changes are a factor?
Open shelving makes tools easy to access and helps you quickly spot what you need, which is great for frequent use. However, in a garage where dust and temperature changes are common, closed cabinets offer better protection against grime and moisture. If you use your tools often, combining both—open shelves for everyday items and cabinets for less-used or delicate tools—creates a balanced setup.
When you mention anticipating future tool purchases, do you have any tips for estimating storage needs if my business might expand in the next year or two? I want to avoid completely redoing my setup every time I add new tools.
To plan for future tool purchases, start by listing the types of tools you expect to add as your business grows, like larger power tools or specialty equipment. Choose modular storage options or adjustable shelving that can be expanded or reconfigured. It also helps to leave about 20–30% of your storage space open, so you have room for new tools without needing a major overhaul each time.
I see you recommend planning ahead for both current and future tool storage needs. Are there any tips on how often I should re-evaluate or reorganize my storage setup as my tool collection grows?
It’s a good idea to revisit your tool storage setup at least once or twice a year, especially if you find yourself adding new tools regularly. If you take on new projects or notice clutter building up, that’s also a sign to reorganize sooner. Periodic checks help ensure your storage stays practical and protects your tools as your collection evolves.
In your pro tips, you talk about planning for future tool acquisitions. How do you keep a storage system adaptable without it becoming too cluttered or taking up unnecessary space?
To keep your storage adaptable yet efficient, choose modular storage options like stackable bins or adjustable shelving. Leave empty sections or allocate some flexible space for new tools, but avoid overbuying storage units you don’t need yet. Regularly reassess your setup and reorganize as your collection grows, so everything stays tidy and accessible.
The article brings up the problem of tools getting damaged when they’re stacked or jammed together. Are there recommended storage systems or organizers that minimize tool-on-tool contact, especially for people with limited space?
To minimize tool-on-tool contact in tight spaces, consider wall-mounted pegboards with hooks, magnetic strips for metal tools, and drawer organizers with individual slots. Stackable bins with dividers or foam inserts also help keep tools separated. These options prevent damage and make it easy to see and access each tool, even when storage space is limited.
I’m interested in the layout planning aspect you touched on. For a small garage or workspace, what are some pro-level strategies to maximize accessibility without making the area feel cramped or cluttered?
For a small garage, think vertically by using wall-mounted pegboards or shelving to keep tools off the floor. Group tools by type or frequency of use and keep the most-used items at eye level or within easy reach. Consider mobile storage carts for flexibility and fold-down workbenches to save space. Clear labeling also helps you quickly locate tools and keeps the area tidy.
I noticed you mentioned the importance of tool accessibility and avoiding deep drawers or stacked bins. Do you have any recommendations for organizing small hand tools so they stay easy to grab but aren’t just scattered on a workbench?
For small hand tools, pegboards are a fantastic option since they keep everything visible and within reach. Magnetic strips also work well for metal tools like screwdrivers and pliers. Drawer organizers or shallow trays can help separate items by type without stacking. Using labeled bins or small containers on shelves is another way to sort items without cluttering your workbench.
I noticed you mention categorizing all your tools before investing in storage. Could you give some examples of categories that work well for a first-time DIYer who mostly has basic hand tools and a couple of power tools?
Absolutely, for a first-time DIYer with mostly basic hand tools and a few power tools, some helpful categories might be: screwdrivers, pliers, wrenches, measuring tools (like tape measures and levels), cutting tools (utility knives, saws), fasteners (nails, screws), and power tools. Sorting your tools into these groups will make it much easier to choose the right storage solution and keep everything organized.
I see that overcrowding storage can lead to tool damage and clutter. If I’m on a tight budget, what cost-effective solutions would you recommend for keeping things accessible and safe while still allowing room to grow my collection?
To keep your tools accessible and safe on a budget, start by using pegboards or wall-mounted hooks, which are inexpensive and make it easy to see and grab what you need. Repurpose containers or small bins from around the house for smaller items. Stackable plastic drawers or shelving units also work well and can be added as your tool collection grows, helping you avoid overcrowding and clutter.
The article talks about tool damage from stacking or overcrowded storage. Have you found any budget-friendly ways to protect delicate or sharp tools, especially for someone just starting out who might not have funds for fancy organizers?
Absolutely, you don’t need expensive organizers to protect your tools. For sharp or delicate tools, you can use cardboard sleeves, old towels, or even bubble wrap to keep them separated and safe. Small plastic containers, muffin tins, or repurposed food containers also work well for sorting and storing hand tools. Keeping things organized and cushioned with what you have on hand is often just as effective as buying specialized storage.
If I have a limited budget, is it better to invest in one larger storage solution right away, or start with smaller units and add on as I buy more tools? I want to avoid overcrowding but not overspend upfront.
With a limited budget, starting with a few smaller storage units is often the best approach. This lets you organize your current tools without overspending and keeps your setup flexible as your collection grows. When you add more tools, you can expand or rearrange your storage as needed, which helps prevent overcrowding without committing to a large upfront investment.
The excerpt highlights that poor accessibility can slow down workflow and discourage use. Can you give examples of pro-level storage setups that balance high capacity with easy access—especially for people working in smaller spaces like garages or sheds?
Absolutely, pro-level setups often use wall-mounted pegboards and magnetic strips to keep frequently used tools within arm’s reach, even in tight spaces. Stackable, clear-labeled drawers underneath workbenches provide high-capacity storage without clutter. Rolling carts let you move tools close to your project and tuck everything away when finished. Vertical storage—like overhead shelves or racks—maximizes every inch, helping you maintain accessibility and a tidy workspace, even in a small garage or shed.
You mention outgrowing a single toolbox or shelf pretty quickly. For someone on a tight budget, what would be a smart first step for tool storage that can actually expand as my collection grows?
A smart approach is to start with stackable plastic bins or modular storage totes. They’re affordable, let you separate different types of tools, and you can add more as your collection grows. Label each bin clearly for easy access, and consider a basic shelving unit to keep everything organized. This setup keeps costs down now and allows easy expansion later.
You mention considering future acquisitions when planning tool storage. How often should I reassess my storage needs? Is this something pros do annually or just when space gets tight?
Professionals generally reassess their tool storage at least once a year or whenever they add new tools to their collection. Even if space isn’t tight, it’s smart to review your setup regularly to keep things organized and efficient. This habit helps you spot issues early and ensures your storage system continues to fit your workflow and any new acquisitions.
The article emphasizes accessibility, not just storage capacity. Can you give more specific examples of storage systems or setups that make it easier to quickly grab your most-used tools during a project?
Absolutely! Pegboards with hooks let you hang tools at eye level for instant access. Magnetic strips on walls keep metal tools like screwdrivers and pliers right at your fingertips. Open tool chests with shallow drawers prevent digging around for essentials, and rolling carts can move with you as you work, so your most-used tools are always close by.
If I already have a cluttered space with mixed storage bins and random shelves, do you have tips on how to transition to a more organized, pro-level setup without having to buy all new storage right away?
Absolutely! Start by sorting your tools and supplies, grouping similar items together. Empty out your bins and shelves, then reassign storage based on how often you use each tool—keep the most-used items easily accessible. Label your bins and containers for quick identification. Consider repurposing existing shelves or bins by adding dividers or small baskets. Gradually upgrade your setup as needed rather than replacing everything at once.
What are some affordable options for securing tools and preventing damage, especially for those just starting to build their collection and working within a tight budget?
For those starting out on a budget, consider using stackable plastic bins or sturdy toolboxes—they’re inexpensive and protect tools from dust and moisture. Pegboards with hooks are also cost-effective for wall storage and organization. To prevent damage, add foam liners or cloth wraps inside drawers or boxes, and store similar tools together to avoid scratching. Always keep tools clean and dry before storing to extend their lifespan.
For someone just starting out who may eventually move or need to expand, how do I balance investing in quality storage with the uncertainty of my long-term tool needs and space?
Since your needs and space may change, consider modular storage systems or stackable toolboxes. These can adapt as your collection grows and are easy to move. Invest in a few high-quality, versatile pieces rather than a large, fixed setup. This way, you get durability without locking yourself into a storage solution that might not fit future spaces or tool needs.
How do you actually predict how much storage you’re going to need down the line, since my tool collection keeps growing unexpectedly? Are there any tricks or formulas for planning ahead so I don’t outgrow my setup so quickly?
It can be tough to predict exactly how your tool collection will grow, but a good rule of thumb is to estimate your current storage needs, then add 30–50% extra space for future growth. Consider using modular or expandable storage systems so you can easily add more space when needed. Periodically review your setup and adjust as you acquire new tools, to avoid running out of room unexpectedly.
If your budget is tight and you have to pick just one upgrade for your tool storage setup, would it be better to invest in more space (like shelving) or in organization systems (like foam inserts or labels) to avoid the overcrowding mistake mentioned here?
If you can only choose one upgrade on a tight budget, adding more space like basic shelving is usually the most helpful first step. Having extra space lets you spread out your tools and avoid overcrowding, which makes everything easier to access and keeps your setup flexible. Once you have enough space, you can gradually add organization systems over time.
In the article you mention the importance of planning for future tool acquisitions when designing a storage system. Could you elaborate on how to estimate future tool needs if you’re just starting out and not sure which tools you might add later?
When you’re just starting out, it’s normal not to know exactly what tools you’ll need later. A good approach is to leave some flexible or open storage space, like adjustable shelves or extra drawers. Consider the types of projects you hope to tackle in the future—woodworking, plumbing, automotive, etc.—and research what tools those typically require. Also, choose modular storage options that can expand as your collection grows. This way, your setup can adapt as your interests and needs evolve.
The article mentions planning for future tool acquisitions when setting up storage. What strategies do you recommend for making a setup that is easily expandable without having to redo everything later on?
When planning for future tool additions, consider modular storage options like stackable bins, adjustable shelving, and pegboards with movable hooks. Leave some open shelf or wall space for new tools. Using uniform storage containers also helps keep things organized as you expand. By setting up zones for tool categories, you can easily integrate new items without rearranging everything.
If someone is just getting started and is unsure about how much their tool collection will grow, is it better to invest in a larger modular storage system up front or start small and expand over time? What do pros usually recommend?
Professionals typically suggest starting with a modular storage system that allows you to expand as your tool collection grows. This way, you avoid overspending at the beginning, but you still have flexibility for the future. Investing in a high-quality, expandable setup helps you stay organized and prevents the hassle of completely overhauling your storage later on.
You mentioned that many people underestimate their future tool storage needs. Do you have any tips for estimating how much extra space I should plan for if I know I’ll be buying more tools over the next few years?
A good rule of thumb is to plan for at least 30–50% more storage than you currently need, especially if you know you’ll be expanding your collection. Think about the types of tools you might add—large power tools will need more space than hand tools. Modular storage systems or adjustable shelving can make it easier to adapt as your collection grows.
Are there budget-friendly storage solutions that still keep tools easily accessible, or do those tend to sacrifice accessibility for a lower price?
You can definitely find budget-friendly storage solutions that keep your tools accessible. Look for pegboards, wall-mounted racks, or stackable bins—these are affordable and allow you to see and reach your tools easily. Repurposing items like old jars for small parts or using magnetic strips for metal tools can also help you stay organized without spending much.
I run a small handyman business out of my garage, and my issue is constantly outgrowing whatever storage I set up. How do I balance planning for future tool purchases without overspending on storage solutions I might not use right away?
To balance growth and cost, consider modular storage systems that can expand as your tool collection grows. Start with core units for your current needs and add more only when necessary. Wall-mounted panels or shelving can also offer flexibility without a big upfront investment. Regularly reassess what you actually use to avoid accumulating unnecessary storage.
If you have a limited budget, is it better to start with modular storage solutions that can be added onto later, or is it smarter to invest in fewer, higher-quality storage pieces up front?
If you’re working with a limited budget, starting with modular storage is usually the smartest move. Modular systems let you expand as your tool collection grows, and you won’t have to invest a lot all at once. Just make sure the pieces you select are sturdy and compatible for future upgrades. You can always mix in higher-quality pieces later as your needs and budget allow.
I noticed you mentioned the problem of underestimating storage needs and outgrowing your setup quickly. How often should I reassess my tool collection and storage space to make sure my system stays functional as I pick up more tools?
It’s a good idea to reassess your tool collection and storage space every six months or after completing a major project. This helps you spot any gaps or overcrowding before it becomes an issue. If you find yourself frequently acquiring new tools, consider reviewing your setup more often—quarterly might work better in that case. Regularly sorting and reorganizing also helps keep your tools accessible and your workspace tidy.
I noticed you emphasized categorizing and laying out all tools first. If I have a mixed-use workspace that doubles as storage, do you have any pointers for planning an efficient layout so I don’t have to constantly rearrange things when starting new projects?
In a mixed-use workspace, try zoning the area by activity—set aside specific spots for tool storage, work surfaces, and general storage. Use mobile carts or pegboards for the tools you use most frequently, so they’re accessible but can be moved as needed. Group tools by project type or frequency of use to reduce search time and minimize reshuffling between tasks. Labeling shelves or containers can also help everything return to its place easily.
Do you have any advice on how to balance tool accessibility with maximizing storage capacity? I often find myself running out of space, but when I stack or store things too tightly, it becomes difficult to quickly grab what I need.
Balancing accessibility with storage capacity can be tricky, but try using a mix of open shelves for frequently used tools and deeper drawers or bins for less-used items. Pegboards are great for keeping tools visible and easy to reach. Consider grouping similar tools together and labeling storage spots so everything has a place. Periodically declutter to avoid overcrowding and ensure your most-used tools remain easy to access.
If I’m just starting to build out my home tool collection, how do I accurately anticipate future storage needs without overbuying too much storage up front? Any tips on scaling up gradually as my tool set grows?
To avoid overbuying, start by listing the essential tools you plan to get within the first year and choose a storage solution that fits those, with a little extra room. Modular storage options, like stackable bins or wall-mounted panels, let you expand as you go. Periodically assess your collection and add only what you need to stay organized, scaling storage alongside your growing tool set.
You mention that overcrowding leads to damaged tools and lost items. What are some practical ways to prevent that if my workspace is pretty limited and I can’t add another shelving unit?
In a limited workspace, try using wall-mounted pegboards or magnetic strips to store tools vertically and free up surface space. Drawer organizers and small bins can also help keep tools sorted and accessible without piling them up. Rotating tools seasonally—keeping only what you use most often within reach—can further reduce clutter and prevent overcrowding.
The article mentions laying out all your tools before investing in storage. Do you have suggestions for homeowners with limited space, like a small garage or apartment? I want my setup to stay organized but also compact.
Absolutely, limited space calls for creative storage solutions. Consider using vertical space with wall-mounted pegboards or magnetic strips for hand tools. Stackable bins or drawer organizers can maximize cabinet or shelf space. Multi-purpose furniture, like a bench with built-in storage, works well in small areas. Choose storage that fits your most-used tools and keep less frequently used items in harder-to-reach spots to save prime space.
I noticed the article emphasizes planning for future tool purchases to avoid outgrowing your storage. How do you recommend estimating future needs if I’m just getting started and not sure what tools I’ll eventually need?
If you’re just starting out and unsure which tools you’ll add over time, consider how you plan to use your space and what projects interest you. Leave extra space in drawers or shelves and choose modular or expandable storage options. Start with a bit more capacity than you currently need, so you have flexibility as your tool collection grows and your needs become clearer.
When it comes to accessibility, are there certain types of storage systems that work better for keeping the most-used tools handy without everything getting cluttered? For example, is pegboard better than drawers for beginners?
Pegboards are often a great choice for beginners who want quick access to frequently used tools. They allow you to see and grab tools at a glance, which helps reduce clutter on your work surface. Drawers can be useful for less-used items or small parts, but they tend to hide tools unless they’re well organized. Combining a pegboard for everyday tools with labeled drawers or bins for accessories can strike a good balance between accessibility and organization.
I noticed you mention that many homeowners underestimate their future tool collection when choosing storage. Do you have any tips for predicting how much your tool collection might grow, especially for someone just getting into DIY projects?
When starting out with DIY projects, it’s smart to plan for growth since most people add tools as their skills expand. Consider what kinds of projects interest you—woodworking, home repairs, or gardening—and research common tools for those areas. Estimate space for at least double your current collection, and choose modular storage options you can expand later. This way, you avoid quickly outgrowing your setup.
The article talks about overcrowding tools in a small toolbox or shelving unit. For someone just starting out with DIY projects, what would be a realistic starting storage solution that balances affordability and room to grow?
A great starting point is a medium-sized plastic toolbox or a sturdy tool bag, which both offer portability and affordability. If you have a bit more space, consider a basic shelving unit with clear storage bins or drawer organizers for small parts. This setup lets you easily add more containers or upgrade to larger storage as your tool collection expands.
The article touched on categorizing and laying out all your tools before deciding on storage. Could you share more about the process you use to evaluate which tools you need quick access to versus those it’s okay to store further away, especially for someone just starting out?
To decide which tools deserve prime, easy-to-reach spots, start by thinking about the tasks you do most frequently. Keep your essential, everyday tools—like screwdrivers, hammers, and pliers—within arm’s reach or in top drawers. Less-used items, such as specialty tools or seasonal gear, can go on higher shelves or in labeled bins. As you work on projects, notice which tools you’re always reaching for; adjust their placement as you get more experience. This approach keeps your workspace efficient and clutter-free.
You mentioned laying out all your tools and categorizing them before buying storage, but what do you recommend if I have limited space in my garage? Are there specific systems that work well for tight areas without making access more difficult?
When garage space is tight, consider vertical storage like wall-mounted pegboards or magnetic strips to keep tools off the floor and visible. Stackable bins or drawers under a workbench save floor space but still provide access. For very limited areas, a rolling tool cart can be tucked away when not in use. Modular shelving also allows you to customize storage to fit available wall spaces.
If I only have a small dedicated space in my garage, what are some pro-level strategies to maximize tool accessibility without making everything feel cramped or hard to reach?
To make the most of a small garage space, try using vertical storage options like pegboards or wall-mounted shelves to keep tools visible and accessible. Magnetic strips work well for metal tools and free up counter space. Store smaller items in labeled bins or drawers. Prioritize the tools you use most by keeping them at eye level or within arm’s reach, and group similar items together for efficient workflow.
I see a lot about planning for future tool acquisitions, but how do you balance scalability with budget if you’re just starting out and not sure what tools you’ll need down the line?
Balancing scalability and budget when starting out is all about flexibility. Opt for modular storage options like stackable bins or adjustable shelves, which can expand as your collection grows but don’t require a big upfront investment. Start with space for your current tools, then leave room for additions. This way, you avoid overspending now while making it easy to scale your storage later as your needs become clearer.
You mentioned that inadequate storage can lead to clutter and even injuries. Can you share some specific examples of storage layouts or products that help minimize these risks in a small garage setting?
Absolutely! For a small garage, wall-mounted pegboards keep tools visible and off the floor, reducing tripping hazards. Magnetic strips are great for organizing metal tools like screwdrivers and wrenches. Stackable, labeled bins can store smaller items without taking up much space. Also, consider foldable workbenches or shelves that can be tucked away when not in use to keep walkways clear.
In the section about storage mistakes, you talk about categorizing tools before investing in any system. Are there specific categories or organizing methods you’d recommend for someone who does both woodworking and basic home repairs?
For someone who does both woodworking and basic home repairs, it’s helpful to group tools by activity first—such as woodworking tools (saws, chisels, clamps) and general repair tools (wrenches, pliers, screwdrivers). Within each group, organize further by function or frequency of use. Using labeled bins, drawer dividers, or wall pegboards can keep everything visible and accessible. This way, you can quickly grab what you need for each type of project.
I always find myself rushing to finish projects because I can’t quickly grab the tools I need. Could you give some examples of storage systems that keep tools accessible but still organized for safety?
To keep tools both accessible and organized, consider using pegboards for hanging frequently used items, drawer organizers with labeled sections, and open shelving for larger tools. Wall-mounted magnetic strips are great for metal tools like screwdrivers and pliers. Also, rolling tool carts can be moved to your workspace, keeping everything within reach and reducing the need to rush or fumble for tools during a project.
The article touches on overcrowding and potential tool damage from stacking. If I am on a budget, what are some affordable ways to maximize protection and accessibility without investing in expensive storage systems right away?
You can use simple, budget-friendly solutions like repurposed jars or small bins for organizing smaller tools and fasteners. Pegboards with basic hooks are inexpensive and help keep tools visible and accessible. For added protection, line shelves or drawers with old towels or foam to cushion tools and prevent scratches. Regularly reorganizing and decluttering as you add tools also helps maintain accessibility and avoid overcrowding.
You mention laying out and categorizing your tools before buying storage—how much time should I realistically set aside for that process? I feel like it could take hours, but I want to avoid making the underestimating mistake you described.
The time needed really depends on how many tools you have. For a small collection, you might spend 30 to 60 minutes sorting and categorizing. If you have a lot or haven’t organized in a while, it could take 2 to 3 hours. Give yourself more time than you think, and consider breaking it into sessions to avoid feeling overwhelmed.
I’m just starting out and have a limited budget for organizing my tools. Which pro-level strategies from your guide would you prioritize first to make the biggest impact without overspending?
With a limited budget, start by sorting your tools and using inexpensive containers like bins, jars, or even repurposed boxes for grouping similar items. Wall-mounted pegboards are a cost-effective way to keep tools visible and accessible. Label everything to stay organized. Prioritize keeping your workspace tidy and invest in dedicated storage only for your most-used tools. These steps offer a big improvement without a big spend.
Do you have any specific suggestions for organizing tools that I use daily versus ones I only need occasionally? I want to keep my most-used items handy, but also avoid clutter.
To keep your daily-use tools handy without clutter, consider using a pegboard, magnetic strip, or a small open toolbox near your workspace for those items. For tools you use less often, store them in labeled drawers, bins, or a tool chest further away. Regularly review your setup so only your most-used tools stay within arm’s reach, and rotate items as your projects change.
I noticed the article mentions planning for future tool purchases when setting up storage. In your experience, what’s the best way to estimate how much extra space to leave without wasting room if you mostly do smaller DIY projects?
When planning storage for smaller DIY projects, I recommend leaving about 20–30% extra space beyond your current collection. This typically provides enough room for a few new tools over time without making your storage feel empty. Modular storage options, like adjustable shelves or stackable bins, can also help you adapt your setup as your needs change without wasting space.
The article talks about anticipating future tool acquisitions. How often should someone revisit and update their storage setup to keep it functional, and are there signs I should look for that indicate my current system is no longer adequate?
It’s a good idea to review your tool storage setup at least once or twice a year, or whenever you make significant new tool purchases. Signs that your current system may no longer be adequate include tools piling up outside storage, difficulty finding items quickly, overcrowded drawers or shelves, and damaged tools from lack of space. If you notice these issues, it’s time to rethink and update your setup.
Your point about accessibility struck a chord with me. If I only have a small workshop area, what are some efficient ways to maximize both storage capacity and quick tool access, especially when space is really tight?
In a small workshop, vertical storage is your best friend—add wall-mounted racks, pegboards, or magnetic strips to keep tools within reach but off your work surfaces. Use stackable bins or drawers beneath benches for less-used items. Consider a rolling cart for frequently used tools so you can move them easily. Group similar tools together and label storage spots to help you quickly find what you need.
In the article, you mention that many people underestimate how much storage space they need and end up outgrowing it quickly. Is there a formula or rule of thumb you recommend for estimating how much room I should plan for if I expect my tool collection to grow?
A helpful rule of thumb is to plan for about 30–50% more storage space than you currently need, especially if you expect your tool collection to grow. Try to assess your current tool volume, then add extra shelves, drawers, or pegboard space accordingly. Modular or expandable storage solutions can make it easier to adjust as your needs change over time.
The article talks about how overcrowded storage can lead to lost or damaged tools. Have you found certain storage systems, like wall-mounted pegboards versus modular cabinets, to be better for avoiding these issues for homeowners just starting out?
Wall-mounted pegboards are often easier for beginners to use because they keep tools visible and accessible, making it less likely you’ll lose or damage them. Modular cabinets work well for storing less frequently used or larger tools, but if you’re just starting out, a pegboard can help prevent overcrowding and make it easy to organize and find items quickly. Many homeowners combine both systems as their tool collection grows.
When you recommend laying out all your tools and categorizing them before choosing a storage system, how do you suggest handling larger items like power tools or oddly shaped equipment that don’t fit neatly on shelves or in standard toolboxes?
For larger items like power tools or odd-shaped equipment, consider using heavy-duty storage solutions such as wall-mounted racks, pegboards with sturdy hooks, or dedicated cabinets with adjustable shelves. Rolling tool chests with deep drawers are also great for bulky tools. When sorting, group these larger items separately so you can plan custom spaces or supports that keep them accessible and protected without forcing them into ill-fitting storage.
I’m curious if there are any budget-friendly storage systems or DIY strategies you’d recommend for someone just starting out, so they can avoid overcrowding and tool damage without investing in high-end cabinets right away?
For beginners on a budget, pegboards with hooks are a great option—affordable, easy to install, and versatile for arranging tools visibly. You can also repurpose old bookshelves or crates for open shelving. For smaller tools, use clear bins or even jars to keep items organized and prevent damage. Labeling everything helps maintain order as your collection grows, and wall-mounted solutions free up floor space to avoid overcrowding.
I noticed the article suggests planning for future tool acquisitions, but how do I estimate what storage size I might need if I’m just getting into DIY projects? Is there a safe way to avoid overbuying expensive storage systems?
If you’re new to DIY projects, start by making a list of the basic tools you’ll need for your planned projects. Add a bit of space for growth, but focus on modular or expandable storage systems that can be increased as your collection grows. This way, you avoid spending too much upfront and can adapt your storage as your tool needs evolve.
I’m interested in your point about tool accessibility. If I need to store my tools in deep drawers due to space constraints, what tricks or organizers do you recommend to make sure everything stays easy to find and reach?
To keep tools accessible in deep drawers, use tiered organizers or shallow trays that stack but still allow you to lift out layers easily. Drawer dividers or foam inserts can help separate tools and make them visible at a glance. Labeling sections or using color-coded organizers also helps you quickly identify where each tool belongs, making access and clean-up much faster.
You talked about categorizing and laying out all your tools before investing in storage. I’m curious, what’s the best way to do this efficiently if you have a mix of small hand tools and some bulkier power tools?
To organize a mix of small hand tools and bulkier power tools, start by sorting all your tools into broad categories like cutting, measuring, and fastening. Lay them out on a large, clear surface. Group similar items together, keeping small items in trays or bins to prevent them from getting lost. For bulky power tools, set them aside by type and size. This makes it easier to see what you have and plan storage solutions that fit both small and large tools efficiently.
If you realize your current tool storage is already overcrowded, what’s the most efficient way to reorganize without taking apart your entire setup? Any simple steps for a busy parent with little free time?
If your tool storage is overcrowded, start by quickly sorting out any duplicates or broken tools to free up space. Use small bins or drawer dividers to group similar items together without a full teardown. You could also add pegboards or magnetic strips to the inside of cabinet doors for extra storage. Just tackling one drawer or section at a time can make a big difference without needing a huge time investment.
When you mention laying out all your tools and categorizing them as a first step, do you have suggestions for how to organize larger items versus small hand tools in a compact workshop space?
For compact workshops, store larger items like power tools or bulky equipment on sturdy shelves or in dedicated cabinets, keeping them off the floor. Small hand tools can be organized using pegboards, magnetic strips, or drawer organizers. Group similar items together—like screwdrivers or pliers—for easy access. Wall-mounted storage helps save floor space and keeps your workspace tidy.
I noticed the article talks about the risks of overcrowding and repeated tool purchases due to poor organization. Are there any budget-friendly storage solutions you recommend for someone who has a small workspace and wants to avoid these beginner mistakes?
For a small workspace, consider using pegboards, magnetic strips, and stackable plastic bins. Pegboards let you keep tools visible and accessible without taking up much room. Magnetic strips are great for metal tools and save drawer space. Stackable bins can organize smaller items like screws or drill bits. These options are affordable and help you avoid overcrowding and buying duplicates.
I noticed the article mentions planning for future tool purchases. How much extra space should I actually account for if I’m just getting into DIY projects but expect my collection to grow? Is there a rule of thumb pros use?
If you’re just starting out with DIY projects, it’s wise to plan for about 30-50% more storage space than your current tool needs. Many pros recommend this buffer to accommodate unexpected tool additions as your skills and interests grow. It’s better to have a bit too much storage now than to run out of space quickly and need to reorganize later.
If you’re just starting out and have to stick to a modest budget, which storage systems or layouts would you prioritize first to avoid the common pitfalls like damaging or losing tools?
If you’re starting out on a budget, start with a sturdy toolbox or stackable plastic bins to keep your tools organized and protected from damage or loss. Pegboards are also an affordable way to keep tools visible and accessible on the wall. Label sections or containers so you remember where each tool belongs, and always return them after use—this simple habit helps prevent misplacement.
When you suggest categorizing tools and planning for future purchases, do you have any tips on estimating how much extra space to leave if I’m just starting out and not sure how my collection will grow?
A good rule of thumb is to leave about 25–30% of your storage space empty when setting up your tool area. This gives you enough flexibility for adding new tools as your collection grows. If you expect to pick up a lot of new tools soon, consider adjustable shelving or modular storage systems so you can easily expand or reorganize as needed.
If someone already made the mistake of overcrowding a toolbox or shelf, what is the best way to reorganize without having to buy a whole new storage system? Are there budget-friendly fixes for that situation?
You don’t need to invest in a new storage system to fix overcrowding. Start by sorting and removing tools you rarely use—this instantly frees up space. Use small containers or jars for tiny items like screws or bits. Try using drawer dividers, pegboards, or even repurpose old boxes to separate and organize tools within your existing setup. These simple, low-cost solutions can make a big difference.
You mention the importance of anticipating future tool acquisitions when setting up storage. How often should someone reassess their tool collection and storage needs to keep things organized as their projects and tools change?
It’s a good idea to reassess your tool collection and storage setup every six months or after finishing major projects. This helps you stay organized as your needs evolve and prevents clutter from accumulating. Regularly checking your inventory makes it easier to adjust storage solutions and plan for new acquisitions without running out of space.
You mention that easy tool accessibility is key for workflow. What’s a good balance between keeping tools visible and protecting them from dust or humidity, especially in an unfinished basement or garage?
A balanced approach is to use clear, lidded bins or drawers for smaller hand tools, and wall-mounted pegboards inside shallow cabinets for frequently used items. This keeps tools visible and organized, but with the added protection of closed storage to shield them from dust and humidity. For power tools, consider storing them in their cases or moisture-resistant totes with silica gel packs inside.
You mention the importance of planning for current and future tool collections when choosing storage solutions. Do you have tips for estimating how much extra space to allow for new tools if I have limited room in my garage?
When space is tight, a good rule is to allow around 20–30% more storage than you currently need. Think about the types of tools you may add—larger items like power tools or just more hand tools—and try to group by category. Modular storage systems and stackable bins can help you adapt your setup as your collection grows without taking up extra floor space.
How would you suggest balancing a limited budget with the need for a storage setup that can evolve over time? Are there certain types of storage solutions you find easiest to expand or reconfigure as my tool collection changes?
Start with modular storage solutions like stackable bins, adjustable shelving, or pegboards—they’re affordable and easy to rearrange as your needs grow. Look for options that let you add new pieces or rearrange layouts without much hassle. Avoid fixed cabinetry early on, since it’s harder to expand. Prioritize flexibility and only buy what you truly need to start, then build out your setup as your tool collection grows.
You talked about underestimating storage needs leading to clutter and repeated purchases. For someone on a tight budget, what’s the most cost-effective way to expand storage as my tool collection grows?
A great budget-friendly way to expand tool storage is to repurpose sturdy items like old bookshelves, plastic bins, or even pegboards. Pegboards are especially affordable and let you customize as you go. Stackable containers and wall-mounted racks also make use of vertical space, keeping your area tidy as your collection grows without a big investment.
What security tips do you recommend for small business owners with limited space who want to keep their tools both accessible and safe, based on your pro-level setup strategies?
For small business owners with limited space, use lockable cabinets or tool chests to keep tools secure but easy to access. Wall-mounted pegboards with locking bars can save space and add a layer of security. Consider installing motion sensor lighting or small security cameras in your storage area for extra protection. Always keep an updated inventory list to quickly spot if anything goes missing.
If you’re working with a tight budget, are there any creative storage hacks or affordable alternatives to commercial tool chests that still help avoid the common mistake of overcrowding and stacking tools together?
Absolutely, there are several budget-friendly ways to organize tools without overcrowding. Pegboards with hooks let you hang tools visibly on the wall and are easy to rearrange as your collection grows. Magnetic strips can hold metal tools and take up very little space. Repurposed items like old jars, buckets, or even shoe organizers can separate and store hand tools neatly. Always group similar tools together and avoid stacking to keep everything accessible and avoid clutter.
When you mention future-proofing a tool storage setup, do you have any suggestions for modular systems or layouts that can be easily expanded as your tool collection grows?
Future-proofing your tool storage is all about flexibility. Modular systems like wall-mounted pegboards, adjustable shelving, and stackable drawer units are great options. Look for systems that let you add extra racks or bins without replacing the whole setup. Leave some empty space or unused fixtures in your initial design to make expanding your collection easier later on.
You mentioned that focusing only on storage capacity often leads to tools being hard to access. What’s a practical way to organize tools so the ones I use the most aren’t buried, especially in a small garage where space is tight?
To keep your most-used tools easy to reach in a small garage, dedicate a few shelves or wall-mounted pegboards near your main workspace for them. Arrange these tools at eye or waist level. Store rarely used tools higher up or in drawers further away. Group similar items—like screwdrivers or pliers—together, and label sections for quick identification. This setup saves space and minimizes searching for frequently needed tools.
I’m just starting out and only have a few tools right now, but I plan to add more as I take on new projects. Should I buy a bigger toolbox upfront or is it better to expand piece by piece as my collection grows?
Since you’re just starting out, it’s usually best to begin with a small or medium toolbox that fits your current tools but leaves a bit of extra space. As your collection grows, you can add more storage or upgrade to a larger box. This approach prevents clutter and lets you choose storage that matches your actual needs over time.
For someone on a limited budget, are there specific storage setups or materials you would recommend that balance affordability and the ability to expand as I get more tools over time?
If you’re working with a tight budget, start with stackable plastic bins, open shelving made from affordable plywood, and pegboards for wall organization. These options are cost-effective and easy to expand as your tool collection grows. You can add more bins or shelving later, and pegboards can be rearranged to fit new tools. Repurposing old cabinets or shelves is another budget-friendly option.
How much should I expect to budget for a decent beginner’s tool storage setup that won’t end up being too small in six months? Are there any affordable brands or solutions that still offer flexibility and accessibility?
A reasonable starting budget for a beginner’s tool storage setup is around $100 to $250. This can cover a sturdy modular toolbox, a portable tool bag, or entry-level shelving units. Brands like Husky, Kobalt, and Stanley offer affordable options with expandable features. Pegboards and stackable bins are also great for flexibility and can grow with your collection without breaking the bank.
You mentioned it’s important to plan for future tool purchases when setting up your storage system. How do you actually estimate or plan for how much your tool collection might grow if you’re just getting started with DIY projects?
When starting out, it’s tough to know exactly how many tools you’ll accumulate, but you can plan by allowing extra storage space from the start. Consider your immediate tool needs, then add 25–50% more capacity for future additions. Modular storage options, like adjustable shelves or stackable bins, make it easy to expand as your collection grows. Keeping your setup flexible will save you time and effort down the road.
You mention that many people underestimate their storage needs and quickly outgrow small toolboxes or shelves. What strategies can I use to accurately predict how much storage I’ll need if I’m just starting out but plan to add more tools over time?
To better estimate your future storage needs, start by making a list of the tools you currently own and then research which tools you’ll likely add as your projects evolve. Choose modular storage systems that can be expanded, like stackable bins or racks. Allow for at least 30-50% extra space beyond your current collection to accommodate new additions and keep your setup organized as your toolkit grows.
In the section about avoiding overcrowding, do you have any tips on organizing bulky or oddly shaped tools that don’t fit neatly into standard shelving or toolboxes?
For bulky or oddly shaped tools, wall-mounted pegboards or heavy-duty hooks work really well, letting you hang items like saws or extension cords. You could also use adjustable shelving or open bins for tools that are too large for drawers. If possible, dedicate a corner or a rack for oversized items so they’re accessible but not in the way.
The article mentions anticipating future tool acquisitions when setting up storage, but what’s the best way to estimate how much extra space to leave if I’m just starting out and not sure how quickly my collection will grow?
A practical approach is to plan for at least 25-50% more storage space than you currently need. If you’re unsure how fast you’ll add tools, leave some shelves or drawers empty and consider modular storage options that are easy to expand. This way, you can adjust your setup without having to overhaul it as your collection grows.
When planning a new tool storage layout, do you recommend prioritizing layout planning and accessibility over security and maintenance features, or should all these factors be given equal weight from the beginning? It’s tricky to know which aspect to focus on first as a beginner.
When setting up a tool storage layout, it helps to consider all factors—layout, accessibility, security, and maintenance—from the start, but you can prioritize based on your main needs. For most beginners, focusing first on layout and accessibility ensures your tools are easy to reach and organized. Then, plan for security and maintenance features as you go, so your setup evolves along with your collection and workflow.
When talking about tool accessibility, what are some practical layout ideas for small apartments where I can’t install wall-mounted racks or big shelving units?
In small apartments, try using stackable toolboxes or bins that fit under beds or inside closets to save space. Drawer organizers or rolling carts can keep tools accessible without taking up much room. Magnetic strips inside cabinet doors or pegboards that hang over doors are also handy ways to organize tools without drilling into walls or needing large shelves.
After sorting my tools into categories, I always get stuck deciding between open shelving and closed cabinets. Is there a pro-level tip for which system works best for families with kids, especially for safety and access?
For families with kids, closed cabinets are usually the safer choice. They keep sharp or hazardous tools out of easy reach and can be locked for extra precaution. You might want to use open shelving only for lightweight or non-dangerous items, while reserving cabinets for anything that could pose a safety risk. This setup balances accessibility for adults with safety for children.
When it comes to organizing tools for accessibility, I’m not sure how to balance keeping everything easy to reach versus maximizing space. Could you explain what layout planning strategies work best for a typical garage with limited room?
In a garage with limited space, focus on vertical storage like wall-mounted pegboards and shelves to keep your most-used tools within easy reach. Group tools by function or frequency of use, placing everyday items at eye level. Store less-used tools higher up or in labeled bins below. Rolling carts and magnetic strips can also help maximize flexibility and organization without cluttering your main workspace.
When evaluating future tool storage needs as you mention, are there guidelines for how much extra space to plan for if I expect to add more tools over the next few years? I want to avoid having to completely redo my setup soon.
When planning for future tool storage, it’s wise to estimate your expected tool growth and add about 30–50% extra space to your current needs. Consider the types of tools you may add—larger power tools need more room than hand tools. Modular systems or adjustable shelves also make it easier to adapt your setup as your collection grows.
You mentioned planning for future tool acquisitions—how do you balance leaving enough room for growth without over-investing in extra storage that you might not need right away?
A good approach is to estimate which types of tools you’re likely to add over the next year or two and choose modular or expandable storage systems. Start with enough space for your current collection plus a bit extra, but avoid buying the largest setup right away. Many wall systems or stackable cabinets can be added to gradually, so you only invest more as your needs actually grow.
In your section about underestimating storage needs, you mention anticipating future acquisitions. Do you have any tips or rules of thumb for predicting tool growth, especially for small businesses that might expand their services over time?
When planning storage for a growing business, consider allocating at least 25–50% more space than your current needs. Review your service plans for the next 1–3 years and list any specialized tools you might add. Modular storage systems are helpful because you can expand them easily. Regularly review inventory so you can adjust storage as your business grows.
Could you share some tips on how to estimate future tool storage needs when I’m just starting out and not sure how quickly my collection will grow? I want to avoid constantly reorganizing or buying new storage units every few months.
When starting out, try to plan for about 30-50% more storage than you currently need. Group tools by type and leave space for each category to expand. Choose modular or stackable storage solutions, so you can easily add sections as your collection grows. Keep an inventory list and periodically review which tools you use most to help anticipate future purchases.
When trying to future-proof my setup, should I invest in modular storage systems up front, or is it more practical to expand over time as my tool collection grows? I’m trying to keep a reasonable budget in mind.
Investing in a modular storage system up front can save you money and hassle in the long run, as these systems are designed to expand easily as your tool collection grows. However, if your budget is tight, start with a basic modular setup—just a few components to meet your current needs—and add more elements gradually. This way, you stay organized and avoid outgrowing mismatched storage.
If I want my tool storage setup to ‘evolve with my needs’ like you mention, should I invest upfront in modular systems, or is it okay to start with basic shelves and upgrade over time? What have you found most cost-effective for beginners?
Starting with basic shelves is completely fine, especially if you’re just figuring out your workflow and tool collection. Many beginners benefit from upgrading incrementally as their needs become clearer. Modular systems are a great investment later, once you know what features matter most to you. This approach helps you avoid spending too much upfront on solutions you might outgrow or not need.
I’m concerned about overcrowding and tool damage like you mentioned when storage becomes too tight. Are there any cost-effective solutions for someone on a tight budget to upgrade from a basic toolbox to a better system without having to buy everything at once?
You can improve your tool storage gradually without a big upfront investment. Start by adding drawer organizers or inexpensive pegboards to your current setup, which help keep tools separated and visible. Repurposing items like jars for small parts or using wall-mounted hooks can also reduce crowding. As your budget allows, expand with stackable bins or secondhand cabinets, upgrading piece by piece as you go.
You brought up outgrowing a small toolbox quickly—how do you recommend planning for future tool purchases if you’re just starting out and not sure how your collection will grow? Is it better to overestimate storage space from the get-go?
It’s wise to leave room for growth as your tool collection will likely expand over time. Rather than buying the largest storage unit possible, consider modular options—like stackable containers or expandable tool chests—that can be added to later. Start with enough space for what you have and a little extra, and choose storage that can easily scale up as your needs change.
My biggest challenge is finding a balance between enough storage capacity and making my tools easily accessible for quick jobs. Do you recommend modular systems or mobile storage carts for a small business shop, or would wall-mounted solutions provide better long-term flexibility?
For a small business shop, combining wall-mounted solutions with a modular system often works best. Wall storage keeps your most-used tools visible and within reach, while modular units or mobile carts offer flexibility and extra capacity as your needs change. If space is tight, wall mounts maximize floor area, but adding a mobile cart lets you bring tools to your workspace for quick jobs.
When it comes to improving accessibility, do you have suggestions for arranging frequently used versus rarely used tools? I often find myself digging through deep drawers, so I’d love to know some practical ways to keep the essentials within easy reach.
To boost accessibility, place your most frequently used tools at eye level or in the top drawers and on pegboards within arm’s reach. Reserve lower cabinets and deeper drawers for tools you rarely use. Try using drawer dividers or small bins to keep items separated and visible. Labeling shelves and storage bins also helps you quickly locate what you need.
You mentioned overcrowding and stacking tools can lead to damage. For specialty tools that I only use occasionally, what is the best way to store them so they stay protected but still accessible?
For specialty tools you rarely use, consider storing each one in its original case or a padded pouch if available. Place them on dedicated shelves or in labeled bins to keep them separate and easy to find. Avoid stacking heavy items on top of these tools, and use drawer organizers or foam inserts for added protection if they’ll be stored in drawers.
I noticed you mentioned anticipating future tool purchases when planning storage. How do you balance planning for growth with not overbuying expensive storage components upfront, especially if you’re on a budget?
A good way to balance planning for future tool growth with staying on budget is to choose modular or expandable storage solutions. Start with basic units that meet your current needs, but allow space for add-ons later. Prioritize the tools you use most and avoid buying oversized cabinets or organizers right away; you can always add more shelves, bins, or pegboards as your collection grows.
The article warns against overcrowding and stacking tools, but in a small garage with limited space, what creative solutions would you recommend so everything stays accessible without having to constantly rearrange things?
In a small garage, vertical storage is your best friend. Consider using pegboards or slat walls to hang tools, freeing up work surfaces and floor space. Magnetic strips can hold smaller metal tools, and stacking clear bins or drawer organizers helps keep items sorted but visible. Try adding shelving above doors or along unused wall space for bulky equipment. Group tools by type and frequency of use to make access easy without constant reshuffling.
I noticed you said that overcrowding a small storage unit can cause tool damage. Are there any affordable ways to upgrade from an overstuffed toolbox without spending a lot all at once, especially for someone just starting out?
You can gradually upgrade your storage by using stackable plastic bins or sturdy tote bags, which are often much cheaper than full tool chests. Pegboards are another affordable option for organizing tools on walls and keeping them visible. Expanding your storage step by step lets you avoid overcrowding without a big upfront cost, and you can add more as your collection grows.
You mentioned that a lot of beginners underestimate their storage needs and end up outgrowing small toolboxes or shelves. How do I realistically estimate the right size for my first real setup if I’m only just starting out and don’t own that many tools yet?
A good approach is to take stock of your current tools, then consider the types of projects you plan to tackle over the next year or two. Most beginners double or triple their collection fairly quickly, so choose storage with extra capacity—aim for at least twice the space you need now. Modular systems and stackable storage are flexible options that can grow with your collection.
If I want my tool storage to ‘evolve with my needs’ like you suggest, is it better to start with modular shelving and add on, or invest in a bigger fixed system from the beginning? I’m trying to stay on a budget but also avoid outgrowing my setup too fast.
Modular shelving is usually the best choice if you want your storage to grow with you and stay within budget. You can start with a basic setup and add more shelves or accessories as your collection expands. This way, you avoid a big upfront cost and don’t risk ending up with a system that’s too small or too large for your needs.
If your tool collection keeps growing, how often should you reevaluate your storage system? Is there a point when you should consider a complete overhaul rather than just adding new shelves or bins?
It’s wise to assess your tool storage every 6 to 12 months, especially if you’re actively expanding your collection. If you notice that your current setup is cluttered, tools are hard to find, or safety is compromised, it’s time to consider a full overhaul rather than simply adding more shelves or bins. A major update can help you stay organized and make better use of your space.
The point about accessibility got me thinking—how do pros decide between open shelving, pegboards, or closed cabinets for frequently used tools? For someone working out of a garage with limited wall space, what would you recommend?
Professionals usually base their choice on how often they use each tool and the need for quick access. Open shelving and pegboards are great for visibility and speed, especially for tools you grab often. If wall space is limited in your garage, a pegboard above the workbench can maximize vertical storage, or consider a rolling tool cart—this keeps frequently used tools mobile and accessible without using up precious wall real estate.
You mentioned the risk of outgrowing storage quickly if you don’t plan ahead. I have limited space in my garage—how can I estimate the right amount of storage I’ll need as my tool collection grows over time?
To estimate your future storage needs, start by listing all your current tools and consider what you might add in the next few years—think about upcoming projects or hobbies. Plan for at least 25–50% more space than you currently need. Modular storage systems are flexible and let you expand as your collection grows without taking up too much extra room right away.
The article mentions categorizing tools and anticipating future acquisitions. Can you suggest a practical way to predict what tools I might need, especially if I’m just getting into DIY and not sure how my collection will grow?
A practical approach is to start by listing the types of projects you’re interested in, like woodworking or basic home repairs. Research common tools required for those tasks and set aside extra space in your storage for them. As you tackle new projects, note any tools you borrow or wish you had—this helps guide future purchases and keeps your organization adaptable.
I’m just getting started with my own tool collection and I’m not sure how to predict what tools I’ll add in the future. The article mentions planning for future acquisitions, but do you have any tips for estimating how much extra space I should leave or how to expand storage later on?
A good rule of thumb is to leave about 30–50% of your storage space open for future tools, especially if you plan to grow your collection steadily. Choose modular storage options like stackable bins or adjustable shelves to make expanding your setup easier. That way, you can rearrange or add space as your needs change, without a complete overhaul.
You mention the risk of outgrowing a small toolbox pretty quickly. Do you have any guidelines or formulas for roughly estimating how much storage I should plan for if I expect my tool collection to grow over the next few years?
A helpful approach is to take stock of your current tools and then plan for at least 50% more storage than you need right now. This allows room for new tools as your collection grows. If you expect to expand rapidly or start new projects, consider doubling your current space. Also, modular or expandable storage systems make it easier to add more capacity later without a complete overhaul.
The article warns against tools being stacked or jammed together, which I’ve definitely been guilty of. Is there a particularly budget-friendly method or product you suggest for organizing tools in a way that still keeps them easily accessible?
A very affordable way to organize tools is to use pegboards with hooks, which let you hang tools visibly and access them quickly. You can also repurpose containers like old jars or small bins for things like screws and smaller items. Drawer dividers made from scrap wood or cardboard work well for separating tools in a toolbox. These options keep your setup tidy without much expense.
When planning a storage system on a tight budget, how should I prioritize between buying modular shelving units versus a sturdy toolbox? Is there a practical way to estimate upfront how much space I’ll need in the next year or two?
When working with a tight budget, start by considering what tools you own and use most. If you mainly have hand tools or plan to be mobile, a sturdy toolbox may be more practical. For larger tool collections or if your workspace is fixed, modular shelving offers more flexibility as your collection grows. To estimate future space, list the types of tools you’re likely to acquire based on your projects, then add about 25% extra space for expansion. This helps avoid overcrowding as your toolset grows.
You mentioned the importance of planning for both current and future tool needs. How can I realistically estimate how much extra storage space I’ll need if I’m just starting out with basic DIY projects but expect to expand over the next few years?
To estimate extra storage, start by listing your current tools and considering the types of projects you plan to tackle in the next few years. Expect to at least double your storage as you acquire more specialized tools. Modular storage systems are a smart choice—they let you expand as needed. Leave at least 25–50% of your storage space empty for future growth, and regularly reassess your needs as your skills advance.
When planning storage for a growing collection of power tools, do you recommend modular wall systems or traditional tool chests for better long-term accessibility? I want something that adapts as my business needs change but won’t break the bank right away.
For a growing power tool collection and changing business needs, modular wall systems offer great flexibility. You can easily add, rearrange, or remove storage as your inventory evolves. They’re often more accessible, keeping tools in sight and within reach. Traditional tool chests are sturdy and secure but can become cramped and harder to reorganize. If budget is a concern, consider starting with a modest modular setup and expanding as needed to balance cost and adaptability.
I get stuck trying to choose between wall-mounted systems and traditional tool chests. Are there pros and cons to each in terms of long-term maintenance or tool protection that beginners should keep in mind?
Both wall-mounted systems and tool chests have their strengths. Wall-mounted systems make tools easy to access and keep your workspace open, but dust can accumulate and tools are more exposed. Tool chests offer better protection from dust and damage, and organizing small parts is easier, but they require more floor space and tools can get jumbled if not organized well. For beginners, consider your workspace size and how often you use your tools. Combining both can also be a smart way to balance convenience and protection.
When estimating future tool storage needs, is there a rule of thumb for how much extra space to plan for if you’re just starting out? I’m worried about quickly outgrowing whatever system I set up.
A good rule of thumb is to plan for about 30–50% more storage space than you currently need. This buffer allows room for new tools and any growth in your collection. Modular storage solutions or adjustable shelving can make it easier to expand over time without a complete overhaul.
When it comes to preventing tool damage and ensuring safety, are there certain storage materials or specific organizational features you would advise against? I want to avoid common mistakes like overcrowding but also stay within a reasonable budget.
To prevent tool damage and keep your workspace safe, steer clear of flimsy plastic bins that can crack under weight or let moisture in. Avoid storing tools in piles or overcrowded drawers, since this can cause scratches and be a safety hazard. Instead, look for sturdy metal or thick plastic organizers with dividers or foam inserts to keep tools separated. Pegboards are affordable and help with visibility and easy access, reducing the risk of injury and prolonging tool life.
You talk about laying out and categorizing tools before deciding on storage—are there any specific categories or groupings that tend to work best for busy homeowners who don’t have lots of free time to reorganize?
For busy homeowners, grouping tools by common tasks is often the most practical approach. For example, keep all basic hand tools (like hammers, screwdrivers, and pliers) together, create a box or section for painting supplies, and have a bin for garden tools. This way, you can grab what you need for a specific job without searching, and it’s easy to put things back quickly.
How much should I expect to budget for a decent tool storage system that accommodates future growth and prevents the overcrowding problem you described, especially for a beginner like me?
For a beginner looking to avoid overcrowding and plan for future growth, budgeting around $150 to $300 is realistic. This range covers a sturdy modular tool chest, a basic pegboard, and some organizers for small items, allowing flexibility as your collection grows. If you have more space or larger tools, you might consider spending up to $500 for a larger setup, but starting smaller and expanding is often best for beginners.
I’m in the process of categorizing all my tools as you suggested, but I have a pretty limited budget and space in my garage. Do you have any specific affordable storage setups you’d recommend that can still evolve as my tool collection grows?
Absolutely, you can start with stackable plastic bins or clear shoebox containers for small tools, which are inexpensive and easy to label. Pegboards are another budget-friendly option, taking up minimal wall space and letting you rearrange hooks as your collection grows. For larger tools, consider sturdy shelving or repurposed cabinets. As your needs change, you can add more bins, shelf units, or expand your pegboard area without a big upfront investment.
The article notes that ignoring tool accessibility can slow down DIY projects. If I’m just starting out and working with a tight budget, what are some affordable changes I could make right away to improve tool access before investing in new storage systems?
To improve tool access without spending much, try organizing your most-used tools on a pegboard or wall hooks using items you already have, like nails or sturdy adhesive hooks. Repurpose old jars or cans for small parts, and group similar tools together in boxes or drawers. Keeping your workspace tidy and tools visible will make your DIY projects smoother even before you buy specialized storage solutions.
When you mention anticipating future acquisitions before buying tool storage, how do you suggest estimating the right amount of extra space? Is there a rule of thumb for growth if I only add a few new tools each year?
Estimating extra storage space comes down to your tool-buying habits. If you typically add a few tools each year, a good rule of thumb is to plan for about 20–30% more space than you currently need. That buffer should comfortably accommodate several years of gradual growth without making your storage setup feel oversized or cluttered.
You mentioned organizing tools by category and anticipating future acquisitions. Could you share what types of storage systems are most adaptable as a collection evolves, especially without breaking the bank?
Modular storage systems like stackable bins, adjustable shelves, and pegboards are highly adaptable as your tool collection grows. These options let you reconfigure layouts or add components without significant cost. Rolling tool carts and portable toolboxes are also budget-friendly and flexible, so you can expand or rearrange storage as needed. Starting with these basics helps you adjust your setup over time without major investments.
I liked the part about categorizing tools and considering your most-used items. Could you give examples of different storage systems that work best for people with limited space, like apartments or small garages?
For limited spaces like apartments or small garages, wall-mounted pegboards are a great way to keep tools visible and off the floor. Compact rolling tool carts can tuck into corners and be moved as needed. Stackable bins or drawer organizers help separate smaller items and fit inside closets. Magnetic strips work well for metal tools and save drawer space. Using vertical shelving makes the most of available height.
For beginners trying to avoid overcrowding and tool damage, are there any specific storage systems or brands you suggest that work particularly well on a tight budget?
If you’re on a tight budget, modular plastic storage bins or stackable toolboxes are a great starting point. Brands like Stanley and Husky offer sturdy toolboxes and organizers at reasonable prices. Pegboards with hooks are also cost-effective for wall storage and help prevent overcrowding. Focus on systems that let you separate and easily access your tools to avoid damage.
The article mentions how overcrowding storage can lead to tool damage. For a small workshop with limited space, do you recommend investing in modular storage systems upfront, or is it better to start small and upgrade as the collection grows?
For a small workshop, it’s smart to start with a basic storage setup that fits your current tool collection, but choose options that can easily be expanded later. Modular systems can be a worthwhile investment if you plan to add more tools over time, as they allow you to adapt without replacing everything. Just make sure not to overcrowd, regardless of the system you choose.
I noticed the article talks about both maintenance and security when it comes to tool storage. Are there affordable storage solutions that also offer good protection against theft, especially for people who mostly store tools in their garage?
Yes, there are several affordable storage options that help with both maintenance and theft protection for garage use. Look for lockable tool chests or cabinets made of steel—many budget-friendly brands offer models with reinforced locks. You can also use wall-mounted pegboards combined with a lockable cabinet for high-value tools. Adding a simple garage alarm or security camera can further deter theft without a big investment.
You mentioned that stacking tools can lead to damage and clutter. For those of us with limited space, what are some creative ways to keep everything accessible without just piling tools into bins or drawers?
When space is tight, vertical storage is your friend. Try installing pegboards or magnetic strips on walls to hang frequently used tools. Use hooks or racks on the back of doors for extra storage. Multi-tiered shelves, tool rolls, or fold-out organizers can maximize small spaces while keeping everything visible and easy to grab. Labeling and grouping similar items together will also make your setup more efficient.
I run a small handyman business and my tool collection keeps expanding faster than I expect. You mention that many people underestimate their storage needs. Do you have tips for projecting future tool growth, especially for small businesses that might take on bigger jobs over time?
Estimating future tool needs is key for growing businesses. Start by listing your current tool types and consider what tools are required for the larger jobs you hope to take on. Factor in seasonal work or new services you might add. When setting up storage, plan for at least 30–50% more space than you currently need. Modular or expandable systems can help you adapt as your collection grows.
You mention that one of the biggest beginner mistakes is underestimating future storage needs. What are some practical ways to plan for tool collection growth if I have limited space in my garage? Are there modular storage options you recommend?
To plan for your growing tool collection in a small garage, focus on vertical storage like wall-mounted pegboards and shelving. Modular systems such as stackable bins and cabinets with adjustable shelves let you reconfigure as your collection expands. You can also use rolling carts, which add flexibility and can be tucked away. Look for systems that let you add or rearrange components easily, so your storage grows with your needs.
I get that accessibility is key, but how do you balance making your most-used tools easy to reach while still keeping everything looking organized? Any tips for setups in a small garage where space is pretty limited?
In a small garage, using vertical space is a smart way to keep tools accessible and organized. Try installing pegboards or magnetic strips on the walls for your most-used tools. Store lesser-used items in labeled bins or drawers below. Group tools by task or type, so you can grab what you need quickly without cluttering your workspace.
Could you expand on tool accessibility? Specifically, I’m trying to decide between open shelving and closed cabinets for my garage, and I’m not sure which system really makes it easier to grab my most-used tools while keeping everything organized.
Open shelving makes it easy to spot and quickly grab your most-used tools, which is great for frequent projects or if you’re often in a hurry. However, closed cabinets protect tools from dust and keep your space looking tidy, but can slow you down if you have to open doors to access things. Many pros use a combination: open shelves or pegboards for everyday tools, and cabinets for less-used items or sensitive equipment.
The article says to consider how your storage can evolve as your collection grows. How often would you recommend reevaluating your setup, and are there any signs I should look for that it’s time to reorganize or upgrade my system?
It’s a good idea to review your tool storage once or twice a year, or whenever you add several new tools. Key signs it’s time to reorganize include tools piling up outside storage, difficulty finding what you need, or damaged tools due to overcrowding. If you notice wasted space or frequent frustration, that’s also a signal to upgrade your system.
You talk about organizing tools by laying them all out and categorizing them first. Could you share some examples of effective categories or systems for people with a mix of hand tools and power tools?
Certainly! A good starting point is to group tools by function, such as cutting, measuring, fastening, and shaping. Within those, you can separate hand tools (like screwdrivers, pliers, hammers) from power tools (like drills, saws, sanders). Some people also organize by frequency of use, keeping everyday essentials most accessible. Labeling drawers or bins by category can make finding and returning tools much easier.
You mention the importance of planning for future tool purchases, but with a small workshop space, how can I balance upgrading storage capacity without creating clutter or wasting money on unused cabinets?
To manage a small workshop, consider modular storage solutions that can expand as your tool collection grows. Start with versatile shelving or stackable bins instead of large fixed cabinets. Wall-mounted pegboards or magnetic strips maximize vertical space and keep tools visible, reducing the chance of clutter. Before adding storage, review what tools you actually need, so you don’t waste money on unnecessary cabinets.
When thinking about future-proofing storage, how do I estimate how much extra space I should plan for? Is there a general rule of thumb for beginner DIYers who aren’t sure how much their collection might grow?
When planning future-proof tool storage, it’s wise to allow for at least 30–50% more space than your current needs. Many DIYers underestimate how quickly their tool collection can grow with new projects. Start by listing the types of tools you might add in the next few years. Modular storage systems are also helpful, as they can be expanded without a complete overhaul.
I’m in the middle of organizing my garage and realized I probably underestimated how much storage space I need, like you mentioned in the article. Do you have any advice on how to plan for future tool purchases so I don’t have to keep reorganizing every year?
When planning your garage storage, it’s smart to leave some extra space for future tools. Consider adding adjustable shelving or modular storage systems so you can easily expand as your collection grows. Group similar tools together and leave a few empty bins or drawers in each section. This way, as you buy new tools, you already have a spot for them and won’t need to redo your setup every time.
If I already bought a small toolbox and am quickly running out of space, what are some affordable ways to expand my storage without having to completely start over?
You don’t need to start over completely. You can add stackable tool organizers or small drawer units on top of your existing toolbox. Wall-mounted pegboards or magnetic strips are affordable and keep frequently used tools visible and accessible. Clear plastic storage bins for smaller items also help maximize space, and you can label them for easy organization.
I have a pretty small workspace in my garage and I’m worried about outgrowing whatever storage I set up. How do I plan for future tool purchases when I honestly don’t know what I’ll end up needing? Is there a flexible storage option you’d recommend for beginners who might expand their collection over time?
Planning flexible storage in a small garage is smart. Consider modular shelving or stackable bins, as these can be reconfigured and expanded as your tool collection grows. Pegboards are also a great choice—they let you rearrange hooks and accessories easily for new tools. Leave some empty space or adjustable shelves, so you’re not boxed in as your needs change.
Could you give more detail on organizing tools by how often you use them? For example, should I keep my most-used tools on a pegboard, or is there a better method to make sure they’re always easy to grab during projects?
Organizing tools by frequency of use is a smart move. Pegboards are excellent for keeping your most-used tools visible and within arm’s reach, which saves time during projects. Alternatively, you could use a top drawer or a dedicated open bin for these tools if you prefer them off the wall. The main goal is to place your go-to items in the most accessible spot, minimizing the steps needed to grab and return them.
The article talks about starting with a single shelving unit or toolbox and outgrowing it quickly. For someone on a budget, what’s the most cost-effective way to set up a scalable tool storage system that won’t need a complete overhaul in a year or two?
A cost-effective and scalable solution is to use modular storage, like stackable bins or shelving units that can be expanded as your collection grows. Start with a sturdy base unit and add more shelves or bins as needed. Pegboards with adjustable hooks are also affordable and adaptable—they let you reorganize tools without major changes. This way, you can invest gradually and avoid regular overhauls.
The article mentions planning for future tool acquisitions when setting up storage. Do you have recommendations for modular storage systems that are easy to expand as my collection grows?
Absolutely, modular storage systems are a great choice if you plan to grow your tool collection. Look for options like stackable toolboxes, rail-based wall storage systems, or shelving units with adjustable bins and hooks. Brands such as Milwaukee, DeWalt, and Husky offer modular storage lines that can be expanded piece by piece, so you can add components as needed without redoing your entire setup.
The article talks about categorizing tools before setting up storage. Could you give some examples of how to organize different types of tools for maximum accessibility, especially if you have a mix of power tools and smaller hand tools?
To organize a mix of power tools and smaller hand tools efficiently, start by grouping tools by type and use. Store frequently used hand tools like screwdrivers and pliers in a wall-mounted rack or drawer near your main workspace. Arrange power tools on sturdy shelves, ideally with their batteries and chargers together. Use labeled bins or pegboards for accessories like drill bits or sockets, and keep less-used specialty tools higher up or further away. This setup helps you quickly find what you need while keeping your workspace tidy.
I noticed you suggest categorizing tools before settling on a storage system. Could you recommend which types of storage solutions work best for businesses with a mix of large power tools and smaller hand tools?
For businesses with both large power tools and smaller hand tools, a combination approach usually works well. Wall-mounted pegboards or panels keep hand tools visible and accessible. For power tools, consider heavy-duty shelving or lockable cabinets for security and support. Drawer-style tool chests help organize smaller items, while mobile carts allow you to move frequently used tools around the workspace.
The article mentions the risk of stacking or jamming tools together leading to damage. Can you share some pro-level tips on organizing tools for quick access while also preventing this kind of wear and tear, especially in tight workspaces?
To prevent tool damage and keep everything accessible in tight spaces, use pegboards or magnetic strips for wall storage, letting you see and grab each tool easily. Drawer organizers with individual slots or foam inserts help prevent tools from touching or banging together. For small items, labeled bins or compartment boxes work well. Prioritize keeping your most-used tools within arm’s reach, and regularly return them to their designated spots to maintain organization.
The article talks about accessibility being just as important as storage capacity. Do you have any favorite storage systems or layouts for making sure most-used tools are always easy to grab, especially in a small garage?
For small garages, I recommend using wall-mounted pegboards for hanging your most-used tools—they’re visible and always within arm’s reach. Magnetic strips work well for items like screwdrivers and pliers. You can also use labeled bins or drawers for smaller items near your workbench. Try to group tools by task and keep what you use most often at eye level or in the top drawers.
I’m getting ready to set up tool storage in my new workshop, and I worry about outgrowing the space, as the article mentions. Do you have any tips for estimating future tool expansion, especially for a growing small business where the tool inventory can change quickly?
A good way to plan for future tool expansion is to map out your current inventory and add space for at least 25–50% more tools. Consider adjustable shelving, modular cabinets, and mobile tool carts—they make it easy to reconfigure your setup as your needs grow. Also, leave some open wall or floor space so you can add new racks or storage as your business expands.
Budget is pretty tight for my home repair business. Do you have suggestions for affordable storage setups that still address the overcrowding and tool damage issues mentioned in the article, without compromising too much on quality or access?
Absolutely, you can tackle overcrowding and tool damage on a budget by using pegboards, wall-mounted shelves, or even repurposed cabinets to keep tools organized and visible. Sturdy plastic bins or drawer organizers help separate smaller items. Keep heavier tools on lower shelves for safety. Label everything clearly to speed up access and reduce clutter, and prioritize storing the most-used tools in the most convenient spots.
I always seem to outgrow my toolboxes way faster than I expect. How do you suggest estimating future storage needs, especially for someone who’s just getting started and isn’t sure what kinds of tools they’ll add over time?
It’s smart to think ahead! When starting out, consider buying a toolbox or storage system that’s at least 30–50% larger than your current collection. Picture the types of projects you might tackle in the next few years—woodworking, automotive work, or home repairs—and leave room for those tools. Modular storage systems or stackable units can also make it easy to expand as your needs change without having to replace everything.
You mention that many beginners underestimate their storage needs. How can I realistically predict how much my tool collection will expand in the next few years, especially if I plan to get into new projects?
To estimate future storage needs, start by listing the projects you plan to tackle and the types of tools each will require. Research common tools for those hobbies or trades, and add extra space for accessories and unexpected purchases. It’s a good idea to choose storage solutions that can be easily expanded or reconfigured, so you’re ready as your collection grows.
Do you have any advice for homeowners with limited space who want to avoid the mistake of underestimating their storage needs? It seems tough to balance future tool purchases with a small garage or apartment.
For limited spaces like small garages or apartments, modular storage is a smart choice. Start by using wall-mounted racks, pegboards, or stackable bins to maximize vertical space. When planning, leave extra room or empty bins for tools you may buy in the future. Regularly review what you actually use, and declutter tools you no longer need so your setup stays manageable.
I’m curious about planning for future tool purchases. How do you recommend estimating storage needs if my business is still growing? Is there a method or formula to predict how much space I’ll need as I add more tools over time?
When estimating future storage needs, start by listing the types of tools you’re likely to purchase as your business grows and group them by size. A good rule is to plan for at least 30–50% more storage than you currently need. Modular storage systems or adjustable shelving can offer flexibility as your collection expands. Reviewing your purchasing patterns every six months can help you adjust storage plans before space becomes tight.
Can you share any tips on maintaining accessibility for tools I don’t use often, while still keeping my most-used equipment easy to reach? I’m finding it tricky to strike the right balance in a garage with limited shelving.
One approach is to group your most-used tools at eye level or on a pegboard within easy reach of your main work area. For tools you use less often, store them in labeled bins or drawers higher up or lower down on shelves. Consider adding rolling carts or stackable storage boxes, so you can bring out rarely used tools when needed without them taking up prime space.
I get the point about accessibility, but how do you balance keeping your most-used tools easy to reach without making your setup look cluttered or messy? Are there specific layout planning strategies you recommend for small spaces?
One effective way to keep your most-used tools accessible without causing clutter is to use vertical space—wall-mounted pegboards or magnetic strips let you display tools neatly and grab them quickly. In small spaces, group tools by function and store them in labeled bins or drawers close to where you use them. Having a designated ‘home’ for each tool helps your setup stay tidy while keeping essentials within arm’s reach.
You mention that a common error is underestimating future storage needs. In your experience, is it better to overbuild your storage system from the start, or is there a modular approach that makes it easy to adapt as your tool collection grows?
A modular approach is usually more practical for most people, especially if you’re still building your tool collection. Modular systems let you add new shelves, cabinets, or bins as needed without major overhauls. This way, you avoid wasted space and expense upfront but can expand easily when your storage needs grow.
I get overwhelmed when everything is just stacked together. For a small workspace, what kind of storage system would make the most difference in keeping things accessible without making my area feel even more crowded?
For a small workspace, using wall-mounted pegboards or magnetic strips can really help free up surface space and keep tools visible and within easy reach. Drawer organizers work well for smaller items, and stacking clear storage bins lets you see what’s inside without rummaging. Prioritize vertical storage and only keep essentials within arm’s reach to prevent overcrowding.
I’m curious how much space I should realistically plan for if I’m just starting out and only have a basic collection of household tools, but expect to get more over time. Is there a formula or rule of thumb for estimating future storage needs?
When starting out with a basic set of household tools, a small toolbox or a single shelf is often enough. However, if you plan to expand your collection, it’s wise to allow for at least double your current storage space. A good rule of thumb is to set aside about 25% more space than you think you’ll need now and periodically reassess as you add tools, so you’re not constantly reorganizing.
The article mentions that packing tools in deep drawers or stacked bins can hurt workflow. Do you recommend open shelving, pegboards, or another system for making frequently used tools more accessible, especially in smaller garages?
For smaller garages, a combination of open shelving and pegboards works really well to keep frequently used tools accessible. Pegboards let you hang tools within easy reach and see everything at a glance, while open shelves can hold bins or containers for bulkier items. This setup saves space and prevents tools from getting buried, making your workflow much smoother.
Do you have any suggestions for people who don’t have a dedicated workshop space and need to store their tools in a small apartment or shared area? I feel like the advice about anticipating future tool purchases might be tough for renters or people with limited space.
For small apartments or shared spaces, modular and portable storage works well. Consider stackable toolboxes or rolling carts that can be tucked away in closets or under furniture. Wall-mounted pegboards or magnetic strips can hold essentials without taking up floor space. When anticipating future tool purchases, focus on multipurpose tools and adjustable storage options that expand vertically instead of horizontally. This way, you’ll make the most of limited space while staying organized.
I run a small handyman business and find my current tool storage is always overflowing. When you talk about planning for future acquisitions, do you have suggestions on how often I should reassess my storage needs or what signs to look for that it’s time to upgrade?
For a small handyman business, it’s wise to reassess your tool storage every 3–6 months or whenever you notice tools getting stacked in temporary spots, difficulty finding items quickly, or new acquisitions that don’t have dedicated space. Signs you need to upgrade include tools being damaged from crowding, having to move things just to access what you need, or spending extra time searching for the right tool.
You talk about outgrowing small toolboxes quickly. For someone on a tight budget, what are some affordable storage solutions that can still evolve as my tool collection grows?
Look for stackable plastic bins or modular shelving units, which are usually affordable and can be added to over time. Pegboards are another budget-friendly choice—start small and expand as needed. Repurposing items like old cabinets or sturdy crates can also help you stay organized without spending much. As your collection grows, these options let you rearrange or add more storage without starting over.
You mentioned laying out all your tools and categorizing them before investing in storage. In your experience, what’s the best way to approach this if you have a mix of power tools, hand tools, and random hardware? Any tips for actually keeping everything grouped over time?
Start by making separate piles for power tools, hand tools, and hardware like screws or nails. Within each group, sort further by type or frequency of use. Label storage bins and drawers clearly to help keep things organized. Regularly return each tool to its labeled spot after use, and do a quick check every few weeks to tidy up any stray items. Involving a color code or shadow boards for hand tools also helps maintain order over time.
In the section about underestimating storage needs, you mention laying out all your tools and categorizing them before investing in a system. Are there specific categories or sorting methods you recommend for someone with a mix of power tools and hand tools?
When organizing a mix of power tools and hand tools, a good approach is to first separate them into main categories: power tools, hand tools, fasteners (like nails and screws), and accessories (batteries, bits, blades). Within hand tools, sort further by function—measuring, cutting, gripping, etc. For power tools, group by type or frequency of use. This method helps you visualize what you have and plan storage that keeps similar items together and easy to access.
For beginners trying to avoid overcrowding and damaged tools, are there budget-friendly storage systems or materials you suggest that still provide easy access and room to expand compared to traditional toolboxes or shelving units?
Absolutely! Stackable plastic bins or modular drawer organizers are inexpensive and let you group tools by type, keeping everything visible and accessible. Pegboards with hooks are another budget-friendly solution that offers flexibility for future expansion as your collection grows. Both options help prevent overcrowding and tool damage, while being easier to adjust as your storage needs change.
You mentioned that inadequate storage can lead to damage and even injuries. Are there certain storage setups or materials that you’ve found are particularly effective at preventing these issues, especially in a standard garage setting?
Absolutely, in a standard garage, durable metal shelving units and sturdy wall-mounted pegboards are very effective. They keep tools off the floor, reduce clutter, and prevent accidental trips or dropped tools. Using foam inserts in drawers for delicate items also minimizes damage. Closed cabinets are great for keeping dust at bay. Just make sure everything is secured and heavier items are stored lower to avoid injuries.
When planning a tool storage system that can adapt to future acquisitions, do you recommend modular storage solutions or is it better to oversize your initial setup to save money long-term? Are there specific brands or features that help with scalability?
Modular storage solutions are usually best for long-term adaptability, as they let you expand or reconfigure as your collection grows. Oversizing can waste space and money if your needs change unpredictably. Look for brands with stackable or interlocking features, like Milwaukee’s Packout or DeWalt’s ToughSystem. Features like adjustable shelves, add-on drawers, and compatibility with accessories make future expansion much easier.
The article talks about categorizing tools before buying storage, but what’s the best way to anticipate future tool purchases? Should I get expandable storage systems even if my current collection is pretty basic?
It’s smart to think ahead, even if your current tool collection is small. Expandable storage systems, like modular cabinets or stackable toolboxes, let you add on as your collection grows. When planning, consider the types of projects you might tackle in the future and leave extra space for those tools. This way, you won’t have to completely overhaul your storage as your needs change.
You mention that many people ignore how accessible their tools are when planning storage. Could you share examples of storage setups or layouts that make it really easy to grab frequently used tools quickly?
Absolutely. For quick access, consider using wall-mounted pegboards to hang your most-used hand tools at eye level. Magnetic strips are great for items like screwdrivers and pliers, keeping them in plain sight. Open shelving or tool racks near your main workspace let you grab what you need without rummaging through drawers. Drawers with foam inserts or labeled trays also help by keeping everything visible and sorted by frequency of use.
I noticed the article mentions tool accessibility as a common pitfall. Do you have any suggestions for organizing tools so that frequently used items stay easy to grab, especially in a small garage workspace?
To keep your most-used tools accessible in a small garage, try using wall-mounted pegboards or magnetic strips for items you grab often. Place these close to your main work area. Store less frequently used tools in labeled bins or drawers below your workspace, and rotate tools seasonally if your needs change. Keeping surfaces clear will also help you stay organized and efficient.
When you talk about laying out all your tools before choosing storage solutions, how do you recommend handling tools that you rarely use or only need for occasional projects? Should those be stored separately from things I use all the time?
For tools you rarely use or only need for occasional projects, it’s best to store them separately from your frequently used items. Keep everyday tools easily accessible in your main storage area, while placing seldom-used tools in a labeled bin, a higher shelf, or a less accessible cabinet. This way, your regular workflow stays organized and efficient, but you still know exactly where to find your special-use tools when needed.
When it comes to balancing accessibility with maximizing storage space, do you have any tips for organizing tools that are used less often versus the ones I grab daily? I struggle to keep everyday tools easy to reach without ending up with a cluttered workspace.
A good way to balance accessibility and storage is to group your most-used tools in a pegboard or open tray near your main work area, so they’re always within reach. Store less frequently used tools in labeled drawers, bins, or on higher shelves. Consider rotating seasonal tools in and out of these ‘prime’ spots as your projects change.
You mention overcrowding leads to tool damage and lost items. Is there a cost-effective approach to tool storage that still makes everything easily accessible, especially for college students or beginners on a tight budget?
Absolutely, you can keep your tools accessible and organized without spending much. Try using stackable plastic bins or small drawer organizers from discount stores. Pegboards are inexpensive and let you hang tools visibly on the wall. Repurposing containers like jars or coffee cans for small items can also help. Keeping your system simple makes it easier to maintain and prevents overcrowding.