
Introduction: Why Power Tool Safety Matters in Home Improvement
Whether you’re building a deck, installing new cabinetry, or simply hanging shelves, power tools are the backbone of most home improvement projects. Their efficiency and versatility have made DIY upgrades more accessible than ever before. However, with great power comes great responsibility—according to the U.S. Consumer Product Safety Commission, thousands of emergency room visits each year are linked to improper tool use at home. From minor cuts and eye injuries to serious lacerations and even amputations, the risks are real but largely avoidable.
Many accidents occur not because of tool malfunction, but due to avoidable user errors, lack of preparation, or simple oversights in safety. Whether you’re a beginner or a seasoned DIY enthusiast, following a comprehensive safety checklist is crucial. This guide provides a step-by-step safety protocol for using power tools in home improvement, covering preparation, operation, maintenance, and storage. We’ll also highlight often-overlooked hazards, essential protective gear, and smart habits that keep your workspace accident-free. Let’s build and renovate safely—read on to learn how.
Before You Begin: Pre-Use Safety Preparation
1. Inspect Your Tools
Before plugging in or powering up any tool:
- Check for Damage: Examine cords for frays, cracked housing, missing parts, or loose screws.
- Test Moving Parts: Gently operate switches, triggers, and moving mechanisms without connecting to power.
- Read the Manual: Even if you’re experienced, always refer to the manufacturer’s instructions for your specific model.
2. Prepare Your Workspace
- Clear the Area: Remove clutter, tripping hazards, and unnecessary materials.
- Ensure Proper Lighting: Good visibility is crucial. Supplement with portable work lights as needed.
- Ventilation: If using tools that generate dust or fumes (such as saws or sanders), ensure adequate airflow or use dust extraction systems.
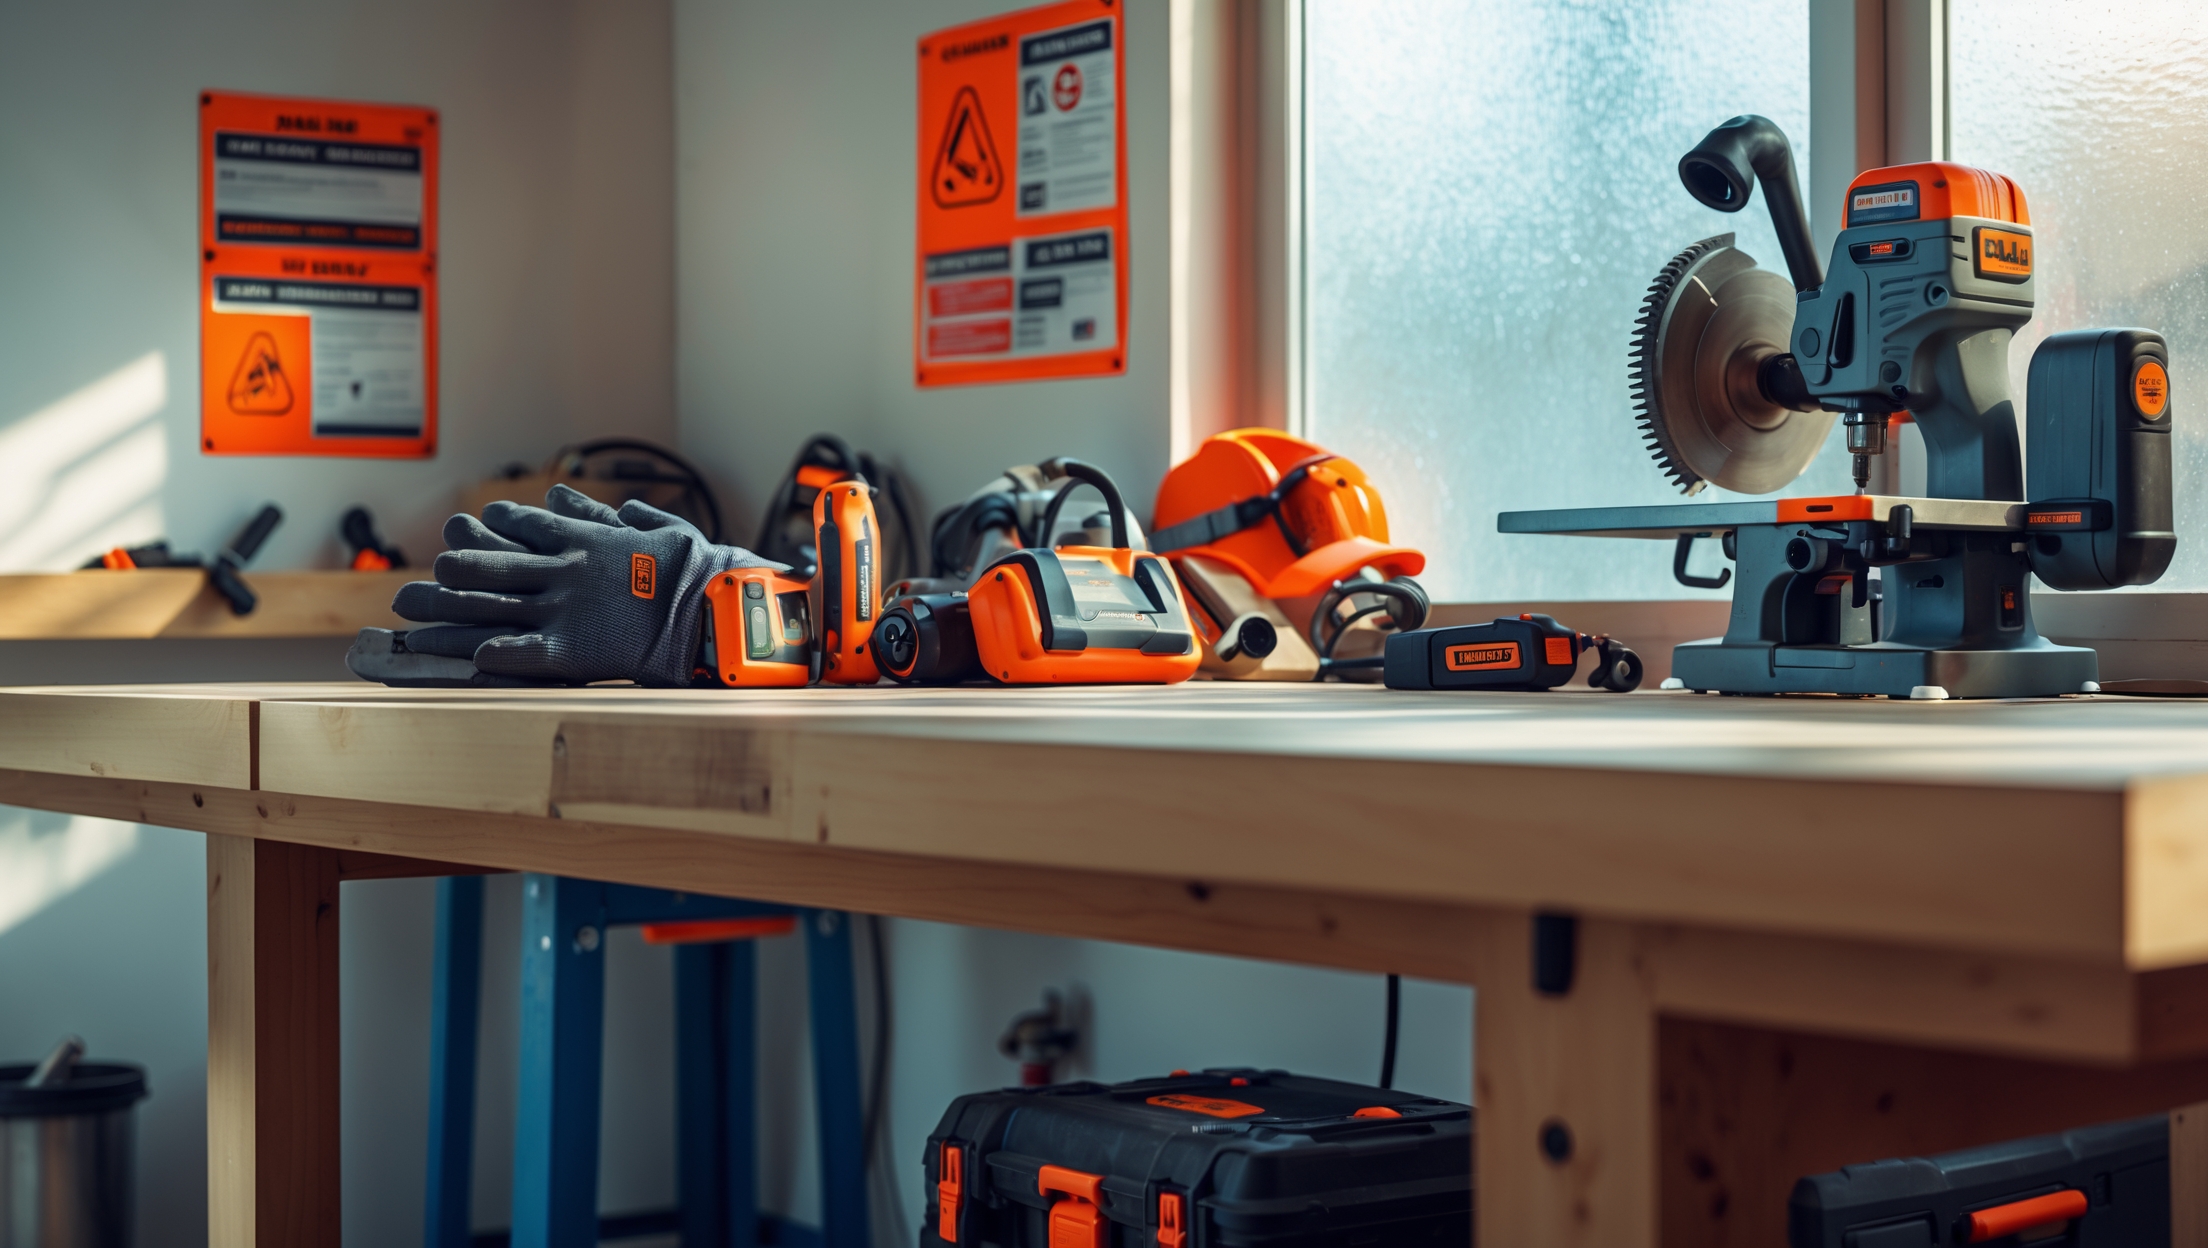
3. Gather and Inspect Protective Gear
- Safety Glasses or Goggles: Protects eyes from flying debris.
- Hearing Protection: Use earplugs or earmuffs for loud equipment like circular saws and nail guns.
- Gloves: Wear only if recommended by the tool manufacturer (some tools may snag loose gloves).
- Dust Mask or Respirator: Essential when cutting, sanding, or painting.
- Non-slip Footwear: Prevents slips on sawdust or spilled materials.
4. Double-Check Power Sources
- GFCI Outlets: Use Ground Fault Circuit Interrupter outlets for electric tools, especially in damp areas.
- Extension Cords: Use heavy-duty, outdoor-rated cords and avoid daisy-chaining.
- Battery Safety: Inspect batteries for leaks or swelling; use only manufacturer-approved chargers.
Safe Operation: Habits That Prevent Accidents
1. Focus on One Task at a Time
Distractions are a leading cause of tool-related mishaps. Avoid multitasking, silence your phone, and let family or housemates know you’ll be working with potentially hazardous equipment.
2. Use the Right Tool for the Job
- Don’t Force It: Never use a tool for unintended purposes—improvised use can lead to breakage or injury.
- Check Accessories: Use the appropriate bits, blades, or attachments for your material (wood, metal, masonry, etc.).
3. Follow Proper Handling Techniques
- Firm Grip: Hold tools with both hands, using handles or grips designed by the manufacturer.
- Stable Stance: Balance your weight, keep feet shoulder-width apart, and never overreach.
- Keep Hands Clear: Always be aware of blade or bit paths—use clamps to secure workpieces instead of your hands.
4. Mind Your Cords and Batteries
- Keep Cords Away: Route cords behind you and away from cutting areas to prevent accidental slicing or tripping.
- Unplug Before Adjusting: Always disconnect power before changing accessories or performing maintenance.
- Monitor Battery Charge: Overheated batteries can catch fire; allow them to cool before recharging.
5. Maintain Awareness of Your Surroundings
- Check for Others: Keep children and pets away from the work area.
- Watch for Hazards: Be alert to wet floors, overhead obstructions, and shifting materials.
Tool-Specific Safety Checklists
1. Circular Saw Safety
- Inspect blade for sharpness and damage.
- Ensure blade guard moves freely and covers blade when not cutting.
- Support material on both sides; never start a cut with the blade in contact with the workpiece.
- Allow blade to reach full speed before cutting.
2. Power Drill Safety
- Tighten bits securely in the chuck.
- Use the correct speed for your material; too fast can cause bits to break.
- Keep hair and loose clothing secured away from rotating parts.
3. Angle Grinder Safety
- Check guard placement; never remove it.
- Use only wheels rated for your grinder’s speed.
- Wear face shields in addition to goggles for extra protection.
- Never use excessive force when grinding or cutting.
4. Jigsaw and Reciprocating Saw Safety
- Verify blades are installed correctly and tightly.
- Let the saw do the work—don’t push forcefully.
- Wait until the blade stops moving before setting the tool down.
5. Nail Gun Safety
- Engage safety mechanisms whenever possible.
- Keep hands and body parts out of the nailing line.
- Disconnect from air or power source before clearing jams.
During the Job: Staying Safe in Real Time
1. Take Regular Breaks
Fatigue leads to mistakes. Schedule breaks every 30–60 minutes, especially when working with loud or vibration-heavy tools.
2. Stay Hydrated and Nourished
Dehydration and hunger can impair focus and reaction time. Keep water and healthy snacks nearby, but away from the work zone.
3. Adjust for Environmental Changes
- Weather: If working outdoors, avoid using electric tools in rain or excessive humidity.
- Temperature: Cold can stiffen cords and reduce battery performance; extreme heat can cause overheating.
After the Job: Safe Shutdown and Maintenance
1. Clean and Inspect Tools
- Wipe down all surfaces to remove dust, debris, and moisture.
- Inspect for any damage incurred during use.
- Lubricate moving parts as directed by the manufacturer.
2. Store Tools Properly
- Unplug corded tools and remove batteries from cordless ones.
- Store in a dry, locked cabinet or toolbox, away from children and pets.
- Hang or secure tools to prevent falls from shelves.
3. Dispose of Waste Responsibly
- Collect sawdust or shavings—many are flammable and should not be left near heat sources.
- Dispose of used blades, bits, and batteries according to local regulations.
Bonus: Emergency Preparedness in the Workshop
No matter how careful you are, accidents can still happen. Prepare for the unexpected:
- Keep a first aid kit in your workshop and know how to use it.
- Have a fire extinguisher rated for electrical and combustible fires within reach.
- Post emergency contact numbers and your address somewhere visible.
- Inform someone when you’ll be working alone with power tools.
Common Power Tool Safety Myths Debunked
- “Safety gear isn’t necessary for small jobs.” Even quick cuts can cause life-changing injuries. Always gear up.
- “It’s okay to remove safety guards for convenience.” Guards exist for a reason—removing them is a recipe for disaster.
- “I can fix minor tool issues while plugged in.” Always unplug before troubleshooting or changing parts.
- “Only professionals need to follow strict safety rules.” Accidents can happen to anyone, regardless of skill level.
Conclusion: Making Power Tool Safety a Habit
Every successful home improvement project starts and ends with safety. From the moment you pick up a power tool to the final cleanup, your attention to detail and commitment to safe practices make all the difference. By following this comprehensive safety checklist, you drastically reduce your risk of injury and ensure your DIY ambitions don’t end in the ER.
Remember, safety isn’t just about ticking boxes—it’s about cultivating habits. Inspecting your tools, preparing your workspace, gearing up, and staying present during every task builds muscle memory that pays off for years to come. Don’t let shortcuts or misplaced confidence override the basics. Even veteran DIYers benefit from reviewing these protocols regularly, as new tools and materials bring unique hazards.
Power tools are incredible allies in transforming your home, but they demand respect. The time spent on preparation and maintenance is always worth it compared to the pain and expense of an avoidable accident. Share this checklist with fellow DIYers, post it in your workshop, and make safety the foundation of every home improvement adventure. Your future projects—and your well-being—depend on it.
You mention checking power tool cords for frays and cracks before using them. If I find a cord that looks slightly worn but still works, is it safe to use or should I always replace it? Are there repair options for cords or is it best to buy a new tool?
If a power tool cord looks even slightly worn, it’s best not to use the tool until the cord is repaired or replaced. Damaged cords can pose serious shock or fire risks, regardless of whether the tool still works. In many cases, cords can be replaced or repaired by a qualified technician—there’s no need to buy a new tool unless the damage is extensive or the repair isn’t possible.
I noticed that ventilation was included as a workspace preparation step, especially with tools that create dust or fumes. Are there specific fans or extraction systems you recommend for smaller home garages where windows might not open?
For small home garages with limited window access, portable air filtration units or extractor fans with attached ducts can work well. Look for models specifically designed for workshop or garage use, as they often have HEPA filters and are good at capturing fine dust. Compact fume extractors, often used for soldering or painting, are also effective. When buying, check for easy filter replacements and ensure the fan power matches the size of your garage.
Could you go into more detail about what kinds of protective gear are truly essential for someone doing basic DIY projects at home? Sometimes I feel overwhelmed by all the different recommendations, so a clear list for common tasks would be helpful.
For most basic DIY projects using power tools, stick to these essentials: safety glasses to protect your eyes, hearing protection like earplugs if tools are loud, sturdy gloves for handling materials, and closed-toe shoes with non-slip soles. If you’ll make dust, use a dust mask or respirator. For heavy-duty cutting or grinding, add a face shield. This core set covers most common home tasks safely without overcomplicating your gear.
If I clear my workspace but my garage is still a bit cramped, would you recommend moving bigger projects outside for better lighting or safety, or are there portable lighting solutions and safety tips for making a small space work?
Working in a cramped garage can be safe with the right approach. Portable LED work lights can greatly improve visibility in small spaces, and you can use extension cords for flexibility. Keep walkways clear, store unused tools away, and ensure proper ventilation, especially if you’re creating dust. Moving bigger projects outside is a good idea if space or ventilation is an issue, but with good organization and lighting, small garages can still be safe for many home projects.
You mentioned inspecting cords for frays and checking for missing parts before using power tools. If I notice minor damage, like a small nick on the cord or a loose screw, is it ever safe to do quick DIY repairs, or should I always replace the tool or have it professionally fixed?
If you spot minor damage like a small nick in the cord or a loose screw, it’s best not to use the tool until it’s properly repaired. DIY fixes, such as taping over a damaged cord or tightening screws without checking for internal issues, can be unsafe. For cord damage, have it professionally repaired or replace the cord. For loose or missing parts, consult the manufacturer’s guidelines or a qualified technician to ensure the tool stays safe to use.
The article mentions checking for frayed cords and damaged tool housing before use. If I notice minor cosmetic cracks on a tool’s casing but everything appears to function normally, is it still safe to use, or should I replace the tool immediately?
If you spot minor cosmetic cracks on a tool’s casing, it’s important to assess whether they are just surface scratches or if they could affect the tool’s structural integrity. Even small cracks can grow over time or allow dust and moisture inside, potentially creating safety hazards. If you’re unsure, it’s safer to stop using the tool and have it inspected or replaced to avoid any risk during your project.
When inspecting power tools for damage, how do you decide if something like a slightly cracked casing or a loose screw is a dealbreaker? Is there a guideline for what just needs a simple fix versus when it’s too risky to use the tool?
When inspecting power tools, any damage that exposes wiring, moving parts, or compromises the tool’s structural integrity—like a cracked casing near stress points—means the tool shouldn’t be used until professionally repaired. Loose screws are usually safe to tighten, but if something remains wobbly or the damage seems to affect safety features or insulation, it’s best to avoid using the tool. Always consult the manufacturer’s guidelines or a qualified technician if you’re unsure.
The article highlights the importance of proper ventilation when working with tools that make dust or fumes. For small projects inside the house, what are some practical ways to improve airflow if I don’t have a fancy dust extraction system?
For small indoor projects, you can improve airflow by opening windows and doors to create a cross-breeze. Use a box fan in the window to help push dust and fumes outside. If possible, work near an open door. You can also take frequent breaks to air out the room. Wearing a quality dust mask or respirator adds an extra layer of protection while you work.
After going through the checklist, I’m wondering about the best practices for storing power tools between projects. Are there certain storage conditions or steps to follow that can help extend tool life and prevent safety hazards in the long run?
Proper storage is key for keeping your power tools in good shape and reducing risks. Always clean tools before storing, remove batteries or unplug them, and store them in a cool, dry place to prevent rust or electrical issues. Use cases or shelves to keep cords untangled and tools organized. Also, keep tools out of reach of children and away from dampness or direct sunlight, as these can damage components over time.
The article mentions using dust extraction systems or ensuring good ventilation when working with tools that generate dust or fumes. Can you explain what an effective dust extraction setup looks like for a typical home workshop and whether it’s truly necessary for smaller DIY projects?
An effective dust extraction setup for a home workshop usually involves a shop vacuum or a dedicated dust collector connected to your power tools via hoses. For tools without built-in ports, portable air filtration units or even a simple box fan with a filter can help. Even for smaller DIY projects, dust can accumulate quickly and cause health or cleanup issues, so having some form of dust control is highly recommended, especially in enclosed spaces.
How do you handle safety preparation if you share your workspace with kids or pets? Clearing the area is important, but do you have any tips for keeping power tools and materials secure when you have little ones running around the house?
When sharing your workspace with kids or pets, it’s crucial to store power tools and materials in locked cabinets or high shelves out of reach. Always unplug tools immediately after use and keep safety guards on. Try to schedule work sessions when children and pets aren’t around, and use barriers or baby gates to block off the area if possible. Double-check that everything is put away before leaving the workspace unattended.
When you mention using dust extraction systems for ventilation, do you have recommendations for affordable options that work well in smaller home workshops? I’m not sure if I should invest in a dedicated dust collector or if a shop vac with a filter is usually sufficient for DIY projects.
For most small home workshops and typical DIY projects, a shop vac equipped with a HEPA or fine dust filter is usually sufficient and much more budget-friendly than investing in a dedicated dust collector. Make sure your shop vac can handle fine dust and empty it regularly. If you work with particularly dusty tools or do a lot of sanding, you might consider adding a cyclone separator to improve filtration and extend the life of your shop vac filter.
I noticed the checklist advises examining cords for frays and cracked housing before use. If I find minor damage on a tool’s cord, is it safe to repair it myself, or should I always take it to a professional?
If you find any damage on a power tool’s cord, even if it seems minor, it’s generally safest to have it inspected and repaired by a qualified professional. DIY repairs can be risky unless you have the proper training and tools, as improper fixes may lead to electrical hazards or void the tool’s warranty. Prioritizing safety is always the best approach.
The checklist mentions inspecting cords and tool housing for damage. If I notice a fray or crack, is it safe to attempt a repair myself, or should I immediately replace the tool? Would love insight on what’s DIY-safe versus needing a pro.
If you spot a frayed cord or cracked housing, it’s usually safest to stop using the tool immediately. Minor cord issues can sometimes be fixed by those with electrical know-how, but most repairs—especially to housing or internal wiring—should be left to professionals. If you’re unsure or the tool is older, replacement is often the safest route to avoid electrical hazards.
You brought up reading the manual before using each tool, even if you’re experienced. Do you have tips for organizing or storing all those manuals for easy reference in a busy home workspace?
An easy way to keep tool manuals handy is to store them in a labeled binder or a small file box right in your workshop. Slip each manual into a plastic sleeve or folder and sort them alphabetically or by tool type. For extra convenience, you could scan the manuals and save digital copies on your phone or computer, making them easy to search and access whenever you need them.
I noticed you mention checking for tool damage before plugging anything in. If I do find a frayed cord or a cracked housing on one of my older power tools, is it safer to repair these myself with electrical tape or should I always replace the part entirely?
If you find a frayed cord or cracked housing on a power tool, it’s much safer to replace the damaged part rather than trying to repair it with electrical tape. Electrical tape is only a temporary fix and might not adequately protect against electrical hazards. Replacing the cord or housing, or having the tool serviced professionally, ensures better safety and reliability.
You mention inspecting power tools before use, like checking cords for frays or cracked housing. How often should these inspections happen if I use my tools only occasionally, and at what point should I replace a cord versus just taping it up?
If you use your power tools occasionally, it’s best to inspect them each time before you start a new project. Even with infrequent use, cords can develop issues during storage. If you find a cord with frays, exposed wires, or deep cuts, it’s safer to replace the cord rather than tape it. Tape is only suitable for minor surface nicks that don’t expose wiring. Safety comes first, so when in doubt, replace rather than repair.
I noticed you recommend reading the manufacturer’s manual even for experienced users. Are there certain features or safety switches on modern power tools that tend to get overlooked but are important for preventing accidents?
Absolutely, even seasoned users sometimes miss newer safety features. Many modern power tools now have automatic shut-off switches, blade guards, trigger locks, or anti-restart functions. These additions can differ between brands and models, so reading the manual ensures you know how they work on your specific tool. Ignoring them could mean you miss out on crucial accident prevention.
I noticed the checklist mentions using dust extraction systems for ventilation when working with saws or sanders. Are there budget-friendly options for dust extraction that work well for small home workshops? Or is a basic shop vac sufficient for most DIY tasks?
A basic shop vac is actually a popular and effective choice for most small DIY projects involving saws and sanders. For improved results, you can connect the tool’s dust port directly to the shop vac with an adapter or hose. There are also budget-friendly dust separator attachments that help prevent filter clogging and increase efficiency. For most home workshops, this setup works quite well without needing a dedicated dust extraction system.
The article talks about following the manufacturer’s instructions even for experienced users. Is there a general checklist you recommend for quick reference, or does each tool really need its own separate checklist for safe operation?
While each power tool does come with its own specific safety recommendations, there are some general safety steps you can use as a quick checklist: wear the appropriate protective gear, inspect tools for damage before use, keep your workspace clean, confirm all guards are in place, use tools for their intended purpose, and disconnect power before changing accessories. For best safety, always check the manufacturer’s instructions for any tool-specific details.
I noticed you mentioned the importance of proper ventilation when using tools that create dust or fumes. Can you recommend affordable dust extraction systems or other solutions for small indoor workspaces?
For small indoor workspaces, portable dust extractors or shop vacuums with HEPA filters are both affordable and effective options. You can also use box fans in windows to help draw dust and fumes outside. If your budget is tight, attaching a dust collection bag or using a basic air purifier alongside regular cleaning can make a noticeable difference in air quality.
You mentioned the importance of inspecting power tool cords for frays or damage before use. If I do find a damaged cord, is it generally safe or recommended to try repairing it myself, or should I always replace the entire tool or take it to a professional?
If you find a damaged power tool cord, it’s safest not to use the tool until it’s fixed. Repairing cords yourself can be risky unless you have proper experience and the right materials. It’s usually best to have a professional handle repairs or replace the cord. In some cases, replacing the entire tool may be more cost-effective, especially for older or inexpensive models.
The article talks about making sure there’s enough ventilation when using tools that create dust or fumes. What are some effective low-cost options for improving airflow in a small apartment or garage workspace?
To improve airflow in a small apartment or garage, try opening windows and doors on opposite sides to create cross-ventilation. Use a basic box fan or an inexpensive exhaust fan near the work area to push dust or fumes outside. Also, working close to windows and taking frequent breaks to air out the space can help maintain better air quality without major expenses.
The checklist suggests clearing the area to remove tripping hazards, but what if I’m working in a cramped space where I can’t move things out easily? Any tips for keeping things safe in a tight workspace?
When working in a cramped space, focus on organizing your tools and materials to minimize clutter. Keep only what you need for the task within arm’s reach, and neatly stack or hang anything else to the sides or above, if possible. Use bright tape or mats to clearly mark walkways or hazards, and take frequent breaks to tidy up as you go. If you can’t remove larger items, cover sharp edges and ensure cords are secured to avoid trips.
I’m just getting started with home projects and my workspace is in a dimly lit basement. What types of portable work lights would you suggest for safe tool use—are there specific features or brands that work best for beginners on a budget?
For a basement workspace, LED work lights are a great choice—they’re energy-efficient, bright, and stay cool. Look for portable models with adjustable stands or clamp bases so you can direct light exactly where you need it. Brands like Husky, Ryobi, and Stanley often have affordable, beginner-friendly options. Aim for lights with at least 1000 lumens for clear visibility when using power tools.
When inspecting power tools before use, how do you determine if a particular fray or crack on the cord is dangerous enough to replace the tool or just needs a quick repair? I want to make sure I am not being overly cautious but still staying safe.
It’s wise to err on the side of caution with power tool cords. If you find a fray or crack that exposes inner wires or insulation, or if the damage is near the plug or tool entry point, replacement is best. Minor surface nicks that don’t expose wires can sometimes be safely repaired with electrical tape, but if you’re at all unsure, replacing the cord or consulting a professional ensures safety.
Could you clarify what counts as adequate ventilation when using saws or sanders inside a garage? I have a standard two-car garage—should I keep the doors wide open, or is using a fan enough to keep things safe?
Adequate ventilation means making sure dust and fumes don’t build up while you’re working. In a two-car garage, it’s best to open the main garage door fully to let fresh air in and help particles escape. Using a fan to direct air out of the garage is helpful too, but it should be combined with open doors or windows. Relying on a fan alone isn’t usually enough for safe ventilation.
After doing the initial safety checks and setup, do you have tips for staying mindful of safety throughout a long project? Sometimes I find myself getting complacent or tired and wonder how to avoid that slip in attention.
It’s common to lose focus during long projects. To help stay mindful, take regular breaks to rest and reset your attention. Periodically recheck your workspace for hazards and tidy up to keep things safe. If you notice feeling fatigued, stop and hydrate or stretch. Remind yourself of the safety basics before restarting each session, and, if possible, have someone else nearby to check in with you.
You mention checking for damage and testing moving parts before using power tools, but I’m wondering what to do if I find a loose screw or a slightly frayed cord. Are there simple repairs I can make myself, or should I always replace the tool or seek professional help?
If you find a loose screw on your power tool, you can usually tighten it yourself with the appropriate screwdriver or tool, making sure not to overtighten. For a slightly frayed cord, it’s safer to stop using the tool and have the cord replaced by a professional or follow the manufacturer’s repair guidelines. Electrical issues can be hazardous, so don’t try to tape over or patch a damaged cord yourself.
The article suggests ensuring good ventilation if you’re using tools that create dust or fumes. What’s the best way to set this up in a typical garage workspace? Should I look into a specific dust extraction system, or will a fan and open door usually suffice?
In a typical garage, opening doors and windows and using a fan to direct airflow can help with basic ventilation when working with power tools. However, if you’re creating a lot of dust or using tools that generate fine particles, it’s much safer to use a proper dust extraction system or shop vac. This helps prevent dust from lingering in the air and settling on surfaces. For fumes, such as from paints or solvents, always prioritize strong airflow and consider adding an exhaust fan for even better results.
I noticed you recommend ensuring proper lighting in the workspace. Can you suggest what types or brightness levels of portable work lights are most effective for typical home improvement projects with power tools?
For home improvement projects with power tools, LED work lights are a great choice since they’re bright and energy-efficient. Aim for lights with a brightness of at least 1,000 lumens for general tasks, while more detailed work may benefit from 2,000 lumens or higher. Adjustable, tripod-mounted lights help eliminate shadows and can be repositioned easily as you work.
You mention the importance of ensuring proper ventilation when using tools that create dust or fumes. Do you have any suggestions for affordable ways to improve airflow in a small apartment workspace?
Improving airflow in a small apartment can be simple and budget-friendly. Try placing a box fan in a window facing out to help pull dust and fumes outside. You can also use a second fan to draw fresh air in from another window if possible. Opening windows on opposite sides of the room creates cross-ventilation, which is very effective. For extra protection, consider using a portable air purifier with a HEPA filter while you work.
The article talks about reading the manual even for experienced users. What should I be looking for in the manual that might not be obvious if I’ve used similar tools before? Are there certain safety features or warnings that are commonly overlooked?
Even if you’ve used similar tools, manuals often highlight unique features or safety mechanisms specific to that model, like lock-off switches, blade guards, or automatic shut-off functions. They may also mention updated maintenance instructions, new hazard warnings, or compatibility notes for attachments. Commonly overlooked items include the correct way to secure attachments, the maximum safe operating speeds, and specific personal protective equipment recommendations. Always check the manual for these details to ensure safe and efficient tool use.
You suggest using portable work lights for better visibility, but do certain types of lighting make it easier to see fine details while cutting or sanding? I often find shadows a problem in my workspace.
Yes, the type of lighting can make a big difference. LED work lights are a great option because they provide bright, even illumination and reduce shadows. Look for lights with adjustable angles or multiple heads so you can direct light exactly where you need it. Also, placing lights at different heights or on both sides of your workspace helps minimize harsh shadows and makes it easier to see fine details while you work.
You mention making sure the workspace is well-ventilated when using tools that create dust or fumes. For projects inside a small apartment, what are some practical ways to improve ventilation if I can’t open windows or use big fans?
If you can’t open windows or use large fans in your apartment, consider using small portable air purifiers with HEPA filters to help reduce airborne dust. You can also use a bathroom exhaust fan if available, or work near an open doorway to encourage airflow. Wearing a high-quality dust mask or respirator is also important in these situations to protect yourself from fumes and particles.
You mention reading the manual for each specific tool, but with so many older tools in my garage, sometimes the manuals are missing. What would you recommend as the best alternative to ensure I’m using them safely?
If the manuals are missing, try searching online for digital copies by entering the tool’s brand and model number. If you can’t find one, look up general safety guidelines for that type of tool. Pay special attention to common hazards, proper handling, and maintenance tips. Inspect each tool for damage before use, and when in doubt, start with the lowest setting or speed and wear protective gear.
Could you elaborate on what counts as proper ventilation when using tools that produce dust or fumes indoors? Are open windows usually enough, or should I invest in a dedicated dust extraction system for typical DIY projects?
Proper ventilation means ensuring that dust and fumes are quickly removed from your workspace to reduce health risks. For occasional DIY projects, opening multiple windows and using fans to direct airflow outside is usually sufficient. However, if you use power tools frequently or work with particularly dusty or fume-producing materials, a dedicated dust extraction system or a shop vac with HEPA filtration is a smart investment for better safety and air quality.
If I’m borrowing or renting power tools and don’t have the manual handy, what’s the next best way to make sure I’m using them safely before starting a project?
If you don’t have the manual, start by inspecting the tool for any damage or missing parts. Look for safety labels or instructions printed directly on the tool. You can also search for the tool’s model number online to find official manuals or safety guides. When unsure, ask the rental staff or previous owner for usage tips, and always wear appropriate safety gear.
You mention ensuring adequate ventilation when working with tools that create dust or fumes. Are there specific types of dust extraction systems you recommend for small home workshops, or is opening windows usually enough?
For small home workshops, opening windows can help, but using a dedicated dust extraction system is much more effective for controlling dust and fumes. Portable shop vacuums with HEPA filters are a popular choice and can be attached to many power tools. There are also compact air filtration units designed for home use that further improve air quality. Combining these systems provides better protection than ventilation alone.
You mentioned that proper lighting is crucial when preparing the workspace. Do you have any recommendations for affordable portable work lights or tips on how to position them to avoid casting shadows while I’m using power tools?
For affordable portable work lights, consider LED work lights with adjustable stands or clamp lights, as they’re usually budget-friendly and bright. When positioning lights, aim to place them at a 45-degree angle from your work surface to minimize shadows and avoid glare. Try to use two lights from opposite sides if you can, which helps evenly illuminate your workspace and reduces the risk of shadows interfering with your project.
I see you mention reading the manual for each tool, but sometimes I buy used tools that come without one. Do you have any tips on how to safely figure out operation and basic maintenance for tools when the manual is missing?
When a manual isn’t available, start by carefully inspecting the tool for safety labels or instructions printed on it. Look up the brand and model online—manufacturers often have free manuals or guides on their websites. Watching video tutorials for your specific tool can also help. Always check for obvious damage, ensure parts are secure, and test the tool at the lowest speed or power setting before regular use. For maintenance, regularly clean, lubricate, and replace worn parts as needed.
The checklist says to always read the manufacturer’s manual, but sometimes I buy secondhand tools that don’t have the manual included. Are there general safety tips or resources you’d suggest for safely using older or used power tools without official instructions?
If you don’t have the original manual, always inspect the tool for damage, ensure all guards are in place, and use the correct accessories. Look up the tool’s make and model online, as many manufacturers host manuals on their websites. Basic safety tips include unplugging the tool before changing blades or bits, wearing protective gear, and keeping your workspace clean. If you’re unsure about a tool’s operation, seek advice from hardware store staff or experienced DIYers.
I noticed the checklist mentions ensuring proper ventilation when using tools that generate dust or fumes. What are some affordable and effective options for ventilation in a small garage workspace, especially if installing a full dust extraction system isn’t practical?
For a small garage, using a box fan in a window to blow dust and fumes outside is a simple, low-cost option. You can also open doors and windows to create cross-ventilation. Portable air purifiers with HEPA filters help reduce airborne particles, and wearing a quality dust mask adds another layer of protection. These solutions together can significantly improve ventilation without the need for a full extraction system.
The article stresses the importance of reading the manual even for experienced users, but sometimes I misplace them or buy secondhand tools without instructions. Any tips on where to reliably find manuals for older or less common power tools?
You can often find manuals for older or uncommon power tools by checking the manufacturer’s website, as many offer downloadable PDFs. If the tool is discontinued, try searching online forums, secondhand marketplaces, or specialty sites that collect and share manuals. Sometimes, contacting the manufacturer directly by email can also help—they may provide a digital copy or point you in the right direction.
I noticed the checklist mentions inspecting power tool cords for frays or damage before use. If I find a small nick in the outer insulation but the wires aren’t exposed, should I replace the cord immediately, or is it safe to repair it somehow for occasional use?
If you find a small nick in the outer insulation, it’s best not to ignore it. Even if the wires aren’t exposed yet, further use could worsen the damage. You can use high-quality electrical tape as a temporary fix for occasional use, but for safety, plan to replace the cord as soon as possible. If the nick deepens or you see exposed wires, stop using the tool until the cord is replaced.
I noticed you mentioned using dust extraction systems, especially when working with tools that create dust or fumes. For someone working in a small indoor space, can you recommend specific types of portable ventilation or dust control setups that are both effective and affordable?
For small indoor spaces, consider a portable air purifier with a HEPA filter to capture fine dust. Shop vacuums with HEPA filters can be connected directly to your power tools for targeted dust collection. Additionally, box fans placed in a window can help vent fumes outside. There are also compact, affordable dust extractors designed for hobbyists that work well in limited spaces.
The article talks about making sure the workspace is well-lit and ventilated when using power tools, especially those that create dust or fumes. For a small workshop in a basement, what are some affordable ways to improve both lighting and ventilation?
For better lighting in a basement workshop, consider adding LED strip or panel lights, as they’re energy-efficient and affordable. For ventilation, a simple box fan in a window helps push dust and fumes out, or you could use a portable air purifier with a HEPA filter. If there’s no window, a small exhaust fan installed through a wall can make a big difference.
The article mentions inspecting cords for frays and testing moving parts before using power tools, but how often should I be doing these checks if I’m using the same tool for a project that lasts several days?
It’s important to inspect power tool cords and test moving parts every day before you start work, even if you’re using the same tool over several days. Daily checks help catch any wear, damage, or issues that might develop during use. This habit keeps your tools safe and reliable throughout your project.
When inspecting power tools for damage before use, what are some signs or symptoms that might be less obvious but still indicate a tool should not be used? Sometimes it’s hard to tell if minor wear is a real safety issue.
Some less obvious signs that a power tool may be unsafe include loose or wobbly parts, unusual noises when running, a faint burning smell, frayed insulation on cords even if the wire isn’t exposed, sticky or inconsistent switches, or minor cracks in plastic housings. These issues might seem minor but can lead to bigger problems or malfunctions. When in doubt, it’s always safer to have the tool checked or repaired before use.
For someone who’s new to DIY home improvement, how do you recommend getting comfortable with reading and understanding power tool manuals? Are there common sections I should focus on that usually cover the most important safety tips?
Getting comfortable with power tool manuals is a smart move for any beginner. Start by reading the safety instructions and warnings section, which usually comes first. Also pay close attention to the setup and operating instructions, as they explain how to use the tool safely. The troubleshooting and maintenance sections are helpful, too. Taking it slow and actually matching steps in the manual to the tool itself can make things much clearer.
You suggested ensuring proper ventilation when working with tools that create dust or fumes. Could you recommend some budget-friendly ways to improve airflow in a small garage, especially during winter months when keeping windows open isn’t ideal?
To improve airflow in your garage during winter without fully opening windows, try using a box fan placed near a partially opened window or door to help direct dust and fumes outside. You can also install a basic window exhaust fan, which is usually affordable and effective for small spaces. Another option is to use air purifiers with HEPA filters to capture particulates. Remember to wear a mask for extra protection when ventilation is limited.
In the section about preparing your workspace, you mention ensuring proper lighting and ventilation. Do you have specific recommendations for affordable work lights or portable ventilation options that are effective for small home workshops?
For affordable work lights, LED clamp lights or portable LED work lamps are both budget-friendly and provide bright, even lighting. For small workshops, box fans or compact air purifiers can help improve ventilation when placed near a window or door. Both options are easy to set up and store, making them ideal for limited spaces.
When you recommend supplementing workspace lighting with portable work lights, do you have any tips for positioning them to avoid shadows that might hide hazards? Is there a type of work light that works best for home projects?
To minimize shadows, position portable work lights at different angles rather than directly behind you. Placing lights on both sides of your workspace or slightly above and to the sides helps reduce shadows that can obscure hazards. For home projects, LED work lights are a great choice—they’re bright, energy-efficient, and stay cool to the touch. Adjustable tripod-mounted lights are especially useful for directing light exactly where you need it.
I see you emphasize reading the manufacturer’s manual even for experienced users. What should I do if I have a second-hand power tool that didn’t come with a manual? Are there reliable places to find this information online or should I always avoid using tools without manuals?
If you have a second-hand power tool without a manual, start by searching for the model number and brand on the manufacturer’s official website, as many offer downloadable manuals. You can also check reputable sites that specialize in tool manuals or contact the manufacturer directly for support. If you can’t find the manual, it’s best to avoid using the tool until you’re confident you understand its operation and safety precautions, since improper use can be risky.
The article mentions ensuring ventilation when using tools that create dust or fumes. Do you have any recommendations for affordable dust extraction systems for a small home workspace, or are open windows usually enough?
For small home workspaces, open windows and a fan can help, but a basic shop vacuum with a HEPA filter is an affordable upgrade that significantly improves dust control. There are also portable dust extractors designed for hobbyists that attach directly to common tools. Look for models compatible with your tools and workspace size—many cost less than large workshop systems and are a good investment for your health.
I noticed you mention checking for frayed cords and loose screws when inspecting tools before use. If I find something like a slightly cracked housing or a minor issue, is it ever safe to temporarily use the tool or should I always get it repaired first?
If you notice any damage like a cracked housing or even minor issues, it’s best to avoid using the tool until it’s been properly repaired. Even small defects can compromise the safety and performance of power tools. Using a damaged tool increases the risk of electric shock, injury, or further damage, so it’s always safest to address repairs before use.
You mention the importance of reading the manufacturer’s manual even for experienced users. Are there any universal tips or signs to watch for that might not be covered in every manual but are crucial for safe operation across most power tools?
Yes, a few universal safety tips apply to nearly all power tools, even if not always detailed in manuals. Always check for damaged cords or loose parts before use, ensure your workspace is dry and well-lit, and keep hands clear of moving parts. Wear appropriate safety gear like goggles and hearing protection, unplug tools before changing accessories, and never bypass safety guards. Staying alert and maintaining focus are key to safe operation, no matter your experience level.
I saw the article stressed removing clutter and ensuring good lighting in the workspace. For someone working in a shared garage, do you have tips on organizing the area quickly before starting a project so it’s both safe and efficient without taking up too much prep time?
In a shared garage, try using portable storage bins or toolboxes to keep your essentials together and easy to move around. Before starting, quickly clear the floor of trip hazards and push larger items to the sides. Use a portable work light if overhead lighting is poor, and lay out only the tools you’ll need to avoid clutter. When finished, return everything to its spot so setup is faster next time.
I see that you recommend clearing the workspace before starting a project. With kids and pets around the house, do you have any extra tips for keeping the area safe and off-limits while I’m working with power tools?
To keep kids and pets safe, set up clear physical barriers like baby gates or temporary fencing around your workspace. Let everyone know when you’ll be using power tools, and never leave tools plugged in or unattended. Store sharp tools and accessories out of reach, and clean up thoroughly after you finish. These steps can help ensure the area stays secure during your project.
Our garage gets pretty dusty, especially when using sanders or saws. Can you suggest affordable ways to improve ventilation or control dust, especially if installing a full dust extraction system isn’t in the budget right now?
To control dust in your garage, try using a box fan in a window or doorway to draw dust outside while you work. You can also use inexpensive air filters attached to fans to help capture fine particles. Sweeping up regularly and wetting the floor slightly before sanding or sawing can help keep dust down. Consider using dust masks and keeping tools with built-in dust bags for added protection.
You mentioned always reading the manual, even if you have experience. I have a few older tools that I bought secondhand and don’t have manuals for them. Are there general safety tips that apply, or should I look up each tool individually before using it?
It’s always safest to look up the manual for each specific tool, as important safety features can vary. If that’s not possible, follow general safety tips: inspect the tool for damage, ensure all guards are in place, use the correct accessories, wear protective gear, and never bypass safety switches. Take extra caution with unfamiliar tools and, if unsure, research their typical operation online before use.
I see that reading the manual is suggested, even for experienced users. Are there any specific warnings or safety instructions in most manuals that people tend to overlook but are actually really important to follow?
Absolutely, there are a few key warnings in most power tool manuals that people often miss. One is always disconnecting the tool from power before changing accessories or making adjustments. Another is wearing proper eye and hearing protection, which many skip. Manuals also stress keeping workspaces clean to prevent accidents and making sure guards and safety devices are in place—these steps really do reduce risks.
You mention checking for frayed cords and loose parts before using power tools—if I do find something like a cracked housing or a missing screw, is it ever safe to DIY a repair, or should I always replace the tool?
If you notice a cracked housing or missing screw, it’s best not to use the tool until it’s fixed. Simple issues like a missing screw can sometimes be addressed if you have the right replacement and know exactly where it goes. However, more serious problems like cracks in the housing should be handled by a professional or the tool should be replaced, as DIY fixes may compromise safety.
Could you give more detail on what kind of dust extraction systems you recommend for home use, especially for smaller spaces where ventilation might be a challenge?
For home use in smaller spaces, consider a portable dust extractor or a shop vacuum with a HEPA filter, as these are compact and effective at capturing fine particles. Attachments like dust collection hoses and adapters can connect directly to most power tools. For tight spaces, also look for extractors with automatic tool activation, so they turn on when your tool does. This setup helps keep air cleaner, even when ventilation is limited.
Could you expand on what you mean by ensuring proper lighting? I sometimes work during the evening and wonder if regular household lamps are enough, or if I should invest in dedicated work lights for safety.
Proper lighting means having enough bright, even light to clearly see your work area, the tool, and your materials. Regular household lamps might leave shadows or not be bright enough for safe tool use, especially in the evening. Dedicated work lights or LED shop lights are designed to provide consistent, focused illumination, making it easier to spot potential hazards and work accurately. If you often work at night, investing in a quality work light is a wise safety choice.
In terms of preparing the workspace, do you have any suggestions for managing dust and debris when using tools like sanders or saws in a home setting without a dedicated shop vac? What’s the most effective way to keep things clean and safe if my space is limited?
If you don’t have a shop vac, try using dampened drop cloths or old sheets to catch dust and debris under your work area. Regularly pause to sweep up dust using a broom and dustpan. For finer particles, lightly mist the air with water from a spray bottle to help settle dust. Opening windows for ventilation and sealing off other rooms with plastic sheets will help contain mess and maintain safer air quality.
Could you clarify what you recommend for effective dust extraction systems when working with saws or sanders in a small, enclosed workspace? I want to be sure I’m minimizing any potential respiratory hazards.
For a small, enclosed workspace, a shop vacuum with a HEPA filter attached directly to your saw or sander is a practical choice, as it captures fine dust at the source. Combine this with using dust shrouds or collection bags if your tools support them. Always wear a properly fitted N95 respirator for extra protection, and if possible, set up a portable air purifier designed for particulates to further reduce airborne dust.
In the article, you talk about reading the manufacturer’s manual even if you’re experienced. Do you have tips for what to look for in the manual if the instructions are not very clear or if I bought the tool secondhand and don’t have the manual at all?
If the manual is unclear or missing, focus on identifying the tool’s model and searching online for a digital copy or safety guidelines. Pay attention to proper assembly, required safety gear, correct power settings, and recommended maintenance. You can also check the manufacturer’s website or forums for advice. If you’re unsure about any step, start with basic safety practices: inspect the tool for damage, ensure all guards are in place, and test it on a low setting.
After clearing clutter and ensuring good lighting as the article suggests, what are some tips for organizing tools during a multi-day project so they stay easily accessible but don’t become tripping hazards?
One helpful approach is to use a portable tool caddy or tool belt to keep your most-used items within easy reach. For multi-day projects, designate a dedicated corner or table for tool storage, and use bins or trays to separate items by type. Make sure cords are coiled neatly and placed out of walkways. At the end of each day, do a quick tidy-up to keep the workspace safe and organized.
Regarding ventilation when using tools that generate dust or fumes, do you have suggestions for affordable dust extraction systems or temporary ventilation solutions suitable for someone working in a small apartment or indoor space?
For small apartments or indoor spaces, consider using a portable air purifier with a HEPA filter to help capture dust. A basic box fan in a window, facing outward, can also help vent fumes and dust outside. For affordable dust extraction, a shop vacuum connected to your tool with an adapter works well. Always open windows when possible and use a dust mask for extra protection.
After clearing the area and checking tool cords for damage, are there specific types of protective gear you recommend for beginners? I’m not sure if basic safety glasses are enough or if I should invest in more specialized equipment.
For beginners, safety glasses are a must, but you should also consider hearing protection, especially with loud tools, and work gloves to protect your hands from sharp edges or splinters. If you’re working in dusty environments, a dust mask is very helpful. For projects that create flying debris or involve metal, a face shield offers extra protection beyond regular safety glasses.
Could you clarify what specific protective gear is most essential for beginners who are just starting out with power tools at home? The article mentions essential gear but I’m not sure if there are differences depending on the type of tool I’m using.
For beginners, the most essential protective gear includes safety glasses to protect your eyes, hearing protection like earplugs or earmuffs, and sturdy gloves to shield your hands. You should also wear a dust mask if you’re generating dust, especially with saws or sanders. For most common power tools, these basics apply, but if you’re using tools that produce sparks or debris (like grinders), consider a face shield and flame-resistant clothing.
The article talks about checking for damage and reading the manual before using power tools. If I buy a used power tool and the manual is missing, are there any reliable ways to make sure I’m still using it safely?
If the manual is missing for a used power tool, you can often find digital versions on the manufacturer’s website by searching for the model number. Check for identification labels on the tool for this information. It’s also wise to look up safety videos or guides for your specific tool type. Before use, inspect the tool for damage, test the safety features, and use the correct accessories. Always use appropriate protective gear and start with low-risk tasks until you’re comfortable with the tool’s operation.
If I’m just starting to build up my collection of protective gear, which items would you consider absolutely essential to buy first for beginner projects like hanging shelves or installing cabinetry?
For beginner projects like hanging shelves or installing cabinetry, start with basic but crucial protective gear. Safety glasses are essential to protect your eyes from dust and debris. Work gloves will help shield your hands from splinters and sharp edges. Also, consider ear protection if you’ll be using loud power tools, and a dust mask if you’re working with wood or creating a lot of dust. These items will cover the main safety concerns for most starter projects.
Do you have any recommendations for specific types of dust extraction systems for small home workshops? I noticed you mentioned ventilation and dust control, and I’m looking for solutions that are both effective and affordable for DIYers working indoors.
For small home workshops, portable shop vacuums with HEPA filters are a practical choice—they connect directly to most power tools and capture fine dust effectively. Compact dust extractors are another good option for tighter spaces and frequent use. If you use multiple tools, consider a small cyclone separator paired with your shop vacuum to improve filtration and extend filter life. These solutions balance affordability with solid dust control for indoor DIY projects.
When checking power tool cords for frays or damage as mentioned in your checklist, is it ever safe to repair a cord with electrical tape, or should the tool always be taken out of use until a full replacement can be made?
It’s best not to use electrical tape as a permanent fix for a frayed or damaged power tool cord. Even small repairs with tape can increase the risk of electric shock or fire. The safest option is to stop using the tool immediately and have the cord professionally replaced or repaired before using it again.
You mentioned using dust extraction systems when working with tools that generate dust or fumes. For DIYers with smaller workspaces, are there affordable options for ventilation that still offer good protection, or do we have to invest in pricier dedicated units?
For small workspaces, you don’t need to buy expensive dust extractors right away. You can use a shop vac with a HEPA filter attached to your tools, and open windows or use box fans to improve airflow. Wearing a quality dust mask or respirator also helps protect you. These options are budget-friendly and make a noticeable difference for home projects.
The article talks about checking manuals even for experienced users. I’ve had some of my tools for years and lost the manuals—are there general safety steps that apply to most power tools, or should I try to track down each specific manual online?
It’s a good idea to follow general safety steps for all power tools, such as wearing protective gear, keeping your workspace tidy, and unplugging tools when changing attachments. However, each tool can have unique features or hazards, so tracking down the specific manual online is best, especially for unfamiliar functions or maintenance. Many manufacturers offer free PDF manuals on their websites if you’ve lost the originals.
I noticed the checklist suggests using dust extraction systems when working with tools that generate dust or fumes. For someone who doesn’t own a dust extraction system, are there any effective DIY alternatives or low-cost options you’d recommend for improving ventilation?
If you don’t own a dust extraction system, you can improve ventilation by working near open windows and using a box fan to direct dust outside. Wet/dry shop vacuums can often be attached to tool ports as a low-cost alternative. Also, taking frequent breaks to air out the space and wearing a mask can help reduce exposure to dust and fumes.
I noticed the checklist emphasizes reading the manufacturer’s instructions even if you’re experienced. Have you found that some brands provide more detailed or helpful safety guidance than others, or are there any you’d suggest for beginners?
You’re right—manufacturer instructions can vary quite a bit. Brands like DeWalt, Makita, and Bosch are known for clear, detailed manuals that include helpful safety tips and diagrams, which many beginners find useful. Some budget brands might offer less thorough guidance, so sticking to reputable names can be a good idea, especially if you’re just starting out.
You mentioned always reading the manual, even for experienced users. What should I look for in the manual that might not be obvious, especially when it comes to safety features or hidden hazards with newer power tools?
When reading the manual, pay special attention to sections about new or unfamiliar safety features, like automatic shut-off or blade guards. Look for warnings about tool-specific risks, such as kickback or overheating, that may not be obvious from prior experience. Manuals often highlight updates or design changes unique to that model, which could affect safe operation. Always check for recommended maintenance routines and any special instructions for using attachments or accessories.
The article mentions checking for tool damage before use. If I find a frayed cord or a loose switch, is it usually something I can fix myself safely, or should I always have a professional repair it? Are there any quick fixes for minor issues?
If you spot a frayed cord or a loose switch, it’s safest to have a professional handle the repair. Electrical issues can be hazardous if not repaired properly. Quick fixes like tape or glue are not recommended, as they may not provide adequate safety. Always unplug the tool and avoid using it until it’s been properly repaired or replaced.
I noticed you mentioned dust extraction systems for ventilating the workspace when using tools that generate fumes or sawdust. Are there affordable options you recommend for home use, or is a basic fan setup usually enough for smaller projects like shelving?
For small home projects like building shelving, a basic fan set up near an open window can help improve ventilation, but it won’t capture fine dust as effectively. Affordable portable dust extractors or shop vacuums with HEPA filters can be a good investment for better dust control. These options are more efficient for keeping the air clean and protecting your health during repeated use.
I noticed the checklist suggests clearing clutter and ensuring good lighting in the workspace. Do you have any tips for organizing small, crowded areas like apartment balconies or garages so they’re safe for using power tools?
Absolutely, making small spaces safer for power tool use is important. Start by storing tools and materials vertically on shelves or pegboards to free up floor space. Use portable workbenches that can be folded away when not in use. Keep only essential items within reach and remove anything unrelated to your project. Good lighting can be achieved with clamp-on lamps or battery-powered LED lights. Always sweep up dust and debris before you start working.
You mentioned the importance of proper lighting and ventilation before using power tools. If I have a small garage with limited outlets and windows, what are some practical ways to improve both lighting and airflow without making major renovations?
For better lighting in your small garage, consider using portable LED work lights or clamp lights that can be plugged into available outlets or extension cords. For improved airflow, use a box fan or a small portable exhaust fan positioned near an open door or window to help circulate air. You can also open the garage door partially to increase ventilation without major changes.
You mention the importance of reading the manufacturer’s manual before using any power tool. Can you share tips on what information is most important to look for in the manual, especially for someone who is just getting started with DIY projects?
When reading a power tool manual, focus on sections about safety precautions, proper setup, and operating instructions. Pay attention to diagrams showing parts and controls, recommended protective gear, and procedures for maintenance or troubleshooting. Also, check for any specific warnings and limitations about what the tool should not be used for. These details help ensure safe and effective use, especially if you’re new to DIY projects.
When it comes to ventilation for dust or fumes, do you have suggestions for someone working in a small garage with just one window? Would using a regular fan be enough, or should I look into something more specialized for safety?
In a small garage with only one window, a regular fan can help move air, but it might not be enough to remove dust or fumes safely. For better protection, consider using a box fan in the window to exhaust air outside and keep the door slightly open for fresh air. For more hazardous materials or frequent use, a specialized exhaust fan or portable air filtration unit is much safer. Always wear a proper mask as extra protection.
I noticed the checklist suggests reading the manufacturer’s instructions every time, even for experienced users. Are there particular sections or warnings in those manuals you find are most often overlooked but critical for safety?
One section that’s often skipped but crucial is the safety warnings and notes about specific tool limitations. Even experienced users might overlook special cautions related to tool attachments or power requirements that differ between models. Another commonly missed part is the maintenance instructions, which often include important tips to prevent malfunction or accidents. Checking these sections can help avoid unexpected hazards.
The article says to always check the tool’s manual before use, even if you have experience. Is there a quick way to find digital manuals if I bought a tool secondhand and the physical manual is missing?
You can usually find digital manuals for most power tools by visiting the manufacturer’s official website and searching for your tool’s model number. If that doesn’t work, try searching the brand and model number together with the word ‘manual’ in a search engine. Online forums and tool enthusiast communities may also have scanned copies or helpful links.
When you talk about workspace ventilation, does using a standard household fan provide enough airflow when working with power tools that create a lot of dust, or is a dedicated dust extraction system necessary for safety?
A standard household fan can help move air, but it usually isn’t enough to safely manage the dust created by power tools, especially in enclosed spaces. For projects that generate a lot of dust, a dedicated dust extraction system or at least a shop vacuum with a HEPA filter is recommended. This not only improves air quality but also reduces the risks of inhaling harmful particles.
The article mentions making sure your workspace is well-ventilated when using tools that generate dust or fumes. For folks working in older garages or basements with poor airflow, what are some affordable ways to improve ventilation without major renovations?
If your workspace has poor airflow, using a box fan near a window or door to pull fresh air in—or push dust and fumes out—can help a lot. You might also consider an exhaust fan or setting up a portable air purifier with a HEPA filter. Keeping doors open and working in shorter sessions can further reduce dust and fume buildup.
For ventilation, especially when using sanders or saws indoors, are there specific types of affordable dust extraction systems or fans you suggest for small home workshops?
For small home workshops, portable dust extractors or shop vacuums with HEPA filters are a practical choice for managing dust from sanders and saws. Brands like Shop-Vac and Ridgid offer budget-friendly options. Additionally, using a box fan in a window to help direct dust outdoors can improve ventilation. Pairing this with a simple air purifier can further reduce airborne particles.
I noticed the article mentions checking for damage like frayed cords or cracked housing before using power tools. Are there specific warning signs that indicate a tool is unsafe to use even if it still seems to work, or should I replace tools at the first sign of wear?
It’s wise to look for more than just basic wear when deciding if a power tool is safe. Unusual noises, overheating, sparking, loose parts, or a burning smell can all be signs that a tool is unsafe, even if it still works. Minor cosmetic wear isn’t always a reason to replace a tool, but if you notice any of these warning signs, stop using it and have it inspected or replaced to stay safe.
Could you give some advice on what kind of portable work lights work best for improving visibility in a typical garage workspace? Are there certain features or brands that are safer or more effective for DIY projects?
For garage workspaces, LED portable work lights are a top choice—they’re energy-efficient, bright, and stay cool to the touch. Look for models with adjustable stands or magnetic bases for flexible positioning. Features like shatterproof lenses and water resistance add safety, especially in busy DIY environments. Brands like Dewalt, Milwaukee, and Husky are well-regarded for durability and reliability. Prioritize lights with grounded cords or rechargeable batteries for added convenience and safety.
I see the checklist talks about dust and fumes when using tools like saws or sanders. Are there certain types of dust masks or ventilation systems you recommend for basic DIY projects on a modest budget, especially if I’m working in a smaller space?
For basic DIY projects in smaller spaces, a disposable N95 dust mask is a good, affordable option for filtering out fine particles from saws and sanders. If you need extra protection, look for a reusable half-face respirator with P100 filters. For ventilation, a box fan placed in a window (blowing out) can help remove dust and fumes while pulling in fresh air from another open window or door. Always try to keep your work area as well-ventilated as possible.
It says to always read the manual for each power tool, even if you’re experienced. Are there any common mistakes people make by skipping this step, or examples where the manual might provide information that’s not obvious even to seasoned users?
Absolutely, manuals often include safety updates, unique features, or maintenance requirements that even experienced users might overlook. For example, some tools have specific guards or switches, or need certain lubricants, which aren’t standard across all brands. Skipping the manual can lead to using the wrong accessory, missing important calibration steps, or even voiding warranties. Manuals also highlight manufacturer-specific safety warnings and troubleshooting tips.
Can you advise on what kind of dust extraction systems work best for home workshops? I use saws and sanders quite a bit, and I’m not sure if a basic shop vac is sufficient for keeping the air safe to breathe.
For home workshops with frequent use of saws and sanders, a basic shop vac can help with general cleanup, but it may not capture the finer dust particles that can affect air quality. Consider a dust extractor with a HEPA filter, which is more effective at trapping fine dust. Connecting tools directly to a dust extraction system and using an air filtration unit in the workshop will provide the best protection for your lungs.
You mention making sure the workspace is properly ventilated when using tools that make dust or fumes. Are there specific types of dust masks or respirators that are recommended for occasional DIY projects, or is regular ventilation usually enough?
For most occasional DIY projects, a basic N95 dust mask is usually sufficient to protect against common dust particles. If you’re working with materials that create fine dust or fumes, like sanding drywall or using strong adhesives, a respirator with replaceable filters (such as an N95 or P100 rated mask) provides better protection. Good ventilation is always important, but for extra safety, especially in enclosed spaces, wearing a suitable mask or respirator is recommended.
When it comes to checking power tool cords for fraying or damage as you mentioned, is there a recommended way to repair minor issues, or should you always replace the cord entirely if you spot any wear? I’m trying to figure out what’s actually safe versus just cautious.
If you notice any fraying, exposed wires, or damage to a power tool cord, it’s safest to replace the cord entirely rather than attempt repairs. Even minor wear can lead to electrical hazards or malfunctions. While electrical tape might seem like a quick fix, it doesn’t provide enough protection for power tools. Replacing the damaged cord or having a professional do it ensures your safety when using the tool.
I noticed you suggest using portable work lights for better visibility. Are there certain types of lighting that work best in a garage setting where natural light is limited, especially for detailed projects like cabinetry installation?
For detailed projects in a garage with limited natural light, LED work lights are an excellent choice. They provide bright, even illumination and don’t generate much heat. Adjustable tripod-mounted LED lights help you direct light exactly where needed. Additionally, consider using clamp-on task lights for focused work on intricate tasks like cabinetry installation.
Could you give more details about the kinds of dust extraction systems that work best for home workshops, especially for smaller spaces? I noticed ventilation is highlighted, but I’m not sure whether portable extractors or stationary setups are safer and more effective indoors.
For smaller home workshops, portable dust extractors are often the most practical choice. They’re easy to move, connect directly to power tools, and take up less space than stationary systems. Many models come with HEPA filters for improved indoor air quality. Stationary systems are typically better for larger setups but can be overkill in small spaces. Whichever you choose, make sure to empty collectors often and use proper filters to keep the air safe.
After doing the workspace prep and tool inspection, what’s the best way to organize protective gear so it’s easily accessible and always gets used? I sometimes forget to put on goggles or gloves until after I’ve already started.
To make sure you always use your protective gear, designate a specific spot near your work area—like a wall hook or a labeled basket—for items like goggles, gloves, and ear protection. Place everything together so you see and grab them before starting. Some people even create a quick visual checklist or keep their gear on top of the tools to act as a reminder before powering up.
Do you have any recommendations for protective gear that is both effective and comfortable for someone who wears glasses? The article mentions eye injuries as a common risk, and I want to make sure I’m properly protected while using power tools at home.
For glasses wearers, look for safety goggles designed to fit comfortably over your existing frames. These are often called “over-the-glasses” or OTG safety goggles. Choose ones with anti-fog coatings and adjustable straps for added comfort. Some brands also offer prescription safety glasses if you prefer a more streamlined fit. Whichever you pick, make sure they are rated for impact resistance to provide proper protection.
If my home projects generate a lot of dust, especially when sanding, what are some affordable yet effective ways to improve ventilation or set up a basic dust extraction system in a small workspace?
To manage dust in a small workspace, try using a box fan in a window to pull dusty air outside while bringing in fresh air from another open window or door. You can also set up a basic dust extraction system by attaching a shop vac to your power tools with a hose and using a high-efficiency filter. Regularly sweeping and wiping surfaces helps, and consider using a dust mask for added protection.
Could you elaborate on what types of protective gear are considered essential versus optional? For example, are safety goggles always necessary even for quick, simple projects like drilling a single hole?
Safety goggles are considered essential anytime you’re using power tools, even for small tasks like drilling a single hole, because debris can fly unexpectedly. Other essential gear usually includes hearing protection and gloves, depending on the tool. Optional gear can include dust masks or respirators, which are important for cutting or sanding but may not be needed for brief, low-dust tasks. Always assess the risks of each project, but err on the side of caution with eye protection.
I noticed you recommend inspecting cords and moving parts for damage before using power tools. If I find a small crack in the housing of a drill but everything else seems fine, is it safe to use, or should I replace it immediately?
A small crack in the drill housing may not seem serious, but it can compromise the tool’s safety over time. Cracks can grow or expose internal parts, increasing the risk of electric shock or further damage. It’s best to stop using the drill and have it inspected or replaced to avoid any potential hazards.
Could you clarify what you recommend for ventilation if I’m working in a small or enclosed room with tools that create dust? Are standard fans enough, or should I look into specific types of dust extraction systems for home use?
Standard fans can help move air, but they usually just spread dust around rather than removing it. For small or enclosed spaces, it’s much safer to use a shop vacuum or a portable dust extraction system designed for home workshops. These collect dust directly at the source, helping keep the air cleaner. If you’re working with fine particles or for extended periods, consider using an air purifier with a HEPA filter as an extra precaution.
After going through the steps on workspace preparation, I’m wondering what specific types of lighting work best for detailed project work? Are LED work lights recommended over traditional ones, or does it depend on the kind of tools being used?
LED work lights are generally a great choice for detailed project work because they offer bright, clear illumination and tend to produce less heat than traditional incandescent or halogen lights. They also use less energy and last longer. For most home projects, adjustable LED work lights let you direct light exactly where it’s needed, which can be especially helpful when using power tools that create shadows. The type of tool isn’t as important as simply ensuring your workspace is well-lit and shadows are minimized.
After reading about the importance of workspace lighting, I’m wondering how bright it actually needs to be. Is there a certain type or wattage of lighting you suggest for safely working with power tools indoors?
For safe indoor power tool use, aim for lighting that provides at least 75–100 foot-candles (about 800–1200 lumens per square meter) over your workspace. Bright, evenly distributed LED lighting is usually best, as it reduces shadows and glare. Choose cool white bulbs (4000–5000K) for clear visibility. If using fixtures, a few 15–20 watt LED bulbs or 60–100 watt equivalent incandescent bulbs per area should be sufficient.
I’m curious about the best way to check for subtle tool damage like internal wiring issues. Beyond just inspecting cord frays and housing cracks, are there any signs I should watch out for before using older power tools?
Checking for internal wiring issues in older power tools can be tricky since damage isn’t always visible. Before use, listen for buzzing, crackling, or any unusual sounds when you plug in or turn on the tool. Notice if there’s a burning smell or if the tool heats up quickly, which can signal wiring problems. If the tool intermittently loses power or the trigger feels loose or inconsistent, it’s best not to use it until a professional can inspect it.
When inspecting tools for loose screws and cracked housing before use, is there a specific checklist or schedule you suggest for doing this, especially if I only use my tools a few times a year?
It’s a good idea to inspect your tools every single time you use them, even if that’s just a few times a year. Before each use, check for loose screws, cracked or damaged housing, frayed cords, and any missing safety guards. There’s no need for a complicated schedule if use is infrequent—just make it part of your pre-use routine to go through this quick checklist before plugging in or switching on any tool.
When inspecting power tools for damage, what are the most common warning signs that a tool is unsafe to use, especially if it seems to run fine when powered on? I want to avoid any hidden risks before starting my next project.
Some common warning signs to watch for include frayed or cracked power cords, loose or missing safety guards, damaged or bent plugs, excessive heat or unusual smells during brief operation, and unusual noises like grinding or rattling. Even if a tool powers on, these issues can pose serious risks. Also, check for missing screws, cracked housings, and any signs of rust or corrosion, especially near moving parts or electrical components.
The article mentions using dust extraction systems for tools that produce dust or fumes. Do you have specific recommendations for affordable dust extraction setups that are effective for small home workshop spaces?
For a small home workshop, consider using a shop vacuum (shop vac) paired with a cyclone dust separator—this setup is cost-effective and works well for most power tools. You can connect standard hoses to your tools’ dust ports. Also, look for compact portable dust extractors designed for home use; some brands offer affordable models with HEPA filters for added safety. Remember to regularly clean filters and empty the collection bin to maintain good performance in a small space.
We usually work on projects in our garage, but it gets pretty dusty and the ventilation isn’t great. Can you recommend affordable ways to improve airflow or control dust when using power tools indoors?
Improving airflow and dust control in your garage can make a big difference. You could use a box fan in a window or door to help move air out, and consider a portable air purifier for finer dust particles. Wet/dry shop vacuums attached to your power tools can capture sawdust at the source. Also, try to sweep or vacuum regularly to keep dust from building up.
You talk about clearing the workspace and ensuring good lighting and ventilation. For folks who are short on space, what are your top tips for setting up a safe work area in a small garage or even a shared living space?
In tight spaces, focus on keeping only essential tools and materials at hand, storing everything else away to reduce clutter. Use portable workbenches or folding tables that can be put away when not in use. Always work near a window or door for ventilation, and add extra task lighting if needed. Lay down a drop cloth to contain dust and debris, and ensure your tools are unplugged or locked when not in use, especially if sharing the space.
If I followed the checklist but accidentally noticed a hairline crack in the tool’s casing after starting work, should I stop immediately, or are there safe ways to temporarily reinforce it until a replacement arrives?
You should stop using the tool immediately if you notice a hairline crack in its casing. Even small cracks can compromise the tool’s safety, increasing the risk of electric shock or further damage. There aren’t any safe ways to temporarily reinforce power tool casings, as DIY fixes may fail under use. It’s best to wait for a replacement or have the tool professionally repaired.
The checklist mentions making sure to have proper lighting in the workspace. Do you have any recommendations for affordable portable lights that work well in tight indoor spaces, or is natural lighting usually enough for most projects?
Natural lighting can be helpful if your workspace has plenty of windows and you’re working during the day, but for most home projects, especially in tight or enclosed areas, portable lighting is a safer choice. Compact LED work lights or clamp lights are affordable and work well in small indoor spaces. Look for models with adjustable heads and rechargeable batteries for maximum flexibility and ease of use.
I noticed the checklist mentions inspecting power tools before each use, especially checking cords for frays and cracked housing. How often do you actually need to replace a tool or cord if you spot minor wear, and are there temporary fixes that are still considered safe?
If you notice minor wear like small nicks on a cord or slight scuffs on a tool’s housing, you should stay cautious. Any frayed wires, exposed metal, or cracked housing means the tool or cord should be replaced right away—these aren’t safe to fix temporarily. Electrical tape is not a safe long-term fix for damaged cords. Always err on the side of safety and replace damaged components promptly.
I noticed you mentioned using dust extraction systems for tools that generate dust or fumes. For someone new to DIY projects, are there affordable options for dust extraction, or can basic ventilation like opening windows be enough in a garage workspace?
For beginners, basic ventilation like opening windows and using a fan to direct airflow out of the garage can help reduce dust and fumes, especially during short projects. However, for tasks that create a lot of dust, there are affordable portable dust extractors or shop vacuums designed for power tools. These can be a worthwhile investment for both safety and cleanliness as you take on more DIY projects.
After inspecting and preparing everything as you suggested, is there a recommended order for tackling different types of power tool projects, especially for beginners who want to minimize risk?
Yes, starting with simpler tools and projects is a good idea for beginners. Begin with basic tools like cordless drills and sanders, since they’re generally easier to control and have fewer safety risks. Once you’re comfortable, you can move on to jigsaws or circular saws, then tackle more advanced tools like routers or table saws. Always read each tool’s manual and practice with scrap materials before working on your actual project.
You mention making sure the workspace is well lit and ventilated. Do you have any recommendations for affordable portable work lights or dust extraction systems that are good for someone just starting out with home projects?
For portable work lights, LED clamp lamps or rechargeable LED work lights are both affordable and provide plenty of brightness for home projects. Brands like Ryobi and Dewalt offer basic models that are reliable and easy to set up. For dust extraction, a simple shop vacuum with a hose attachment works well for beginners and is much cheaper than more advanced dust collectors. Look for one with a HEPA filter if you’ll be cutting wood or generating lots of fine dust.
The article highlights clearing clutter and ensuring good lighting as part of workspace preparation. Could you suggest any organizational tips or specific lighting setups that work well in small or multi-purpose spaces where home projects are done?
For small or multi-purpose spaces, consider using wall-mounted shelves or pegboards to keep tools off work surfaces and easy to access. Stackable bins or clear containers help organize smaller items and keep the area tidy. For lighting, portable LED work lights or clamp lights can be positioned as needed and stored away when not in use. Task lamps with adjustable arms are also great for focusing light on specific projects.
Your article talks about reading the manufacturer’s manual before using a tool, even if you’re experienced. What should I do if I’ve inherited older power tools that no longer have the manuals – are there general safety practices that apply, or should I avoid using them altogether?
If you don’t have the original manuals for older power tools, you can still use them safely by following general precautions: inspect the tool for damage or frayed cords, make sure all parts are secure, and test it at a low setting first. Wear the appropriate safety gear, and only use the tool for its intended purpose. If you’re unsure about its operation or condition, consider having it checked by a professional or look for manuals online from the manufacturer.
For workspace preparation, I’m curious about ventilation—do regular box fans actually help with dust from saws and sanders, or is a dedicated dust extraction system necessary for most small home projects? Trying to keep costs down but stay safe.
Box fans can help move air and reduce dust settling, but they aren’t very effective at actually capturing fine dust from saws and sanders. For small home projects, a dedicated dust extraction system isn’t always necessary, but using a shop vac with attachments, sanding outside when possible, and wearing a good dust mask provide a solid balance between cost and safety. Just be sure to keep your workspace well-ventilated and clean up dust regularly.
When clearing the workspace, do you have recommendations for how to organize tools and materials so they remain accessible but not hazardous? For a small garage, space is tight and clutter can build up quickly.
For a small garage, consider using wall-mounted hooks or pegboards to hang tools and keep them off work surfaces. Magnetic strips work well for metal tools. Store frequently used items within arm’s reach, and less-used supplies on higher shelves or in labeled bins. Always keep walkways clear and return tools to their designated spots immediately after use to minimize clutter and hazards.
The article talks about clearing the area from tripping hazards before starting a project. Do you have advice on organizing tools and materials for people with very limited workspace, maybe even working out of a garage used for storage?
If your workspace is limited, try using vertical storage like pegboards or wall-mounted shelves for tools. Keep only the essentials out; store other items in labeled bins or boxes. Lay out a drop cloth to define your work area and minimize clutter. When possible, plan your project so you only bring out the tools and materials you need for each step, putting things away as you go to keep the area clear.
I’m new to using power tools and noticed you mentioned using dust extraction systems for ventilation. Are there any budget-friendly options that work well for small home projects, or do you have suggestions for setting up basic ventilation if I don’t have a system yet?
For small home projects, you can use a shop vac with a HEPA filter as a budget-friendly dust extraction solution. If you don’t have a system, working near open windows and using a portable fan to direct dust outside can help improve ventilation. Always wear a dust mask for extra protection, especially when cutting or sanding materials.
the reminder to read the manufacturer’s instructions, even for experienced users. For people who have misplaced or never received a manual, do you have tips on finding safe and accurate instructions for older or secondhand power tools?
If you don’t have the original manual for an older or secondhand power tool, try searching the manufacturer’s website for downloadable manuals using the model number. If it’s not available there, look for reputable online archives or forums that specialize in tools. You can also contact the manufacturer’s customer support directly. Make sure any instructions you find match your exact tool model to ensure safety.
I noticed the checklist says to inspect cords for frays and damaged housing before using a power tool. If I find minor damage, is it usually possible to safely repair it myself, or should I replace the whole tool or cord?
If you find any frays or damage on a power tool cord or housing, it’s safest not to use the tool until it’s properly addressed. Minor cord damage can sometimes be repaired by replacing the cord with a new one, but repairs should be done only if you have experience and use manufacturer-approved parts. Otherwise, it’s best to have a qualified technician handle the repair or to replace the tool or cord entirely to avoid electrical hazards.
You talk about clearing the area for safety, but what do you suggest for people working in smaller apartments or garages where space is limited? Any tips for keeping small workspaces safe and organized while using power tools?
In small apartments or garages, it’s helpful to keep your workspace tidy by only bringing out the tools and materials you need for each task. Use storage bins or shelves to keep items off the floor and maintain clear walkways. Always unplug and store power tools immediately after use, and sweep up debris regularly to avoid slips and tripping hazards. Good lighting and a designated work mat or area can also help keep everything organized and safe.
You mentioned the importance of proper ventilation when using tools that generate dust or fumes. For someone working in a basement with limited windows, what affordable options do you recommend for improving airflow or minimizing dust exposure?
In a basement with limited windows, you can use a portable fan to help direct dust and fumes out of the area, ideally towards an open door or window if possible. Consider using a box fan fitted with a furnace filter to help capture dust. Wearing a well-fitted dust mask or respirator is also important for personal safety. Additionally, wet-cutting methods and frequent vacuuming with a HEPA-filter shop vac will help minimize airborne particles.
I noticed you mentioned always checking tool manuals before use, even for experienced users. In practice, do you have any tips for quickly finding key safety info in manuals when you’re switching between different brands or older tools?
When switching between brands or older tools, start by looking at the manual’s safety or warning sections—these are often highlighted at the very beginning. Check for bold text or symbols that indicate critical points. If the manual has an index or table of contents, use it to jump straight to safety instructions. For older tools without detailed manuals, search for the model number online to find digital copies or key safety updates.
You highlight proper ventilation as important when using saws or sanders. What specific types of dust extraction systems work best for smaller home workshops, and are there budget-friendly options you suggest?
For smaller home workshops, a shop vacuum with a HEPA filter connected directly to your saw or sander is a practical option and quite budget-friendly. Portable dust extractors made for woodworking are also very effective and come in compact sizes. For those on a tighter budget, even a basic box fan with a furnace filter taped over it can help capture airborne dust, though it’s not as efficient as a dedicated extractor.
I’m curious about workspace ventilation. For smaller home projects where I use a sander or jigsaw inside my garage, would a basic box fan and an open door be sufficient, or should I be investing in a more serious dust extraction setup?
For smaller projects, a box fan and an open door can help reduce dust, but they won’t capture fine particles as effectively as a dedicated dust extraction system. If you notice dust lingering in the air or settling on surfaces, it’s safer to use a shop vacuum with a HEPA filter or a portable dust extractor, especially for repeated use. Always wear a dust mask for added protection.
I noticed you mentioned inspecting tools before each use, but what about cordless or battery-operated tools—are there any unique safety checks I should keep in mind for those compared to corded versions?
Cordless or battery-operated tools do require a few extra checks. Make sure the battery is securely attached and inspect for any signs of damage or leakage. Confirm that the battery contacts are clean and free of debris. Always use the correct charger and avoid using a swollen or overheated battery. These steps help prevent malfunctions and keep your work safe.
You mentioned the importance of inspecting cords and housing for damage before using power tools. Is there a specific guideline for how often these checks should be performed if I’m using the same tool for an extended project?
For extended projects where you use the same power tool repeatedly, it’s best to inspect the cords and housing before each use, even if it’s several times a day. Regular checks help catch wear, fraying, or cracks early, reducing the risk of accidents. If you pause work for a while or move the tool to a different location, another quick check is a good idea.
I see you talked about clearing clutter and organizing the workspace. Do you have any tips for setting up a small workspace when you don’t have a dedicated garage or workshop, especially for safely storing tools between projects?
Absolutely, setting up a small workspace is possible even without a garage or workshop. Try using a sturdy, foldable table that you can set up and pack away easily. Store your tools in stackable, lockable bins or a portable toolbox to keep them organized and safe. Pegboards or wall-mounted racks can also work well if you have a bit of wall space. Always unplug and safely store power tools after each use to prevent accidents.
I see you highlighted the importance of ventilation when using tools like saws or sanders that generate dust. For a small garage workspace, what are some practical solutions for ensuring proper airflow without investing in expensive extraction systems?
For a small garage, try opening doors and windows at opposite ends to allow cross-ventilation. You can also use a box fan in one opening to push dusty air out. Working near the open garage door and taking regular breaks to air out the space helps as well. Wetting surfaces before sanding can reduce dust, and wearing a dust mask gives you extra protection.
I noticed the checklist suggests making sure you have proper ventilation when using tools that generate dust or fumes. Can you recommend any specific types of affordable dust extraction systems or ventilation methods that work well for small apartment projects?
For small apartment projects, a portable dust extractor or shop vacuum with a HEPA filter is a practical and budget-friendly choice. You can also use box fans placed in windows to draw dust and fumes out of the room. If possible, work near open windows or doors and seal off other areas with plastic sheeting to contain dust.
I usually skip reading the manual if I have used similar tools before. Based on your checklist, can you share an example of something critical I might miss if I don’t look at the instructions for each specific power tool?
One critical detail you might miss is the location and function of safety switches or emergency shut-off features, which can vary greatly between brands and models. The manual often highlights unique precautions or assembly steps that aren’t obvious just by looking at the tool, even if you’ve used something similar before. Missing these specifics could increase your risk of accidents or damage.
After reading your section on workspace preparation, I’m wondering what the best way is to keep curious kids safe while I’m working on a project at home. Do you have tips for setting up effective boundaries or perhaps temporary barriers in busy households?
To keep kids safe while you’re working, try setting up temporary barriers like baby gates or portable room dividers around your workspace. Make it clear to children that the area is off-limits, and store tools safely out of reach when not in use. If possible, choose times to work when kids are occupied elsewhere or supervised by another adult. Consistent boundaries and clear communication go a long way in keeping everyone safe.
I see the checklist suggests always reading the tool manual, but sometimes older or second-hand tools don’t have manuals included. Do you have any advice on where to find safety information for discontinued or vintage power tools?
If the original manual is missing, you can often find digital copies by searching the tool’s brand and model on the manufacturer’s website or reputable tool forums. Many vintage tool communities online share scanned manuals and safety tips. You can also check library archives or contact the manufacturer directly, as they sometimes provide older documentation upon request. Always double-check any advice with several sources to ensure the information is accurate and up-to-date.
You highlight the importance of reading the manufacturer’s manual even for experienced users. What are the main safety updates or changes in newer model manuals compared to older tools that DIYers should watch for?
Newer power tool manuals often include updated safety features like improved blade guards, automatic shut-off mechanisms, and enhanced battery safety instructions. You’ll also find revised guidance on proper PPE use, warnings about new materials or hazards, and more detailed troubleshooting steps. DIYers should pay close attention to instructions about new technology, electronic controls, and any changes in recommended maintenance or storage.
When you mention using dust extraction systems for tools that generate a lot of dust or fumes, do you have any recommendations for portable solutions that work well in a typical garage workshop? I don’t have a built-in ventilation setup and am not sure what’s most effective for home DIYers.
For a garage workshop without built-in ventilation, portable shop vacuums with HEPA filters are a great starting point. You can connect them directly to many power tools or use universal adapters. Compact dust extractors made for woodworking are also effective and quieter. For fumes, a portable air purifier with a carbon filter can help, and consider opening doors or windows for extra airflow when possible.
The article talks about reading the manual even if you’re experienced, but sometimes older or secondhand tools don’t have the manual included. Where do you suggest finding reliable instructions or safety info for those situations?
If the manual is missing, try searching online using the tool’s brand and model number—many manufacturers post manuals on their websites, even for older models. You can also check reputable tool forums or request manuals through customer support. For general safety and usage tips, the Occupational Safety and Health Administration (OSHA) offers guidelines on power tools that apply to most brands and types.
I noticed the article mentions ensuring proper ventilation when using tools that generate dust or fumes. Are there specific types of fans or ventilation systems you would recommend for a small apartment workspace?
For a small apartment workspace, a portable air purifier with a HEPA filter can help capture fine dust. A box fan placed in a window can also improve airflow and direct fumes or dust outside. If you regularly use power tools indoors, a compact dust extractor or shop vacuum with a HEPA filter is a worthwhile investment to keep the air cleaner and safer.
Could you suggest what kind of dust extraction systems are most effective for a small home workshop? I’m especially concerned about sanding and cutting activities, and I want to make sure my workspace is as safe as possible given the limited ventilation.
For a small home workshop, a shop vacuum with a HEPA filter is a practical choice for capturing fine dust from sanding and cutting. Consider using portable dust extractors that connect directly to your tools, as they’re effective and save space. Installing a simple cyclone separator before your vacuum can also reduce filter clogging and improve efficiency. Always wear a dust mask or respirator for added safety, especially when ventilation is limited.
I noticed you suggest making sure the workspace is well-lit and ventilated, especially when using tools that create dust or fumes. Do you have recommendations for affordable lighting setups or simple ways to improve ventilation in a small garage?
For affordable lighting, consider using LED shop lights or clamp lights, which are inexpensive and easy to install. Position them to minimize shadows over your work area. For ventilation, a simple box fan placed in a window or doorway can help move air out, and opening opposite windows or doors can create a cross-breeze, improving airflow in your garage.
When inspecting cords for damage, do you recommend any specific way to repair minor fraying, or is it always safer to replace the cord entirely? I’ve seen some people use electrical tape, but I’m unsure if that’s really sufficient for power tools.
For power tools, it’s much safer to replace a frayed cord rather than trying to repair it with electrical tape. Even minor damage can expose you to electrical shock or fire risks, and tape isn’t a reliable fix under the stress of tool use. If the cord is damaged, replacing it or having it professionally repaired is the best practice.
I see you recommend reading the manual before using a power tool, even for experienced users. Are there specific updates or safety standards that have changed recently that business owners like me should watch out for when working with newer models?
Yes, there have been updates to safety standards for power tools in recent years. Many newer models now include enhanced safety features like automatic shut-off, improved guards, and better dust control. Manufacturers sometimes update their instructions to reflect these changes and to comply with revised OSHA or ANSI standards. It’s important for business owners to check each new tool’s manual for these updates, even if you’re already experienced.
You highlight reading the manual even if you’re experienced. Have you found that most injuries happen when people skip this step, or are there other preparation mistakes that tend to cause more accidents during DIY home improvement projects?
Skipping the manual is a common cause of accidents, especially with new or unfamiliar tools, because important safety features or updates can be missed. However, other prep mistakes also lead to injuries—like not wearing proper protective gear, failing to inspect tools for damage, or neglecting to clear the workspace. All of these can be just as risky as not reading the manual.
The section on workspace preparation talks about ventilation when using tools that create dust or fumes. Could you recommend specific types of affordable dust extraction systems or portable fans that work well in a small garage setup?
For a small garage, a compact shop vac with a HEPA filter can serve as an effective and affordable dust extraction system. Look for brands like Shop-Vac or Craftsman. For ventilation, a portable box fan or a utility blower fan positioned near a window or door can help direct dust and fumes outside. These options are budget-friendly and easy to move around your workspace.
The article says to always refer to the manufacturer’s instructions, even if you’re experienced. What’s the best way to find manuals for older power tools that might have lost their documentation over the years?
For older power tools without their original manuals, try searching for the brand and model number on the manufacturer’s website, as many offer downloadable PDFs of manuals. If that doesn’t work, online forums, auction sites, and specialty tool websites often share scanned copies of older manuals. Local hardware stores sometimes have reference materials or can point you in the right direction. If all else fails, contacting the manufacturer directly may yield results.
For new DIYers who might be intimidated by all the steps in the safety checklist, do you recommend prioritizing certain pre-use checks over others if time is tight, or is it crucial to do every single one before each project?
If you’re short on time, focus first on the critical checks: inspect the tool for any obvious damage, ensure safety guards are in place, and confirm you’re using the right tool for the job. However, it’s best to do the full checklist whenever possible because skipping steps can increase the risk of accidents, especially for beginners.
For workspace preparation, is there a particular type of lighting that works best for tasks like fine woodworking or using saws? I’m curious whether LED work lights are sufficient or if something specialized is recommended.
For fine woodworking and using saws, bright and even lighting is really important to reduce shadows and improve visibility. LED work lights are a great choice because they are energy efficient and offer clear, white light. Look for LED lights with adjustable angles and a high lumen output. It’s also helpful to position lights on both sides of your workspace to minimize shadows. Specialized lighting isn’t strictly necessary unless you have very detailed tasks, but high-quality LEDs should suit most home projects.
Could you share more about what kind of protective gear is considered essential beyond safety glasses and gloves? I’m especially interested in options for hearing protection or respiratory masks for someone mostly doing indoor projects.
Along with safety glasses and gloves, it’s wise to use hearing protection like earplugs or earmuff-style protectors, especially if you’re using loud tools such as saws or drills. For respiratory protection, disposable N95 masks or reusable half-face respirators are great options, as they help filter out dust, fumes, and other airborne particles common in indoor projects. Always match your gear to the specific tool and material you’re working with for the best protection.
I noticed the checklist mentions ensuring proper ventilation when using tools that create dust or fumes. Can you suggest specific types of dust extraction systems or ventilation setups that work well in a typical home garage or basement workspace?
For a home garage or basement, portable shop vacuums with HEPA filters work well for most power tools. You can also use dust extractors that connect directly to tools like sanders or saws. Installing a wall-mounted air filtration unit helps clear fine particles from the air. If you work with fumes, a window exhaust fan or a portable fume extractor improves ventilation. Always check that your setup directs dust and fumes outside safely.
You recommend checking for damage on cords and tool parts before each use. If I find a minor fray or a slightly loose screw on a power tool, is it better to repair it myself, or should I always take it to a professional for safety reasons?
If you notice a minor fray on a power tool cord, it’s safest to stop using the tool right away. Electrical issues can be serious, so it’s usually best to have a professional repair or replace the cord. For a slightly loose screw, you can tighten it yourself, as long as you feel confident and the tool is unplugged. When in doubt, consult the tool’s manual or a professional.
The article mentions checking for tool damage and operating moving parts before plugging in. Is there a safe way to test a tool if you’re not sure whether it has an internal fault, or should beginners have someone more experienced inspect it first?
If you’re unsure about a power tool’s condition or suspect an internal fault, it’s safest not to test it by plugging it in yourself. Beginners should have someone experienced inspect the tool first, as they can better identify issues without risking injury. If no expert is available, consider taking the tool to a professional repair shop before use.
I noticed you mentioned checking for frayed cords and cracked housing, but what should I do if I discover minor damage on a tool—can it be safely repaired at home, or is it always best to replace it? Any guidelines would be helpful.
If you find minor damage like a frayed cord, it’s safest to stop using the tool right away. Some issues, like a damaged power cord, can sometimes be fixed by a professional, but DIY repairs are not recommended unless you have the proper training. Cracked housing or other structural damage usually means the tool should be replaced, since it could compromise safety. Always follow the manufacturer’s guidelines, and when in doubt, opt for replacement or professional repair.
The checklist emphasizes ventilation when working with tools that create dust or fumes. Could you recommend specific types of dust extraction systems or ventilation setups that work best for small workshops in home garages?
For small home garage workshops, a combination of a shop vacuum with a HEPA filter and portable air filtration units is effective for dust control. You can also use a dust extractor connected directly to your power tools if they have dust ports. For ventilation, a window fan set to exhaust mode or a box fan in the doorway helps move fumes outside. Always keep doors or windows open when using materials that produce strong fumes.
I noticed the article emphasizes inspecting tool cords for damage. If a power tool has a frayed cord but otherwise works fine, is it safer to repair it myself, or should I replace the whole tool or take it to a professional?
If you notice a frayed cord, it’s best not to use the tool until it’s repaired. For safety, unless you’re experienced with electrical repairs, it’s safer to have a professional fix the cord or replace it. In some cases, if the tool is old or inexpensive, replacing the tool might be the wisest choice. Avoid taping or patching cords yourself, as this can create further risks.
Your article covers safety prep pretty thoroughly, but what about after a project is done? Are there any must-do steps for storing tools safely—especially if young kids sometimes wander into my work area?
Absolutely, safe storage after a project is just as important as safe use. Always unplug power tools and let them cool down before storing. Use lockable cabinets or toolboxes, keeping them out of reach of children. Store sharp accessories separately in locked containers, and never leave tools plugged in or unattended. It’s also wise to check that your workspace is tidy and free of stray parts or cords.
In the checklist, you talk about ensuring proper lighting and ventilation, especially when using tools that generate dust or fumes. For someone working in a small apartment or basement with limited windows, what are some practical options to meet those safety recommendations?
If you’re working in a small apartment or basement, using portable LED work lights is a great way to boost visibility without much setup. For ventilation, try using a box fan in a window or doorway to help move air out, and consider a portable air purifier with a HEPA filter to help capture dust and fumes. Also, wearing a quality dust mask or respirator adds an extra layer of protection when ventilation is limited.
You suggest reading the manufacturer’s instructions for each specific tool, even for experienced users. Could you expand on what critical safety tips or warnings might often be missed by skipping the manual, especially for newer tool models?
Even experienced users can miss crucial updates by skipping the manual, especially with newer tool models that may have unique features or safety mechanisms. Manuals often highlight changes in switch locations, automatic shut-off systems, or specific maintenance needs. They may also include updated guidelines for safe operation, new accessory compatibility notes, or revised warnings about materials that shouldn’t be cut or drilled. By reading the manual, you ensure you’re aware of these important details that help prevent accidents and protect your tools.
I noticed the checklist mentions ensuring proper ventilation when using tools that generate dust or fumes. Could you give some examples of affordable dust extraction systems suitable for small home workshops?
For small home workshops, you might consider portable shop vacuums with HEPA filters or compact dust extractors from brands like Shop-Vac or Ridgid. These are affordable and effective for connecting to tools such as sanders or saws. There are also simple cyclone separators that work with standard vacuums to collect larger dust particles. For working with fumes, a box fan in a window can help improve air exchange.
You talk about workspace lighting being important. What type of lighting works best for detail-heavy projects like cabinetry installation, and are regular household lamps sufficient or should I invest in a specific kind of work light?
For detail-heavy tasks like cabinetry installation, bright and even lighting is key. Regular household lamps may leave shadows and aren’t always bright enough. It’s better to invest in LED work lights or adjustable task lights that can be positioned to eliminate shadows. Look for lights with a high lumen output and a color temperature around 4000–5000K, which closely mimics daylight and helps you see fine details accurately.
You suggest clearing clutter and ensuring good lighting before starting a project. Do you have any recommendations for affordable portable work lights or organizing solutions that work well in smaller garage spaces?
For smaller garages, LED work lights with adjustable stands are both affordable and bright—look for models that fold flat for easy storage. Clip-on lamps can also provide targeted lighting without taking up much space. For organizing, wall-mounted pegboards, magnetic tool strips, and stackable plastic bins help keep tools accessible and off the floor, making your workspace safer and more efficient.
You mention using dust extraction systems or ensuring good airflow if a tool generates dust or fumes. If I’m working in a small apartment without a real workshop, what are some practical ways to make sure I’m ventilating the space well enough for safety?
In a small apartment, it’s best to work near open windows or balcony doors to maximize airflow. Use portable fans to direct dust and fumes outdoors. If possible, set up your work area near an exhaust fan or range hood to help pull air out. For extra protection, consider using a portable air purifier with a HEPA filter while you work. Always take breaks to air out the room after using power tools.
I noticed the checklist says to check cords for frays and cracks before using power tools. How do I know when a cord is too damaged to use safely, and is it something a beginner can repair themselves or should I replace the whole tool?
If a power tool cord has visible frays, deep cracks, exposed wires, or missing insulation, it’s too damaged to use safely and should not be ignored. Minor surface wear can sometimes be fixed with electrical tape, but exposed wires or deep damage require professional repair or replacement. As a beginner, it’s safest to avoid DIY repairs on cords and either have a professional replace the cord or, if the cost is too high, consider replacing the tool entirely to ensure your safety.
What’s your advice for people on a budget who can’t buy a lot of extra lighting or ventilation gear for their workspace? Are there affordable ways to make a home setup safer without major upgrades?
There are definitely budget-friendly ways to improve safety in your workspace. For lighting, try using extra lamps or clip-on lights you already have at home to brighten your area. For ventilation, working near open windows or doors and using a household fan to move air can help minimize dust and fumes. Regular cleaning and organizing your workspace also greatly improves safety without extra cost.
You mentioned checking for damage like frayed cords and missing parts before using power tools. Are there any specific signs that tell you when a tool is no longer safe to use, or is it more about overall wear and tear?
Specific signs that a power tool is no longer safe include visible cracks in the housing, exposed wires, malfunctioning switches, excessive sparking, unusual noises, or overheating during use. While general wear and tear is normal, these issues mean the tool shouldn’t be used until repaired. Always stop using a tool immediately if you notice any of these safety concerns.
I noticed the checklist mentions inspecting power tools for damage and loose screws before each use. If I find a cracked housing or a frayed cord, are there safe DIY repair options for these issues, or should I always replace the tool or contact a professional?
If you find a cracked housing or a frayed cord on a power tool, it’s usually best not to attempt DIY repairs unless you have the correct technical expertise. Cracked housings can affect the integrity and safety of the tool, while frayed cords pose a serious electrical hazard. In most cases, contacting a qualified professional or replacing the tool is the safest option to avoid injury or further equipment damage.
When checking tools for damage, what should I do if I notice a minor crack in the housing but everything else seems fine? Is it safe to use if I don’t see any exposed wires or loose parts?
If you find a minor crack in the tool’s housing, it’s best not to use it until you’ve addressed the issue. Even without exposed wires or loose parts, cracks can get worse during use and compromise safety. Consider having the tool inspected or repaired by a professional, or replace it if repair isn’t an option. Safety should always come first.
You talked about making sure there’s proper ventilation when using tools that generate dust or fumes. Are there specific types of dust masks or respirators you’d recommend for a first-time DIYer working on occasional home projects?
For occasional home projects, a disposable N95 dust mask is a solid, affordable choice for protecting against sawdust and most non-toxic particles. If you’re working with paints, solvents, or materials that create fumes, consider a half-face respirator with replaceable organic vapor cartridges. Make sure any mask fits snugly for proper protection and comfort during your work.
You mention ensuring proper ventilation when working with tools that create dust or fumes. What are some affordable ventilation or dust extraction setups you’d recommend for a typical home garage workspace?
For a typical home garage, you can use a combination of a box fan placed in a window to exhaust dust and fumes outside, and a simple dust mask or respirator for personal protection. Attaching a shop vac to power tools with adapters is an affordable dust extraction method. Portable air purifiers with HEPA filters can also help reduce airborne particles. These options are budget-friendly and easy to set up.
The article mentions using dust extraction systems for tools that generate fumes or dust. Are there any affordable recommendations for these systems, or are DIY setups just as effective for smaller home projects?
For smaller home projects, a basic shop vacuum with a hose adapter can work well as a budget-friendly dust extraction system. There are also affordable portable dust extractors designed for hobbyists. DIY setups using a shop vac and homemade cyclone separator are quite effective for most tasks, but make sure any DIY system is properly sealed and vented. For projects that generate a lot of fine dust, consider using a HEPA filter to improve air quality.
I usually work in my garage, which gets dusty quickly when I use power saws. You mention ensuring proper ventilation and dust extraction—are there budget-friendly solutions for dust control that really make a difference, or is professional equipment necessary for home projects?
You don’t need professional equipment to manage dust effectively in a home garage. Using a shop vacuum with a hose attachment near your cutting area can capture a lot of dust. Portable air filters or even a box fan with a furnace filter taped to the back can also help improve ventilation. Remember to wear a dust mask for added protection during your projects.
You mention making sure there’s adequate ventilation when using tools that create dust or fumes. What are some budget-friendly ways to improve ventilation in a small garage workshop without installing a whole ventilation system?
You can improve ventilation in your garage workshop by using inexpensive box or pedestal fans to create airflow and help move dust and fumes outside. Position a fan near an open door or window to direct air out. You can also open multiple windows or doors to encourage cross-ventilation. For extra dust control, consider a portable air purifier with a HEPA filter, which is often affordable and effective in smaller spaces.
I noticed your checklist mentions making sure the workspace has enough ventilation when using tools that generate dust or fumes. Do you have any recommendations for affordable portable ventilation systems or DIY solutions for small garages?
For small garages, a simple and affordable option is to use a box fan placed in a window or doorway facing outward to help exhaust dust and fumes. You can also combine this with a second fan drawing fresh air in from another opening. DIY air filtration boxes made with a standard box fan and a furnace filter taped to the intake side are popular among hobbyists and work surprisingly well for catching dust particles. Just remember to check and replace filters regularly.
The article mentions using dust extraction systems or ensuring good ventilation when working with tools that create dust or fumes. Do you have any recommendations on affordable dust extraction setups for someone just starting out with home projects?
For beginners, a simple shop vacuum with a hose adapter can be an effective and affordable dust extraction solution. Many power tools have ports that fit standard vacuum hoses, or you can use inexpensive adapters. You might also consider portable dust extractors designed for small workshops, which are usually more budget-friendly than industrial systems. Always combine this with opening windows or using fans to maintain good airflow.
When you mention checking tool cords for frays or cracks, is there a recommended way to repair minor cord damage, or should the tool be taken out of service completely until professionally fixed?
If you notice any frays or cracks in a tool cord, it’s safest to stop using the tool immediately. Even minor cord damage can pose electrical hazards. Repairing cords yourself is not recommended unless you are qualified. The tool should be taken out of service and either repaired by a professional or replaced to ensure safety during use.
The checklist mentions using dust extraction systems for ventilation when working with saws or sanders. Are there specific features I should look for in a dust extraction system to ensure it’s effective for a small garage workshop?
For a small garage workshop, look for a dust extraction system with a HEPA filter for fine particles, a compact design to save space, and sufficient airflow (measured in CFM) for your tools. It’s helpful if the system has a hose compatible with your saws and sanders, quiet operation, and easy-to-empty collection bags or bins. A model with automatic tool activation can also make your workflow smoother and safer.
You mention reading the manufacturer’s instructions for every tool, but a lot of my used tools didn’t come with manuals. Are there general safety steps I should follow if I can’t find the original guide for a specific tool?
Absolutely, there are some general safety practices you can follow even without the original manuals. Always inspect the tool for damage before use, wear appropriate personal protective equipment like safety glasses and gloves, and keep your work area clean and well-lit. Make sure you understand the tool’s controls and never bypass safety features. Unplug or remove batteries when changing accessories or making adjustments. Start at a low speed if possible and never force a tool to work beyond its capacity.
I noticed the checklist talks about ensuring proper lighting and workspace ventilation. If I’m working in a cramped apartment with limited windows, what are some budget-friendly ways to improve safety conditions with lighting and airflow?
For better lighting in a small apartment, consider using LED work lamps or clamp lights, which are energy-efficient and affordable. Place them to minimize shadows on your workspace. For airflow, a basic box fan or a small window fan can help move air, especially if you position it near a window or door. Also, try to take regular breaks to let fresh air in and avoid working with power tools in closed spaces for too long.
About workspace prep, you mention ventilation when using tools that make dust or fumes. For someone living in an apartment with limited windows, what are the best ways to manage ventilation and keep things safe while using power tools inside?
In an apartment with limited windows, try working near any available window or balcony, and use a box fan to help push dust or fumes outside. Consider using portable air purifiers to reduce airborne particles. Always wear a dust mask or respirator, and cover nearby furniture to prevent dust buildup. Keeping your workspace clean by vacuuming frequently will also help maintain better air quality.
The article talks about ventilating the workspace when using tools that generate dust or fumes. Could you explain what kind of ventilation is best for a typical garage setup, and is a regular window fan enough for most home projects?
For a typical garage, natural ventilation like opening doors and windows helps, but combining this with a fan is much better. A regular window fan can work for most small home projects—just set it to blow air out, drawing dust and fumes outside. For frequent or heavy-duty tool use, consider a stronger exhaust fan or even a portable air filtration unit for extra protection.
You mentioned checking cords for frays and damage before using power tools. Is electrical tape ever a safe temporary fix if you find a small nick in an extension cord, or should the cord always be replaced?
If you find a small nick or any damage to an extension cord, it’s best not to use electrical tape as a fix. Even minor damage can compromise the cord’s safety, leading to electrical shocks or fire hazards. The safest option is to replace the cord or have it properly repaired by a qualified professional to ensure your safety during any project.
You mention using dust extraction systems or ensuring proper ventilation when operating tools that generate dust or fumes. For someone working in a smaller, older home without built-in ventilation, what are the most effective and affordable ways to achieve good airflow while using something like a sander indoors?
In a smaller, older home without built-in ventilation, you can boost airflow by opening windows and placing a box fan facing out to draw dust and fumes outside. Use a portable HEPA air purifier in the workspace for added protection. Also, consider attaching a shop-vac with a dust collection attachment to your sander if compatible, as this can capture much of the airborne dust at the source.
If my workspace doesn’t have the best lighting, would adding portable work lights be enough, or do I really need to invest in upgrading the room’s permanent lighting for safety? Any suggestions for easy solutions while I’m just starting out?
Portable work lights are a practical and effective solution when you’re starting out. They can provide focused, adjustable illumination exactly where you need it for tasks, which is crucial for safety. Make sure the lights are stable and bright enough to clearly see your workspace and tool markings. Upgrading permanent lighting can wait until you’re using the space more regularly or need broader coverage.
You mention using dust extraction systems or ensuring ventilation when working with tools that generate dust. Are there certain DIY setups or products you’ve found effective for small home workshops without installed ventilation systems?
For small home workshops without built-in ventilation, portable dust extractors or shop vacuums with HEPA filters can make a big difference. Attaching these directly to your tools, like sanders or saws, helps capture dust at the source. Also, using a box fan in a window to pull air out of the room or working near open doors can improve airflow if more advanced systems aren’t available.
The article mentions checking tools for frayed cords or missing parts, but if I spot minor cosmetic damage to a tool’s housing, is that usually a safety concern or can I keep using it? What kind of damage should be a dealbreaker?
Minor cosmetic damage like light scratches or small scuffs on a tool’s housing usually isn’t a safety concern as long as the tool functions properly and the internal components are protected. However, cracks, deep chips, or any damage that exposes electrical parts or sharp edges are dealbreakers. If you notice anything that could compromise the tool’s structure or insulation, it’s best to stop using it until it’s inspected or repaired.
If my home workspace is in a basement with not-so-great ventilation, especially when using power sanders, what are some budget-friendly ways to improve airflow or manage dust without expensive equipment?
Improving airflow in a basement can be simple and affordable. Try opening any available windows or doors to create a cross-breeze. Use a basic box fan to help move air out of the workspace. For dust control, lay down damp sheets to catch particles, and consider a DIY air filter by attaching a furnace filter to the back of a box fan. Regularly clean up dust with a damp cloth or mop to keep your area safer.
I noticed you suggest inspecting moving parts and testing switches before connecting tools to power. What should I do if I find a minor crack or loose screw on a tool? Is it safe to repair myself or should I bring it to a professional?
If you spot a minor crack or a loose screw, stop using the tool immediately. Tightening a loose screw is usually safe if you follow the manufacturer’s instructions. However, even small cracks can compromise the tool’s safety, so it’s best to have a professional assess and repair any cracks. This ensures your safety and keeps the tool working properly.
Could you clarify what kind of protective gear is essential for occasional DIYers working around kids? I want to make sure I have the minimum safety equipment on hand that’s appropriate for home projects.
For occasional DIYers, especially when kids are present, the minimum essential protective gear includes safety goggles for eye protection, ear protection like basic earplugs or earmuffs, sturdy work gloves, and a dust mask for tasks that generate dust. Closed-toe shoes are also important to prevent foot injuries. Always store tools and protective gear out of kids’ reach when not in use.
The article emphasizes checking tools for damage and reading manuals before use. What should I do if I find a frayed cord or a missing screw but need to finish my project soon? Is it safe to make quick repairs myself, or should I always replace the part?
If you notice a frayed cord or a missing screw, it’s best to stop using the tool until it’s properly repaired. Quick fixes can be unsafe, especially with electrical tools, as they may cause injury or further damage. Only attempt repairs if you are confident and have the correct replacement parts. For electrical issues or important components, it’s safer to have the tool professionally repaired or replace the part entirely rather than making a temporary fix.
You mentioned ensuring proper lighting and ventilation when prepping the workspace. Do you have recommendations for affordable lighting solutions or ventilation setups that work well in a typical garage or basement?
For lighting, LED shop lights are a budget-friendly option and provide bright, even illumination; they’re easy to mount on ceilings or walls and use little energy. For ventilation in garages or basements, a box fan placed in a window or doorway can help exhaust fumes, while a portable air purifier can improve air quality. If possible, open windows and doors to increase airflow while working.
You mentioned adequate ventilation when working with tools that create dust or fumes. Are there specific guidelines on how much airflow is needed, or any affordable ventilation systems you’d recommend for someone working in a typical garage workspace?
For a typical garage, it’s ideal to have at least 5-10 air changes per hour when working with dust or fumes. This can be achieved by using a box fan in a window to exhaust air and opening a second window or door for fresh air intake. For more targeted dust removal, consider an affordable portable air filtration unit or a shop vac with a HEPA filter. These options help improve air quality without major expense.
The article mentions using dust extraction systems if tools produce dust or fumes. For a small home workshop, are there affordable options you’d recommend, or is opening a window usually enough?
For a small home workshop, opening a window can help, but it’s not always enough, especially if you’re working with tools that generate a lot of dust or fumes. There are affordable portable dust extractors and shop vacuums designed for hobbyists that can connect to most power tools. Even a basic box fan positioned in a window to direct air outside can improve ventilation. For best results, combine open windows with a simple dust extractor or high-efficiency shop vacuum.
I noticed you mention ensuring proper ventilation when using tools that create dust or fumes. Do you have recommendations on specific types of dust extraction systems or DIY solutions that are effective for a small garage workshop?
For a small garage workshop, a portable shop vac with a HEPA filter can be effective for most woodworking tools. You can also consider a basic dust separator attachment to extend the life of your vacuum. For fumes from painting or solvent use, a window-mounted exhaust fan is a simple DIY solution. Always try to work near open doors or windows for extra airflow.
You talk about inspecting power tool cords for frays or damage each time before use. Is there a difference in safety protocol between using older hand-me-down tools versus newer ones that are still under warranty?
Yes, there are a few differences. With older hand-me-down tools, you should be extra thorough when inspecting cords and overall condition, since wear and tear are more likely. Newer tools under warranty may have updated safety features, but you should still check them before each use. Regardless of age, always unplug and stop using any tool with visible damage until it’s properly repaired or replaced.
I noticed you mentioned ensuring proper lighting and ventilation before using power tools. Do you have any specific recommendations for affordable work lights or easy ways to improve ventilation in a small basement workshop?
For affordable work lights, LED shop lights or clamp-on utility lamps with adjustable heads work well and can be found at most hardware stores. For ventilation in a small basement, try using a portable box fan near a window or door to help circulate air. If windows are limited, a small exhaust fan can also help remove dust and fumes during your projects.
When inspecting older tools, how can I tell if a frayed cord or damaged housing is fixable, or if the tool is unsafe and should be replaced entirely? The article mentions checking for damage, but some issues seem borderline to me.
A frayed cord or cracked housing on a power tool can sometimes be repaired, but it depends on the extent and location of the damage. Minor cord frays near the plug or wire can be fixed by replacing the cord, while superficial housing cracks may be patched. However, if wires are exposed, the housing is badly broken, or repairs would compromise the tool’s integrity or safety, it’s best to replace the tool. When in doubt, consult a qualified technician to assess the risk.
You mentioned using proper lighting in the workspace. Do you have any suggestions for affordable portable work lights or specific features I should look for to make sure I have enough visibility while I’m working on home projects?
For home projects, LED work lights are a great affordable option—they’re energy-efficient and usually very bright. Look for models with adjustable heads so you can direct light where you need it, and consider lights with a sturdy base or built-in hooks for flexible placement. Rechargeable battery-powered lights are convenient if you don’t have easy access to outlets. Aim for at least 1000 lumens for good visibility in most situations.
You mentioned using dust extraction systems when working with tools that produce dust or fumes. Are there affordable setups recommended for small workshops, or is basic ventilation like opening windows usually enough for most DIY projects?
For small workshops, basic ventilation like opening windows can help, but it’s often not enough for tools that generate a lot of fine dust or fumes, such as sanders or saws. There are affordable portable dust extractors and shop vacuums that can be attached to power tools for under $150. Pairing these with a basic air purifier or fan near an open window will improve air quality and safety during most DIY projects.
You mention using dust extraction systems when working with saws or sanders for proper ventilation. For someone just getting started, are there affordable options for dust control, or is it okay to rely on just opening windows and doors?
For beginners, it’s understandable to look for affordable dust control solutions. Opening windows and doors definitely helps improve ventilation, but it doesn’t catch dust at the source. You can find budget-friendly dust extractor attachments for many power tools, or even use a shop vacuum connected to your tool with an adapter. Using both a vacuum and good airflow gives you better protection than ventilation alone.
When you talk about ensuring proper ventilation while using tools that create dust or fumes, do you have any recommendations for affordable dust extraction systems that work well in a small home workshop setting?
For a small home workshop, a portable shop vacuum with a HEPA filter is an affordable and effective option for dust extraction. You can also consider compact dust extractors designed for woodworking, which often come with adapters to fit various power tools. Additionally, using a simple box fan with a furnace filter taped to the back can help capture airborne dust, but it’s less effective for heavy use. Always remember to wear a dust mask for added safety.
You mention checking for proper lighting and using portable work lights if needed. Do you have any recommendations on affordable lighting setups for someone working in a small garage with limited outlets?
For a small garage with limited outlets, consider using LED work lights that have built-in rechargeable batteries, as these don’t require constant plug-in and are energy efficient. Clamp-on work lights are also handy because you can attach them to shelves or beams to save space. Look for models with adjustable brightness and a wide beam for maximum visibility.
When checking for damage on power tool cords and housings as mentioned in your checklist, do you have recommendations on what to do if I notice only minor wear or cosmetic issues? At what point is it unsafe to keep using a tool?
If you notice minor scuffs or surface marks on your power tool’s cord or housing, it usually isn’t a safety concern. However, if you see cracked insulation, exposed wires, or loose housing parts, the tool shouldn’t be used until repaired. Even small nicks in cords can become bigger hazards over time. If you’re unsure, it’s best to have the tool checked or repaired before further use.
I’m planning to use some saws and sanders in my garage, but I’m not sure how much ventilation is considered ‘adequate.’ Are there specific ventilation setups or air purifiers you’d recommend for small enclosed spaces?
For a small garage, it’s important to have fresh air moving through the space. Aim to keep at least one window or door open when using saws and sanders, and use a box fan to draw fumes and dust out. Position the fan so it blows outward. For added protection, a HEPA-rated air purifier can help capture fine dust particles, but proper airflow is still essential. Avoid working in fully enclosed spaces, and always wear a dust mask or respirator for extra safety.
The article mentions reading the manufacturer’s instructions before using any power tool, even for experienced DIYers. In your experience, are there specific types of tools where manufacturers’ manuals include safety steps not found in generic checklists?
Yes, certain power tools often have manufacturer-specific safety steps that go beyond general checklists. Tools like table saws, nail guns, and rotary tools sometimes include unique setup procedures, maintenance requirements, or usage warnings in their manuals. For example, some saws have special blade guards or riving knives that need proper adjustment, and nail guns may have specific pressure settings. Always check the manual for these details before starting any project.
I noticed you mention checking power tool cords for frays and damage before each use. How often should I do a more thorough inspection, like opening up the casing to look inside, or is a surface check usually enough for home projects?
For most home projects, a careful surface check of the cord before each use is usually enough. Opening up the casing isn’t typically necessary unless you notice unusual issues like persistent power loss, strange noises, or visible damage that goes beyond the outer insulation. If anything seems off during your checks, then a deeper inspection—or having a professional look at it—is a good idea for safety.
You mentioned the importance of ventilation when using tools that create dust or fumes. Is opening a window enough, or are there specific types of fans or extraction systems you’d recommend for a small garage workshop?
Opening a window can help, but for a small garage workshop, it’s best to use a combination of ventilation methods. A box fan placed in the window can help pull dust and fumes out. For better protection, consider a portable air filtration unit or a dust extractor designed for workshops. These systems capture more fine particles and fumes, keeping the air safer to breathe.
The article highlights workspace ventilation, especially with tools like saws or sanders. Can you elaborate on what types of ventilation setups are most effective for typical residential garages or basements?
For residential garages or basements, the most effective ventilation setups include using a combination of open windows and doors, box fans positioned to exhaust air outside, and portable air filtration units. If possible, installing a window-mounted exhaust fan helps pull dust and fumes out. For frequent tool use, consider a dust extraction system connected directly to your saw or sander to keep airborne particles under control.
You mention making sure the workspace is well-lit and ventilated, especially for tools that create dust or fumes. What are some affordable ways to improve ventilation in a small garage without installing an expensive system?
Improving ventilation in a small garage can be simple and budget-friendly. You can open doors and windows to create cross-ventilation, use a box fan to draw out dust or fumes, or set up a window fan facing outward to expel air. For even better results, try working near the open entrance. Regularly cleaning dust and keeping pathways clear also helps maintain good airflow.